Final inner walls step is to fill the voids I just created - I'll try to post more tomorrow.
Regards.
Regards.
They have been up and running for some time now. Aengus brought them to the Vancouver Island diyFest this year. Beautiful speaker.

Hmmm. Expanding foam? Interesting idea, but I haven't heard of using that before. Is this common? I'm only just starting to play with building speakers, so I'm sure there's a lot still to learn.
Carl
Carl
Carlp said:Expanding foam? Interesting idea, but I haven't heard of using that before. Is this common?
I don't know if it is common, but it certainly has been a staple for some time -- i 1st used it some 26 years ago.
dave
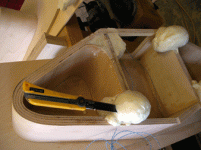
Next I glued on the outer front panels which had been rabbeted for the speakers (no photos, sorry). After that, the 2nd side was glued on each speaker. This required considerable care to ensure that the second side was exactly aligned with the first one, that the aluminum braces were exactly at right angles, etc. So the photo shows the clamping setup, with 2x4 cauls across the top, a straightedge (the black bar) to make sure I wasn't squeezing it out of flat, squares to align the edges, etc., etc.
Part of the problem was that because I had built the inner walls in several pieces I had small misalignments, so had to fudge the position of the sidewalls a bit. If I did it this way again, I might make up an alignment jig for this glue-up; lining everything up and making sure it didn't shift as I slowly tightened multiple clamps was, um, tedious.
Part of the problem was that because I had built the inner walls in several pieces I had small misalignments, so had to fudge the position of the sidewalls a bit. If I did it this way again, I might make up an alignment jig for this glue-up; lining everything up and making sure it didn't shift as I slowly tightened multiple clamps was, um, tedious.
Attachments
I don't know if it is common, but it certainly has been a staple for some time -- i 1st used it some 26 years ago.
Ah, Dave, you're older than me in so many ways... Aside from chronologically, of course. 😀
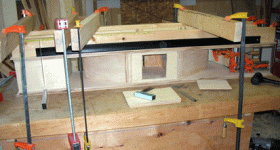
At this point several steps occurred with no photo documentation. I'll go through them briefly so as to point out what I wouldn't do again.
The curved backs were made of rubber-ply cut to fit tightly between the outer (rectangular) bits of the sides, so they could follow the curved inner bits. I glued them up one layer at a time, except that the first layer was formed of a sheet of paper-backed birch veneer (birch facing the inside of the speaker) and a layer outside that of rubber-ply. I didn't want to glue the veneer to the rubber-ply and let it dry before bending, since I was afraid that would have made the rubber-ply unwilling to bend. In retrospect, it might have been a better way to go.
What I did was to slather a lot of glue on the veneer back, lay it in place, slather a lot of glue on the mating face of the first rubber-ply layer, and then tack the rubber-ply down by nailing it to the side rabbets with copper boat-nails. This worked OK except that the (water-based) glue caused quite a bit of ripple in the veneer. It is still there - I rationalize it by believing that it probably helps to suppress high-frequency propogation through the vents.
Subsequent layers of rubber-ply (two of them) were fastened on one at a time: lots of glue - the serrations in the ply suck it up - and tacked down with many, many staples to the preceding layer. When the glue was dry, the staples were pulled before the next layer went on. The final layer was another piece of p-b veneer on the outside, this time of course with the birch facing out. Since I didn't want to staple through this, I clamped it with webbing, and I did use less glue - so I got only a few ripples on the outside.
The reason I did it all this way - using the sides as a bending form for the back - was to avoid building a form. Next time I would:
1. Build a form in the shape of the back, wide enough for two backs plus a bit of wiggle room.
2. Glue the inner piece of veneer and the first layer of rubber-ply using contact cement, but do it on the form to get the curve right.
3. Glue the other layers on using a caul shaped like the form (so you have as it were an inner "U" shape with the layers on the outside of it; and a larger outer "U" shape which sandwiches the rubber-ply layers).
4. The resulting curved plywood shape would then be ripped in two backs on the tablesaw.
No doubt there could be drawbacks to this method as well, but it's the best I can think of.
Sorry if this was too longwinded - but I hope it might be useful to anyone trying similar builds in future.
Oops, I meant to mention: before I glued the second sides on, there was an additional step.
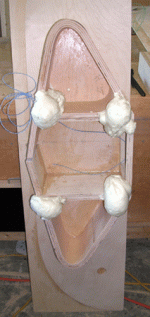
The plan was to cover up all the plywood edges with solid wood. I realized belatedly that I had a problem where the inner and outer front panels were cut at an angle.
I solved it by cutting a shallow rabbet here with a chisel. Chiselling into plywood like this has the advantage that the laminations show how well you're doing (straight is good, wavy bad); but the disadvantage that, well, it's very hard to neatly chop away plywood with a chisel. Pushes the limits of my skills, anyway.
The good thing is that thickened epoxy will fill voids.
Attachments
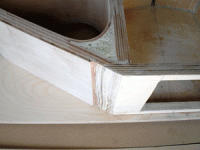
The next sequence of steps - still photoless - was the most frustrating. As I said, I wanted to cover all exposed plywood edges with solid wood. So I:
1. Trimmed the outer side panels flush to the back with a flush-trim bit in the router.
2. Used a rabbeting bit to put a 5/16""x5/16" rabbet on the edges of the back.
3. Cut a bunch of 3/8" square strips of purpleheart.
4. Proceeded to break lots and lots of expensive purpleheart into kindling.
It does make very good hot-burning kindling; but the process was, as I said, very frustrating. So much so that I shelved the whole project for several weeks while I tried to decide what to do.
One issue was that I wanted a dark wood to contrast with the birch, so couldn't use an easy-bending wood like oak. Second was that the only air-dried wood that's easy to get locally is oak, and kiln-dried woods don't steam well. But I finally decided to build a steambox and try it with walnut.
It worked. The message is that you can steam-bend small-section kiln-dried walnut; if you don't mind some breakage. There are a number of scarfs and dutchmen (which are what boat guys call neatly patched in pieces) in the curved walnut strips on the back.
After that the straight walnut strips on the front were a piece of cake. All the walnut trim was made slightly oversize and trimmed to fit with a flush-trim router bit. Are you starting to get the idea that I couldn't build anything without them? You'd be right.
The final unphotographed step was to put walnut veneer on the inside of the cutouts. Then came the most challenging step - getting solid wood trim on the outer edges of the cutouts. The problem was that the radius of the curves was way too tight to bend even 5/16" walnut around.
I'll show (with photos) what I did, since I'm pleased with my solution. But it will have to happen tomorrow, since I'm late starting dinner.
[edit] Also, some of the later photos will show some of the things I was talking about in the last few posts. [/edit]
Regards.
Aengus
I'll show (with photos) what I did, since I'm pleased with my solution. But it will have to happen tomorrow, since I'm late starting dinner.
[edit] Also, some of the later photos will show some of the things I was talking about in the last few posts. [/edit]
Regards.
Aengus
 If just a small bit of your woodworking mojo were instilled into my hands, I'd be a happy camper.. Nice work and pictorial!! Dave 🙂
Inlay for the cutouts
To inlay solid wood in the cutouts I was not going to be able to bend walnut around those tight-radius inside bends, so I was going to have to build up s chunk of solid wood somehow.
Part of the problem was that because I had made these inside curved shapes by just bending rubber-ply around the inside of the triangular shapes - which were themselves made to be the same on the outside, not the inside: see post 39, above. This meant that each of the four cutouts would be somewhat different, and that even the opposite sides of any cutout could also be different.
So just using a rabbeting bit to cut a rabbet around the edbes would have meant potentially 8 different shapes I would have to build a solid filler piece for.
I decided instead to cut a rabbet of the same shape and size in each of them. This meant that the solid wood edging in each cut-out would vary in width at places. This is why I filled the inside of the cutouts with walnut veneer instead of birch, which I had originally planned. I figured that if I rounded the edges of the solid bits, and if the inside visually continued the appearance of the wood, the eye would be tricked into not seeing this variation in width.
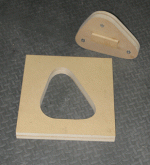
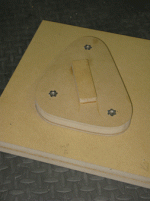
This must be getting a bit confusing - I hope the next series of pictures will explain it. First, here's a picture of the inlay template: the foreground piece, with the hole, will let me cut a same-size rabbet around the edge of each cutout, using a pattern-following bit in the router. The other piece I'll explain in a minute.
To inlay solid wood in the cutouts I was not going to be able to bend walnut around those tight-radius inside bends, so I was going to have to build up s chunk of solid wood somehow.
Part of the problem was that because I had made these inside curved shapes by just bending rubber-ply around the inside of the triangular shapes - which were themselves made to be the same on the outside, not the inside: see post 39, above. This meant that each of the four cutouts would be somewhat different, and that even the opposite sides of any cutout could also be different.
So just using a rabbeting bit to cut a rabbet around the edbes would have meant potentially 8 different shapes I would have to build a solid filler piece for.
I decided instead to cut a rabbet of the same shape and size in each of them. This meant that the solid wood edging in each cut-out would vary in width at places. This is why I filled the inside of the cutouts with walnut veneer instead of birch, which I had originally planned. I figured that if I rounded the edges of the solid bits, and if the inside visually continued the appearance of the wood, the eye would be tricked into not seeing this variation in width.
This must be getting a bit confusing - I hope the next series of pictures will explain it. First, here's a picture of the inlay template: the foreground piece, with the hole, will let me cut a same-size rabbet around the edge of each cutout, using a pattern-following bit in the router. The other piece I'll explain in a minute.
Attachments
- Status
- Not open for further replies.
- Home
- Loudspeakers
- Full Range
- Curved Harveys