ShinOBIWAN said:
Get a sharp stanley knife and carefully run it around the inside the recess. It works best if you hold the blade at an angle and make many light passes shaving the paint off, once that's done go back and tidy up sand paper if need be. I've stripped a few paint jobs in the last couple of months and it works everytime.
Good idea. I'll give that a try. The paint is fairly hard and brittle now though.
🙂 Yeah, I notice all the costume changes on your LGT's lately. Looks spectacular, whatever colour you settle on.
terry j said:quick question if I may
you mentioned using silicone to attach the outer 'skin', is there a reason you used that and not some sort of glue??
very nice job, love these build threads with pictures!! thanks for sharing yours.
Hi Terry,
The silicone is for my version of constrained layer damping. The idea is to have the inner layer (MDF) flex against the outer layer (particleboard). In order for this to happen, the two layers can't be solidly attached. The silicone is the flexible connection.
Silicone is actually a very powerful adhesive. Not suitable for most woodwork as it will ruin finish ability (paint doesn't stick, stain will not penetrate). I was very careful not to get any on the maple veneer.
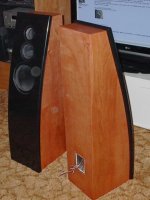
They say a picture is as good as a thousand words (even with my POS camera). More to come for sure.
I have now caught up here with my progress on these speakers.
Three days ago I applied the first coat of stain. Luckily I didn't get any of the evil silicone on the veneer previously.
Tonight I've put on the second (and final) coat of stain.
The stain is a mixture of three colours, two brands and two types. I have Minwax Sedona red, Minwax Ipswich Pine and Flecto Cherry gel stain. The Minwax is liquid brush on.
This combination is like thin paint, when brushed on it stays on the surface without excess running, and doesn't evaporate quickly. I leave it on for about 15 minutes, then wipe it off with a clean cloth.
This first coat has to dry thoroughly before the second coat. The second coat will make the colour more even and will make it slightly darker.
The colour goes well with black.
More white spots from my fantastic camera. Would have liked to get a shot outdoors, but it's wet here.
Attachments
These look really good, I've been following the progress in this thread. The curved front looks really effective and I like active filters so will be interested in the final result. Its an interesting mid you've got there too.
Dr.EM said:These look really good,...Its an interesting mid you've got there too.
Thanks Dr.EM. How's the progress on your TL sub?
The mid is still pretty much a mystery to me. No useful response from Max Fidelity as far as specs and frequency response goes. I can't find it on the internet either. It's like these have fallen from the sky.
One thing I do know, is they sound good.
I have been working too much over the last couple weeks to do anything new with these speakers. Looking for a break in a week or so.
I will then apply the clear waterbased urethane to the body as the stain has had enough time to dry. Several sprayed coats then polish.
I have also decided to repaint both baffles before installing the drivers. My original plan was to live with the ugly repair for a while, then repaint but I know I won't be satisfied with this.
Better to have the speakers truly finished.
I managed a well deserved break from work today, so I devoted most of the day to this project.
With the stain completely dry, it's ready for clear finish. It's my goal from now on to use only water based products, mainly for health concerns and ease of cleanup. Water based finishes have really improved over the past few years to the point where they outperform their solvent based counterparts.
My first coat of urethane goes on with a brush. This will raise the grain so that it can be sanded smooth. The rest of the coats will be sprayed on, with no sanding between coats.
I want to do the same polishing on the body as on the baffle, so the finish has to be thick enough not to sand through. This winds up being around 10 coats. Spraying outdoors, with a slight breeze and the temperature here today around 25 C, the layers dry quick. How quick? Well, with solvent based urethane flash time would be about 20 to 25 minutes. It would be tacky. After ten minutes, the water based urethane is dry to touch!
Incredible.
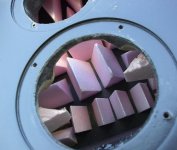
With the incredibly fast dry times for the urethane, I had some time on my hands. I decided I'd spend some time working on the midrange chamber treatment.
As mentioned earlier, I will be using triangular prisms cut from styrofoam to simulate an anechoic like enclosure.
Once cut (with my table saw), I have 30 wedges to work with. They are 3 inches long and 2 x 1 1/2 at the base. As the chamber is small, the wedges need to strategically placed. I have calculated the volume of 15 of these wedges to be about 1 litre.
I manage to get 14 glued in place - with none directly behind the midrange driver. There is an audible difference when I snap my fingers near the opening of the treated one as opposed to the untreated one. That's encouraging. As I have not done this type of damping before, I can't predict the results. Just hope for the best.
As for the wedges, I think I'll leave them without putting the rubberized asphalt coating. When I spray the baffles, some paint will get on the wedges, making some stiffer than others. Could make a slight difference in their effectiveness, either positive or negative.
Here's a picture of the results. It doesn't look like much in the photo (hard to see into the small holes). Four of the wedges are glued to the top, eight on the back and one on each side.
Attachments

I like the idea of trying to absorb the backwave of the mid driver, presumably to prevent sound leaking back out through the cone? Let us know how it works.
My initial reaction (not that I know anything!) is that styrofoam would not be the best absorber??? I suppose the proof is in the hearing tho...
My initial reaction (not that I know anything!) is that styrofoam would not be the best absorber??? I suppose the proof is in the hearing tho...
terry j said:I like the idea of trying to absorb the backwave of the mid driver, presumably to prevent sound leaking back out through the cone? Let us know how it works.
My initial reaction (not that I know anything!) is that styrofoam would not be the best absorber??? I suppose the proof is in the hearing tho...
I don't think the goal is to absorb it but to cause highly chaotic reflection so as to decorrelate it.
dave
planet10 said:
I don't think the goal is to absorb it but to cause highly chaotic reflection so as to decorrelate it.
Exactly my thoughts. The back wave "gets busy" among the wedges bouncing back and forth, losing energy. I think of an empty room as opposed to a room full of furniture.
It may well be that wool or fiberglass stuffing could do a more efficient job of dissipating the back wave and that I am wasting my time. I do know that this kind of stuffing is more effective at some frequencies than others and seems to rob some of the midrange dynamics (or is that just my imagination?).
The proof will be in the listening - if it sounds good, it is good.
I will cut some wedges that are about half the size of these and glue those in place wherever they will fit, mostly behind the driver.
Also consider gluing a cone shaped wedge to the driver magnet (as well as the usual shaping of the exit for smooth flow)
dave
dave
planet10 said:...as well as the usual shaping of the exit for smooth flow)
I have chamfered the inside edge of the opening to give more "breathing" room. The basket on these drivers is short - less than an inch from flange to magnet. Also the magnet is almost the same diameter as the mounting hole, so it will be tight.
Luckily the baffle is only 1 1/4" thick.
Cut and glued in the smaller wedges. 14 of these in each box, just like the big ones. I put them behind and beside the driver. Also managed to squeeze one in on the top.
Inside of the chamber is starting to resemble a sharks smile. 😎
Accomplished a rare feat - a decent photo! Good view of the interior.
Attachments
MJL21193 said:Accomplished a rare feat - a decent photo! Good view of the interior.
How did you manage that photo? Getting good lighting inside the box is a little hard at the best of times...
Cloth Ears said:
How did you manage that photo?
MAGIC!! Not really, brought it out in the daylight and used the cameras flash.
Sometimes I get lucky...
If the baffle looks dull, that's because it got a few layers of urethane yesterday while I sprayed the body. I was going to mask it, but decided to sand them and spray the whole unit.
Gives a good base for the black water based urethane paint which will be the finished coat.
OK not absorption, but decorrelation, understand. Please let us know the results of the listening test on ol' sharky. If absorbant foam was used then maybe whatever was not absorbed would at least be decorrelated?? just rambling, no idea what is better than what.
One question I do have however is what difference will the extra material in the mid chamber make in terms of Q? We most certainly hope it makes a difference on other factors (else why go to the trouble) but the lessened volume will change the Q.
That can either be a good thing or a bad thing with bass drivers, but can someone give a quick rundown on how changing or having high/low Q affects things in the midrange area? Indeed, is it even anything that even vaguely needs to be considered outside of the bass realm?
terry j said:
One question I do have however is what difference will the extra material in the mid chamber make in terms of Q?
Hi Terry,
The problem I have with these mids is that I don't have the T/S parameters for them. I did measurements with Speaker Workshop and came up with usable figures.
Qtc of the enclosure should be close, as in within a litre or two of the ideal. My modeled ideal was 7 litres. With that said, the 310Hz crossover point is well above the roll off of the modeled box size, so not much impact if I were to decrease box volume (within limits).
Make the box too small and run the risk of a peaked response at the crossover point.
In a nutshell, my chamber volume is about 9 litres, the foam is about 1.5 litres. That gives me 7.5 litres which is close enough.
Will be taking a break from these for a few days to concentrate on the active amps.
I have ordered the water based urethane paint. I will not get it until early next week (apparently my local store doesn't have the ability to tint it).
More posts to come...
I have ordered the water based urethane paint. I will not get it until early next week (apparently my local store doesn't have the ability to tint it).
More posts to come...
MJL21193 said:
Hi Terry,
The problem I have with these mids is that I don't have the T/S parameters for them. I did measurements with Speaker Workshop and came up with usable figures.
Qtc of the enclosure should be close, as in within a litre or two of the ideal. My modeled ideal was 7 litres. With that said, the 310Hz crossover point is well above the roll off of the modeled box size, so not much impact if I were to decrease box volume (within limits).
Make the box too small and run the risk of a peaked response at the crossover point.
In a nutshell, my chamber volume is about 9 litres, the foam is about 1.5 litres. That gives me 7.5 litres which is close enough.
Thanks for that, but I fear you may have misunderstood me....it seems you might have thought I knew what I was talking about but no I didn't ha ha, my question was a bit more general.
Perhaps I can re-phrase it and then you more knowledgable guys can help. My question was more "What difference does a varying size mid-chamber make to the sound of the mid driver?", think that puts it in a different light.
I can glean part of the answer from your answer above, too small and it will give a peaky response, which is analogous to what happens with bass drivers.
It's just that when people are calculating their sub enclosures, of course volume is an extremely important part of the calculations, I really can't recall ever seeing a similar attention on the calculation of midrange enclosure volume, which led me to wondering how important any such calculation actually is.
Of more relevance to me I suppose, I use a deqx in my system which if you don't know measures and corrects the drivers and allows you to set your own slopes and points for the x-over. So from a FR perspective any anomolies in the response due to non-optimum chamber size will be compensated for, but will we still be left with descriptors like 'dry' or bloated or......what?
So I guess it was a much more general question than you may have believed, and was in no way a 'criticism' of adverse affects that might have been introduced by the fill.
I wanted to learn.
Hope that cleared it up, I'm actually ignorant in this area not knowledgable ha ha.
Basically, you want your mid enclosure to have no effect on the driver near the crossover frequency, so as long as it is sized to give a smooth roll off after the filter is applied it doesn't really matter. However, whatever the size, the next problem we get in to is box reflections and such like, which is what MJL is trying to treat.
The paint arrived today. A little bit more than the original quote, the cost with tax was $89.00.
I prepare a test on an old speaker box. Sand it, clean it up.
The first thing I notice about this paint is how thick it is. It's going to need serious reduction to get it to spray well. I mix a bit and give it a try.
First off, today was not a very good day for outdoor painting. Raining in the morning and damp, cool and windy in the afternoon. I need to test it though. It sprays on nicely, with great coverage. Even in these less than ideal weather conditions, it dries fast (about 15 minutes). I spray on another 2 coats. nice.
The idea is to go base coat/clear coat with the clear WB urethane going on right after the black. The two products smell the same, therefore I believe they are the same formula, though made by two different manufacturers.
I clean the gun, put in the clear and spray on a coat. It went on a little heavy in the front part of the box, but it's not running so I don't think anything of it.
I go to do something else while the clear flashes off and when I come back I see the the front has a cracked pattern, like leather. The sides (where I sprayed the correct amount) are ok. Here's a tip for myself: be careful with that first coat.
Total of 4 sprayed coats on the first 3 of base seems to be the correct coverage.
I'm looking forward to getting the baffles painted. Weather permitting, it could be tomorrow.
Attachments

- Status
- Not open for further replies.
- Home
- Loudspeakers
- Multi-Way
- Construction journey-Active 3-way