Pretty Persuasions passive crossover update, I have my initial measurements done, after getting my inbox FRD (frequency response out of Omnimic) and ZMA (impedance curve out of WT2) for each driver, I loaded them into Xsim and began some modeling.
I modeled a 6db, 12 and 24db design with several variations an iterations of each, overall about 12 different models. 24db between tweeter and mid didn’t net any improvement over what I could get with 12, and 6db slopes just weren’t enough to tame a compression driver tweeter or mid that goes break up crazy at 2k, 12 gave me the best response and phase characteristic with the least number of components.
I am playing with a series LCR (EQ attenuation circuit) at 2600hz to bring down a hump in tweeter response, I can get really close w/o it but I’ll see how it plays in actual measurements I do later this week.
As luck would have it I had less than half the parts I needed and since I could distract myself with some active crossover while I was waiting, I didn’t bother piecing together components.
I did wire up a 6db version just to hear the drivers initially, it sounded ok, then I did my active setup and that made the 6db version sound terrible, was an interesting back to back effort to see truly how bringing response and phase inline transformed the sound of the horn from honky and bright to smooth and balanced.
See attached charts for a little of what I’m seeing, as you can see some of these curves are quite challenging to deal with compared to the average hifi dome tweeter and mid but things fall in line nicely.
Raw response of all drivers in box

12db response curves, note dip at 4K is in natural tweeter response

Tweeter reverse phase null

Xsim model

I modeled a 6db, 12 and 24db design with several variations an iterations of each, overall about 12 different models. 24db between tweeter and mid didn’t net any improvement over what I could get with 12, and 6db slopes just weren’t enough to tame a compression driver tweeter or mid that goes break up crazy at 2k, 12 gave me the best response and phase characteristic with the least number of components.
I am playing with a series LCR (EQ attenuation circuit) at 2600hz to bring down a hump in tweeter response, I can get really close w/o it but I’ll see how it plays in actual measurements I do later this week.
As luck would have it I had less than half the parts I needed and since I could distract myself with some active crossover while I was waiting, I didn’t bother piecing together components.
I did wire up a 6db version just to hear the drivers initially, it sounded ok, then I did my active setup and that made the 6db version sound terrible, was an interesting back to back effort to see truly how bringing response and phase inline transformed the sound of the horn from honky and bright to smooth and balanced.
See attached charts for a little of what I’m seeing, as you can see some of these curves are quite challenging to deal with compared to the average hifi dome tweeter and mid but things fall in line nicely.
Raw response of all drivers in box
12db response curves, note dip at 4K is in natural tweeter response
Tweeter reverse phase null
Xsim model
MT crossover at 1700hz now?
How is the coaxial sounding compared to your previous hornCD attempts?
How is the coaxial sounding compared to your previous hornCD attempts?
MT crossover at 1700hz now?
How is the coaxial sounding compared to your previous hornCD attempts?
Yes approx, sounds quite good, the FaitalPro HF10AK is hard to beat but the dispersion of this horn is 360d and is much more some tweeter like than horn, sounds very very good, very pleased with these!

I totally admire your work, so just please posting ��. I see you like to work with faital drivers...my favorite also. The midrange on faitals is simply amazing...so live...you should try something with 5fe120 ��.
Looking forward to a stereo pair dialed in and your impressions of the sound. Also that wood is going to come alive once you finish it.
Fantastic work, keep it coming 🙂
The big dip in the raw driver response on the 6HX150 data sheet at around 1.5 - 4 KHz , does it cause any problems or can it be overcome easily in the crossover design?
Jag
The big dip in the raw driver response on the 6HX150 data sheet at around 1.5 - 4 KHz , does it cause any problems or can it be overcome easily in the crossover design?
Jag
Fantastic work, keep it coming 🙂
The big dip in the raw driver response on the 6HX150 data sheet at around 1.5 - 4 KHz , does it cause any problems or can it be overcome easily in the crossover design?
Jag
Thanks! It’s problematic or challenging with a passive crossover but I’ve dealt with it well I believe, in active it was trivial to deal with using a 48db slope to get perfect response and great phase behavior through that region as previous posts show.
Look for an update soon
Pretty Persuasions crossover update - been a few weeks since I posted about this project but I’ve been working away on the crossover during this time. Things have progressed past the initial model I posted and after testing a number of different slopes, values and alignments, this is where I finalized the design.
Not only did measurements guide this crossover but many hours of listening to my reference music as well.
The biggest challenge with this crossover was the sudden mid breakup at 2k, after that response drops and changes abruptly, this is easy to deal with in an active setup (as you may have seen from the active update I did), however with passive it requires much more work than say a good dome tweeter and hifi mid with flat and gentle sloping responses.
Dealing with a horn loaded compression tweeter is always a challenge as well, but all said and done I’m quite pleased with the response and how this speaker sounds currently.
Next step will be to get both speakers up and running in stereo and make any remaining tweaks, typically once things are playing at stereo and everything is installed how it will be in the speaker, a few tweaks to the lpad are usually required
Final response showing individual drivers as well as reverse null response with no smoothing. The reverse null indicates good phase alignment and overall response is quite smooth, there is a small bump at 2600

On axis, 22d and 45d off axis response

Black line is 8” woofer polarity flipped, this transformed the sound of the speaker from thin to warm and full

Overall impedance curve of this crossover, as you can see it dips to 3 ohms in 2 spots, this is a compromise for frequency response and sound, I tested this on a few amps and didn’t have too much trouble driving the speaker, but it’s definitely going to be a little bit more challenging than the average 8 ohm speaker


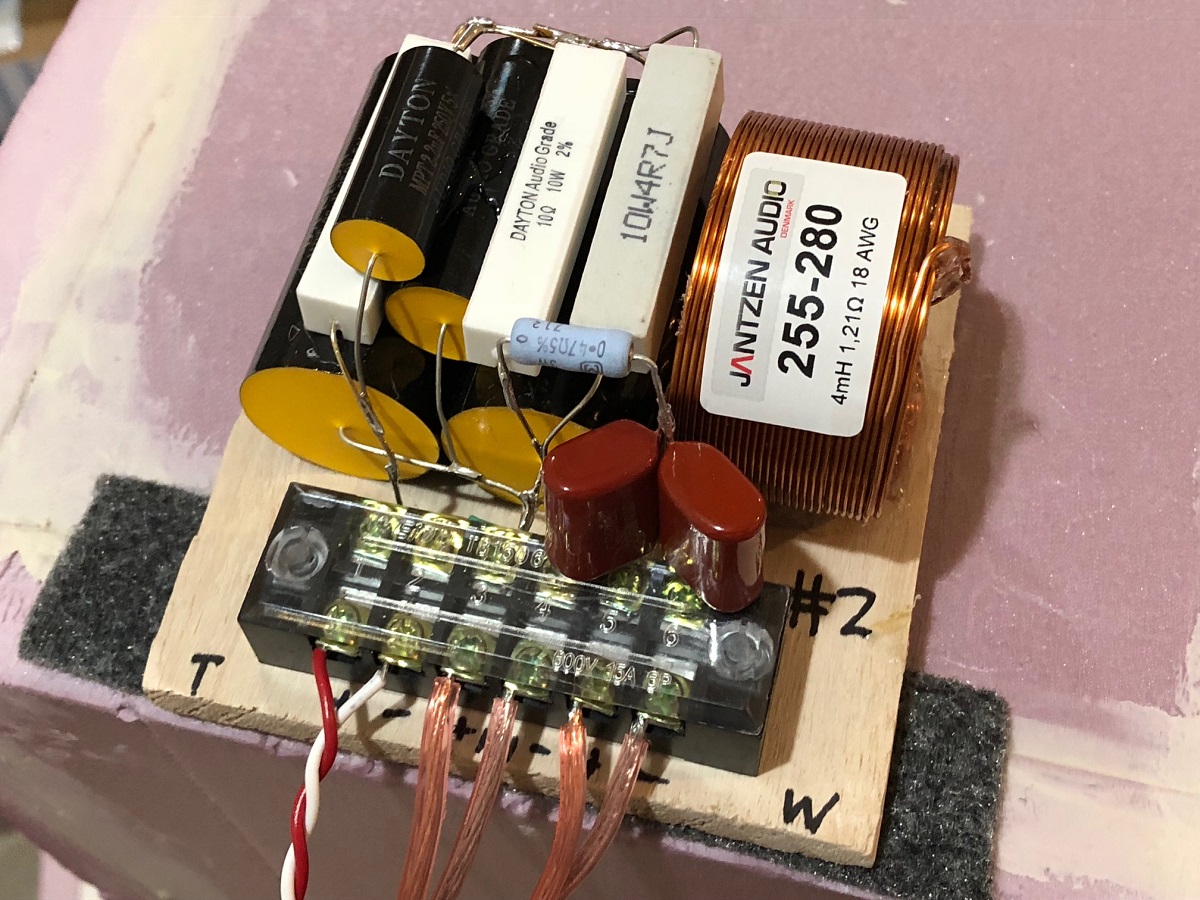
Schematic, C5 is a tank to roll mid break off rapidly

Distortion at 85 and 95 dB


Final crossover on my test board

Measurements set up using Omnimic and a 5ms gate

Cutting crossover mounting boards

Starting to lay out components

Thanks!
Not only did measurements guide this crossover but many hours of listening to my reference music as well.
The biggest challenge with this crossover was the sudden mid breakup at 2k, after that response drops and changes abruptly, this is easy to deal with in an active setup (as you may have seen from the active update I did), however with passive it requires much more work than say a good dome tweeter and hifi mid with flat and gentle sloping responses.
Dealing with a horn loaded compression tweeter is always a challenge as well, but all said and done I’m quite pleased with the response and how this speaker sounds currently.
Next step will be to get both speakers up and running in stereo and make any remaining tweaks, typically once things are playing at stereo and everything is installed how it will be in the speaker, a few tweaks to the lpad are usually required
Final response showing individual drivers as well as reverse null response with no smoothing. The reverse null indicates good phase alignment and overall response is quite smooth, there is a small bump at 2600
On axis, 22d and 45d off axis response
Black line is 8” woofer polarity flipped, this transformed the sound of the speaker from thin to warm and full
Overall impedance curve of this crossover, as you can see it dips to 3 ohms in 2 spots, this is a compromise for frequency response and sound, I tested this on a few amps and didn’t have too much trouble driving the speaker, but it’s definitely going to be a little bit more challenging than the average 8 ohm speaker
Schematic, C5 is a tank to roll mid break off rapidly
Distortion at 85 and 95 dB
Final crossover on my test board
Measurements set up using Omnimic and a 5ms gate
Cutting crossover mounting boards
Starting to lay out components
Thanks!
Very nice build.
For others who may try this, I will reiterate the recommendation for Bondo auto body filler. It fills well, is easy to apply and is about one third the cost of the Loctite.
I can not agree with this more. Although I wish xover design was my forte, it is not. Cabinet building is. Woodwork has been my lifelong passion. And I would like to offer this suggestion, to anyone considering kerfing like this.
I would tape off the entire front baffle, and sides of the baffle, very well. I would lay the baffle out flat, kerfs up, on a piece of wax paper. I would then fill the kerfs with bondo and a large flat putty knife. THEN I would bend the flat baffle and sides into shape, allowing the bondo to squirt out of the kerfs as the enclosure bends. I would then lock it into shape and clamp it. Then immediately , I would grab my putty knife/scraper and remove ALL of the excess, squirted out bondo that I could, before it hardens. scraping the curved insides of the kerfs flat and smooth with the bondo.
Once dry, this is ONE solid piece of material. Much stronger and less likely to any resonance in the voids in the kerfs. The reason I posted this as a successful solution, is because I have done kerfs this way twice before, when building a round subwoofer enclosure from solid wood.
Okay. Now I have read the entire thread. I am so thankful for amazing build threads like these! I learned a lot from your innovative wood working solutions. Your skills, and tools are just amazing! I have seen your builds on Youtube, and have a couple of them bookmarked, and this is before I even knew you posted on here. Glad to have found you, and look forward to more of your amazing work!
Flaxxer said:Okay. Now I have read the entire thread. I am so thankful for amazing build threads like these! I learned a lot from your innovative wood working solutions. Your skills, and tools are just amazing! I have seen your builds on Youtube, and have a couple of them bookmarked, and this is before I even knew you posted on here. Glad to have found you, and look forward to more of your amazing work!
So glad you’ve enjoyed and appreciated this documentation, it’s a lot of extra work but totally worth it when people like you find enjoyment in it. =)
Got the crossovers finalized and tested today, I ended up tweaking the lpad once I had components soldered in place on the board.

I increased R1 to 2 ohms and R3 to 5.6 to get response back to where I wanted it.
Basic layout


And loaded up input and output leads

Woofer spade terminals

Mid push terminals

Binding post input leads


Thanks!
Javad
I increased R1 to 2 ohms and R3 to 5.6 to get response back to where I wanted it.
Basic layout
And loaded up input and output leads
Woofer spade terminals
Mid push terminals
Binding post input leads
Thanks!
Javad
Sorry for the length between posts, been getting a lot done! Here’s where things start, enclosures stripped back down and ready to finish. I did a final pass with 220 to perfectly smooth things out and get a fresh layer of wood. Glad I did too as in the month or so since the last glue up a few seams crept settling a little (like maybe 1/100th” and I got a chance to smooth them back out.

I’ve never used it but been hearing good things about Rubio Monocoat. It’s an oil finish with a catalizer that reacts with the oil and creates a hard finish that bonds at a molecular level to the wood fibers. It initially came out for hardwood floors which gave me confidence to use it on speakers, and I was looking for a matte finish like with Danish oil but something a little more advanced and durable.

You simply mix the two and wipe it on sparingly (no need to flood the surface), then wipe it lightly 3-5 minutes later, then let it cure for 3 days, super easy and idiot proof. And man does that grain pop!


After curing for 4 days I began final assembly, more to come!
Javad
I’ve never used it but been hearing good things about Rubio Monocoat. It’s an oil finish with a catalizer that reacts with the oil and creates a hard finish that bonds at a molecular level to the wood fibers. It initially came out for hardwood floors which gave me confidence to use it on speakers, and I was looking for a matte finish like with Danish oil but something a little more advanced and durable.
You simply mix the two and wipe it on sparingly (no need to flood the surface), then wipe it lightly 3-5 minutes later, then let it cure for 3 days, super easy and idiot proof. And man does that grain pop!
After curing for 4 days I began final assembly, more to come!
Javad
Before final assembly I played around with the crossover one last time (for now lols), my one sticking point after extensive listening was a lack of detail and top end response, I rolled off the top of the tweeter to deal with the hump at 2800 but this rolled off 5k more than I wanted to, so I experimented with some inductors across R2 and a .025mh brought up response above 5k nicely and brought that air and detail back that I felt was missing


I heat test all my crossovers and found the temp of the mid lpad resistors was getting to about 105F after extended play at peak volume, some heat sinks brought that right down to a max of 80F (in a 70F room) which I was very comfortable with. Heat sinks attached with heat sink glue

Crossover boards installed with stapled adhesive Velcro and a single screw to secure it

Internal wires for one enclosure, each binding post connects separately to the crossover board circuit for that driver.

Woofer terminals

Black 3M strip calk to seal wires passing into the mid enclosure, works and seals very well and is serviceable if needed

Wiring buttoned up


Binding post holes

Installed

Solid 3/16” 99.999% copper rod, cut to 2.75” length and ends rounded


Ready for gold plating

Gold plated


Installed

All buttoned up and lots of listening to do!
Will do a nice photo shoot and post pics next week

Thanks!
Javad
I heat test all my crossovers and found the temp of the mid lpad resistors was getting to about 105F after extended play at peak volume, some heat sinks brought that right down to a max of 80F (in a 70F room) which I was very comfortable with. Heat sinks attached with heat sink glue
Crossover boards installed with stapled adhesive Velcro and a single screw to secure it
Internal wires for one enclosure, each binding post connects separately to the crossover board circuit for that driver.
Woofer terminals
Black 3M strip calk to seal wires passing into the mid enclosure, works and seals very well and is serviceable if needed
Wiring buttoned up
Binding post holes
Installed
Solid 3/16” 99.999% copper rod, cut to 2.75” length and ends rounded
Ready for gold plating
Gold plated
Installed
All buttoned up and lots of listening to do!
Will do a nice photo shoot and post pics next week
Thanks!
Javad
Wow! Excellent craftsmanship Javad. Those resistors must dissipate a lot of power to need heat sinking. What did you use as the thermal interface material to glue them on?
How does the passive XO sound compared to the active XO?
How does the passive XO sound compared to the active XO?
mlee said:Wow! Absolutely stunning! Thanks for posting this.
Thanks for following along!
audioaficionado said:Wow! Excellent craftsmanship Javad. Those resistors must dissipate a lot of power to need heat sinking. What did you use as the thermal interface material to glue them on?
I can model how much heat they’re dissipating but yes the mids receive a bulk if the content compares to the tweeters so they see more power, they were nowhere near failing mind you but just to be safe since they’re 10w resistors. As stated above heat sink glue see Amazon.com: 10g Thermal Conductive Silicone Plaster Viscous Adhesive Compound Cooling Glue For LED GPU Chipset Heatsink: Computers & Accessories
How does the passive XO sound compared to the active XO?
Good. Same basic sound, on the active I can smooth out some of the response variations in the 1-4K range so they’re a little less bright and lively in active, but I was extremely pleased how close I got them to the ruler flat active response with the passive.
I think I’ll take them to The Parts Express MWAF this July as fully active as I’d like to enter them in that section.
Thanks!
Javad
Dang me!! this is impressive work.
Nice job, man.

I have similar Dagger rear chambers on my FAST tops.
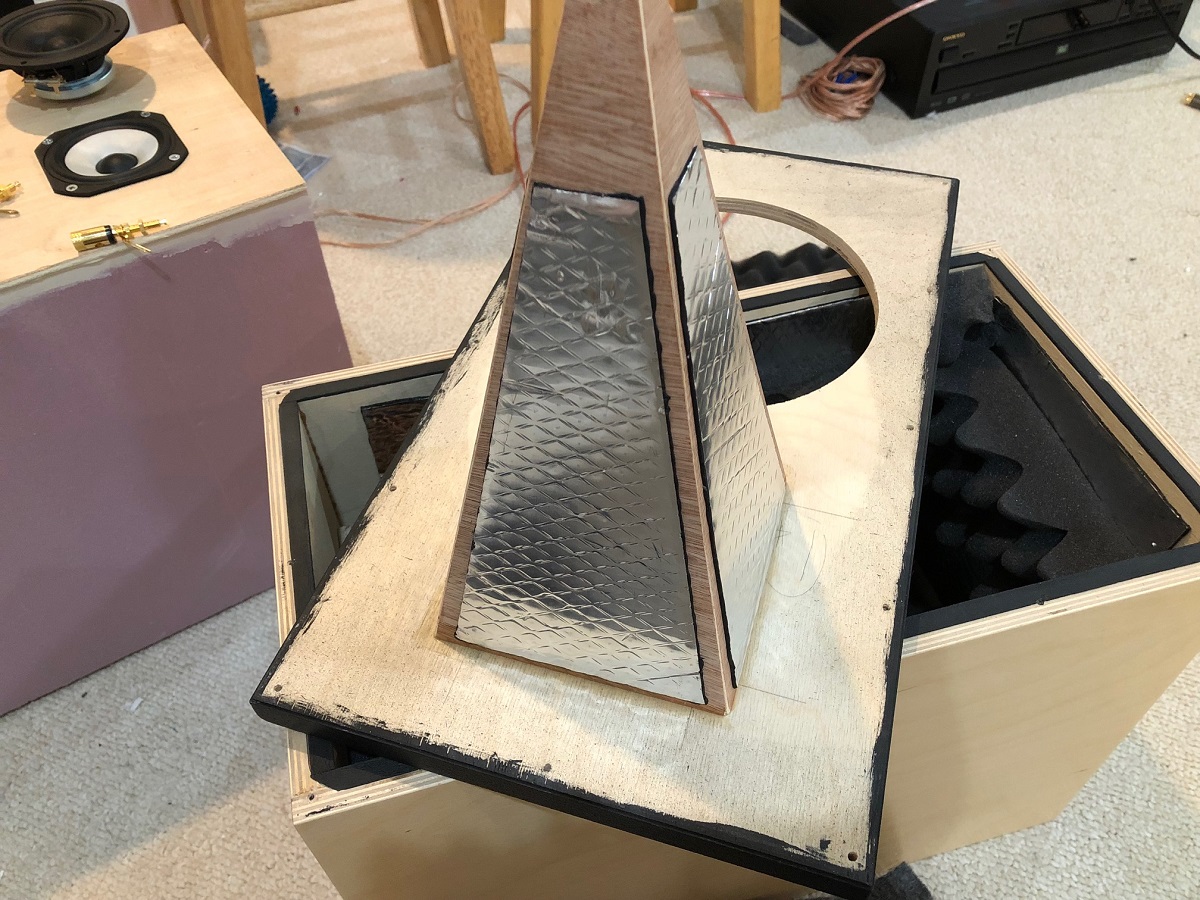
10F/8424 & RS225-8 FAST Ref Monitor
On my resistor that gets hot, I just leave it elevated in free space supported by its two leads so it doesn't touch anything. But I am running well below 100w total.
Nice job, man.
I have similar Dagger rear chambers on my FAST tops.
10F/8424 & RS225-8 FAST Ref Monitor
On my resistor that gets hot, I just leave it elevated in free space supported by its two leads so it doesn't touch anything. But I am running well below 100w total.
Last edited:
- Home
- Loudspeakers
- Multi-Way
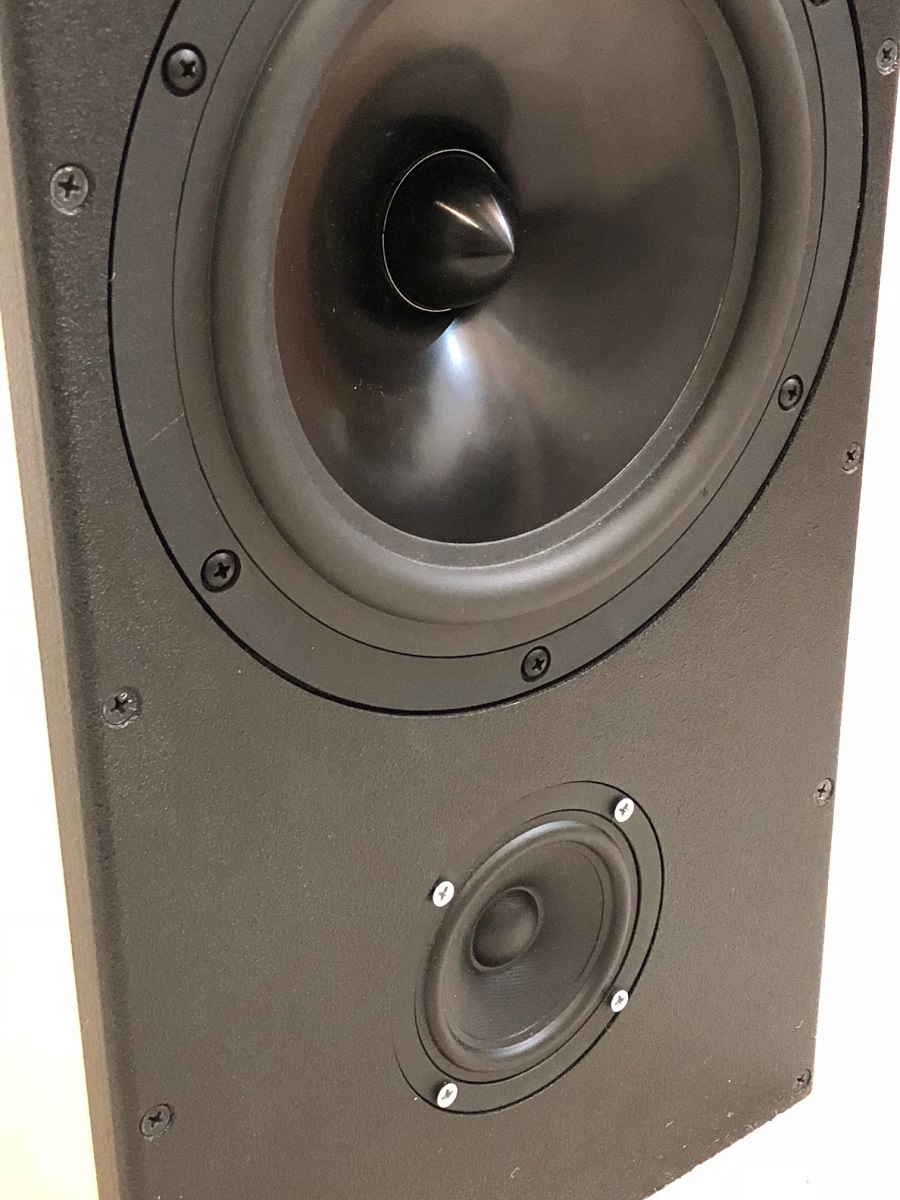
- Coaxial Speaker Build Thread with FaitalPro 6HX150