Karl - thanks
Using the standard Thor crossovers for the moment. Not averse to trying the new one though. But I think I will leave that for the new year.
The other option I have is to go for active crossovers. Got parts lying around here for 8 "leachmussen" amps.
Was there more / less mid with the new xover?
Using the standard Thor crossovers for the moment. Not averse to trying the new one though. But I think I will leave that for the new year.
The other option I have is to go for active crossovers. Got parts lying around here for 8 "leachmussen" amps.
Was there more / less mid with the new xover?
FWIW, the dip at ~145Hz in the rough measurements made above is most likely floor-bounce (it's in the right place).
Glad you like them guys. 16Hz is a trifle ambitious, but strong to the mid 30Hz regions was the object for this cabinet, so it's good to get further confirmation that they're performing as they should.
Glad you like them guys. 16Hz is a trifle ambitious, but strong to the mid 30Hz regions was the object for this cabinet, so it's good to get further confirmation that they're performing as they should.
Byrd said:Wife being obsesive 😉
As they say at the Passover "Why should this wife be different from the rest?"
Byrd said:Wife being obsesive 😉
Byrd,
Your wife is sucking Ants!
I laughed outloud very hard when I saw that picture.
You're one lucky dude.
Ron
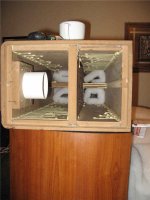
Byrd said:A variety of port lengths cut
You have a plethora of ports.....looking to corner the market?
A few more pairs of PlanetMoose Thor's and we can,
"TAKE OVER THE WORLD"!!!!!!!!!!!!!!!!!!
Ron"TAKE OVER THE WORLD"
Byrd said:Wife being obsesive 😉
Next time I decide to get married (and give away my house and all my stuff again) I will try to find a wife that will help me build and clean up my audio projects!!!
😀

Scottmoose said:FWIW, the dip at ~145Hz in the rough measurements made above is most likely floor-bounce (it's in the right place).
Glad you like them guys. 16Hz is a trifle ambitious, but strong to the mid 30Hz regions was the object for this cabinet, so it's good to get further confirmation that they're performing as they should.
May be so...and it was vey local. Just in the sweetspot. Three feet away on each side had no dip.

I didn't do full measurements there though, it may have dipped elsewhere.
Hey Karl,
Do you have the ability to measure over the whole audio band? I'd like to see what the response looks like at 1 meter or so.
Jim
Do you have the ability to measure over the whole audio band? I'd like to see what the response looks like at 1 meter or so.
Jim
Sounds favourite then. Above 1KHz is academic WRT different cabinets BTW guys as from this point up the only thing the box does is provide a solid mounting point for the drivers. Be interesting to see what the overall trend / balance of the drivers & XO is like of course.
jimangie1973 said:Hey Karl,
Do you have the ability to measure over the whole audio band? I'd like to see what the response looks like at 1 meter or so.
Jim
Unfortunately not, Jim.
I don't have the equipment.
But since I'm very curious too I'm trying to find someone that can help me with that. I'll make the data available as soon as, or rather, if I get it done. 🙂
Byrd said:Karl
Have you compared the new & old crossovers in the same cabinet?
No...haven't gotten around to it yet.
Sounds too good as it is. 😉
jimangie1973 said:Hey Karl,
Do you have the ability to measure over the whole audio band? I'd like to see what the response looks like at 1 meter or so.
Jim
I found someone now that can help me with the measurements.
We'll probably do it after the weekends..🙂
Great Karl, thanks.
I'm interested in seeing how consistent the Excel drivers are, so I can be a little more confident in recommending the crossover design.
Jim
I'm interested in seeing how consistent the Excel drivers are, so I can be a little more confident in recommending the crossover design.
Jim

The veneering is NOT as easy at it sounds.
No it's not - my (Original Plans) Thors got a bunch of huge bubbles on them. I used 'self stick' and actually wore out a roller pressing it flat. I tried an iron, and some weights, no dice.
On the subwoofer I built, I found the right technique. FINISH the speakers with bubbles on them. I mean, varnish, whatever; I used Danish Oil.
Then, once you can't worry about glue getting on it, you slice the bubbles with a razor blade. Depending on the size of the bubble, you might have to sand the sides a little. Then I squirted some wood glue (yellow) under the bubble and pressed the bubble flat. If the razor (x-acto) is good and sharp, you won't even be able to tell where the bubble was. I then clamped it with a flat board and some bar clamps.
The clue for me was the finishing - with a 'hard' surface, the glue that squirts out of the bubble won't clog the pores and spoil the finish, because it's already finished. The danish oil didn't seem to make it too inflexible; the bubbles pressed flat anyway.
This worked perfectly on my subwoofer. Once I get new cabinets made, I plan on testing this with my existing speakers. I'm going to build a set of rear speakers with the new 'small Thor' cabinets, once my knee heals (MCL tear).
Ross,
Did you try putting a coat of glue on each surface and after it dried use the iron to bond them together? You can wet the bend areas on the veneer to avoid cracking. It is pretty simple...
Ray
Did you try putting a coat of glue on each surface and after it dried use the iron to bond them together? You can wet the bend areas on the veneer to avoid cracking. It is pretty simple...
Ray
jgwinner said:
No it's not - my (Original Plans) Thors got a bunch of huge bubbles on them. I used 'self stick' and actually wore out a roller pressing it flat. I tried an iron, and some weights, no dice.
On the subwoofer I built, I found the right technique. FINISH the speakers with bubbles on them. I mean, varnish, whatever; I used Danish Oil.
Then, once you can't worry about glue getting on it, you slice the bubbles with a razor blade. Depending on the size of the bubble, you might have to sand the sides a little. Then I squirted some wood glue (yellow) under the bubble and pressed the bubble flat. If the razor (x-acto) is good and sharp, you won't even be able to tell where the bubble was. I then clamped it with a flat board and some bar clamps.
The clue for me was the finishing - with a 'hard' surface, the glue that squirts out of the bubble won't clog the pores and spoil the finish, because it's already finished. The danish oil didn't seem to make it too inflexible; the bubbles pressed flat anyway.
This worked perfectly on my subwoofer. Once I get new cabinets made, I plan on testing this with my existing speakers. I'm going to build a set of rear speakers with the new 'small Thor' cabinets, once my knee heals (MCL tear).
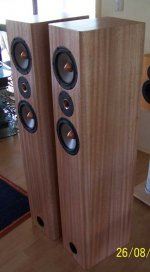
John – wooow that sounds a lot of work and heartache; I’ve never really liked iron on veneer and never had success with it the few times I’ve tried. “Real” veneer seems very tricky also to me and especially when covering large projects. A while ago I found (like a lot of others) paper backed veneer – Valhalla – huge 2.44 x 1.22 m (I’m in Australia) sheets; lovely and flat bonded to a strong paper backing.
A lot of people use normal yellow wood glue but I’ve gone the recommended but more scary contact adhesive route. Small panels are fine with care but I did a side-front-side one-piece wrap on my Small Thors. There was no way I could do this on my own. So a mate helped, we did a number of “dry-runs” to make sure we new exactly what to do and how to locate the large sheet and avoid it “grabbing” before we were ready. Success – not one bubble – see http://www.greenie512.net/greenie512/html/finished_thors.html
Cheers - Phil
Attachments
greenie512 said:
A lot of people use normal yellow wood glue but I’ve gone the recommended but more scary contact adhesive route. Small panels are fine with care but I did a side-front-side one-piece wrap on my Small Thors. There was no way I could do this on my own.
Contact adhesives -- if you use wooden dowels to support the veneer you can slowly move the veneer panel onto the substrate -- working slowly from one edge. A good veneer saw or knife is a must.
- Home
- Loudspeakers
- Multi-Way
- Clarity on Seas Thor Kit