PLanet10 did ever build one of these or just make the drawing....lol....theres no way to readily manipulate the threaded rods...Im use a cap nut to drive the threaded rod and am going to have to permanently attach it to make it reversible... IM thinking jb weld or epoxy might be the trick...got any ideas?
I've tried threaded rods on opposed drivers. Its a massive pain! very hard to line everything up, they need to be tensioned and there was no noticeable benefit over just opposed drivers.
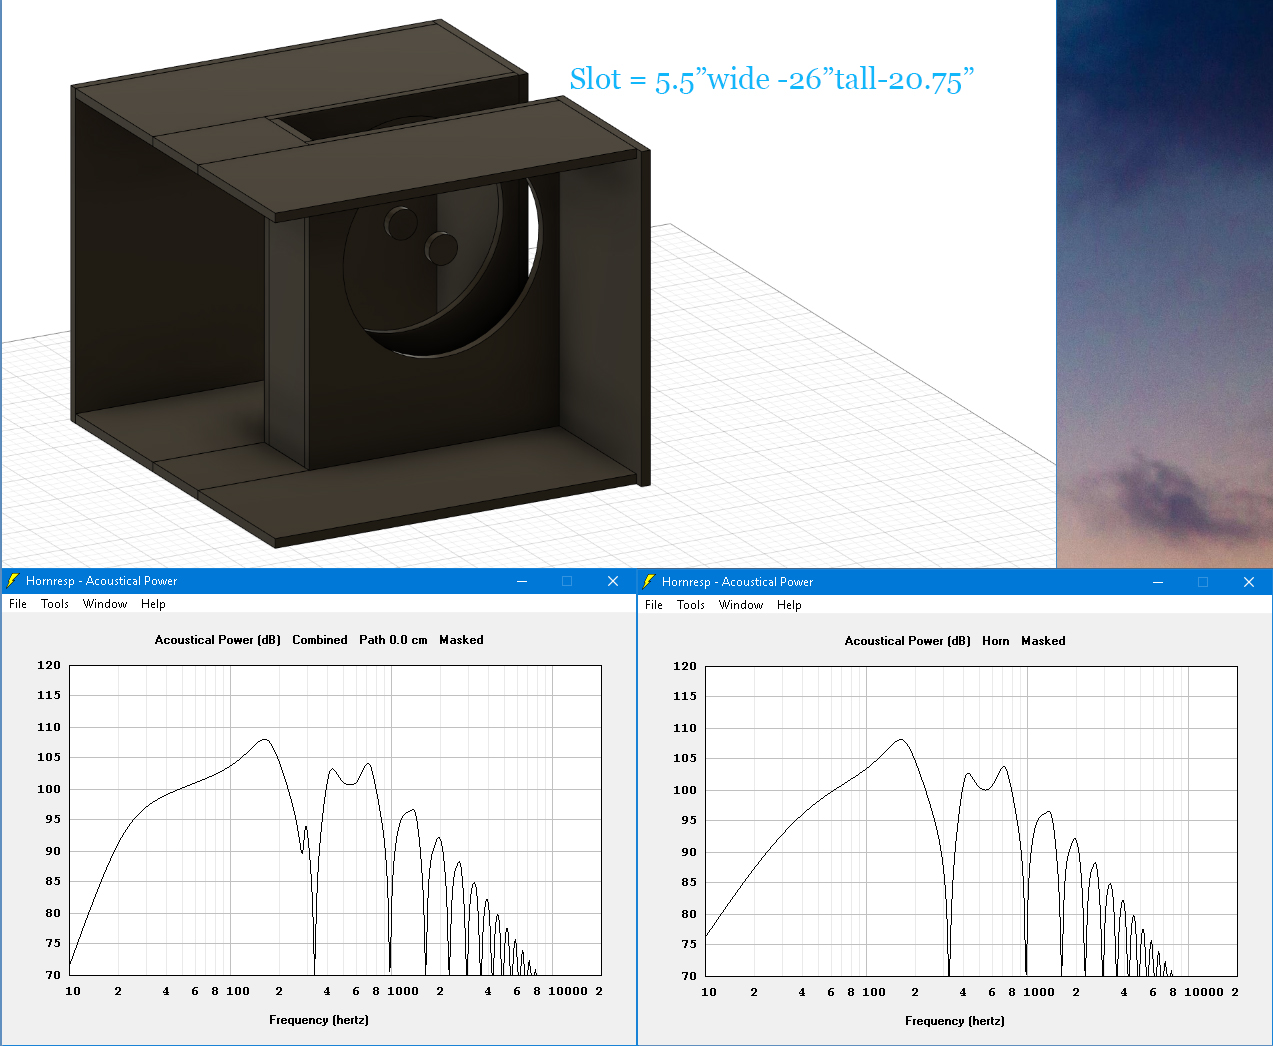
Was your build slot loaded? Any pics?
At the very least I can use what I’ve started and run threaded to the woofers but not cross the slot...
Maybe a wood brace or two in the gap or maybe not...but I like how the woofers back wall bracing is taken care of in the process.
Tension isn’t a problem if you use several threaded inserts in a row...I’ve binded and snapped and destroyed 2 threaded rods already along with 2 threaded inserts...the slight misalignment at each following insert causes tension.
Gotta go pick up a few more lock nuts and washers...but I definitely have to remove some threaded inserts because tension was too high.
Pain in the *** is an understatement lol
Last edited:
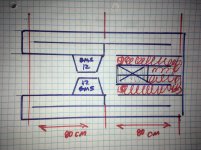
these dimensions are slightly off but the profile remains the same. Curious to what GM is talking about.
Thanks for chiming in Kipman!
I can use the backwall of each woofer to create tension by removing the threaded insert and just use a nut and washer on the outside.
Can you all look at the pick and imagine the threaded bracing at each 8 mounting holes to the woofers backwall....from there wheres the nest important bracing....the large back panel is one stop but not much more bracing is needed if you ask me...but I'm asking you all.
Last edited:
They cancel each others vibration ...
How do they mechanically cancel? They are tied together to create a solid piston moving back n' forth?
To do this properly requires a rotating [washing machine] motor coupling like the late/great ServoDrive systems: ServoDrive ContraBass 14HZ @115db! Subwoofer Carpet/Black | | Reverb
Doesn't matter too much for low power/Xmax, woofer systems, just make it as rigid as practical and mass load it till it's damped, but high power sub woofer systems?
Last edited:
Given the physically opposed but electrically in phase push-push arrangement yields a dramatic reduction (90% say) of the mechanical load on the box because of active force cancellation.
dave
dave
Hey Court, if you remember Kirk from Martin’ s page he did this trying to freelance a copy of the paraflex/roar i did awhile back. But he had some kinda TS parameter issue or something and did the design offsett by s good margin (not good) and do he ends up playing around to salvage it but long story short was recent comments nit yet tested, where he was flipping polarity here on one driver back and forth and the suck and blow version(opposite motion is ‘an incredible audible’ difference and he did have a phone app with a imm6 which definitely looked great, but had nothing to ompare or reference it to(yet),,?
Never the less, it sounds intersting as i have the same basic layout except fir akl that offsett to the middle and ‘stuffed area’.
Never the less, it sounds intersting as i have the same basic layout except fir akl that offsett to the middle and ‘stuffed area’.
Attachments
Luckily for me, this build isn’t as complex and can just about be modeled in horn resp. I’m just looking at some dampening in front of the drivers due to slot resistance, lowering fs probably barely lol... turning about 2400 cm2 and two motors into about 1000cm2 slot CSA without loosing output from either driver...very interested in hearing this thing...unfortunately I didn’t get to the hardware store in time (they close at 4 instead of 5 wtf)
I haven’t decided on what exact changes I’ll make...but I looked at wesayso’s build fluid posted on my thread in multi forum and think he used good sense based on what I’m experiencing right now during attempts at assembly
I am not convinced tension persay is needed vs is just another way to benefit...wooden bracing has no tension..just looking for rigidity
Any comments on that topic guys?
I really need to get these things together before I make more changes...I have a fancy of a vented, possibly TH tuned to 20hz stuffed to the brim =( I keep telling myself more outputs more phase issues and vents always result in more decay...=(
Last edited:

So I am back for some reassurance...I got a thread in installed....the thread is slightly magnetic now....is this an issue? Being that I have 7 more to go?
Camplo: A nut is missing!
You have to do it again. 😀
DOH.... you have to do it again! ( don't you wish mono to be the norm now?).
You have to do it again. 😀
DOH.... you have to do it again! ( don't you wish mono to be the norm now?).
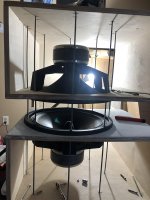
LOL! omgoodness....I got one thread in and secure, on the second one, I'm calling it a night lol...take notice to the 1.5lb of mortar on the each driver baffles (the white stuff). This stuff will be sculpted onto the other baffles when the time comes. I came up with this mortar to achieve a certain look but at ~1/8th inch,do you guys think it'll help dampen the box? I don't see much of a need to brace on the vertical as the dimensions are narrow (12") (the box is pictured sideways)....the rear wall is 32wx29h so I have plans to run bracing up the middle of that to the middle baffle between the woofers...I also will have to cover the rods with something thick...maybe a thick "tar" like tape...because I had to install the woofers first I am not sure if I will continue with the idea to coat the inside walls but if i am careful it may be ok...opinions?
A well-braced sub does not need additional damping.
Your construction is placing emphasis on esoterica that will have near zero impact on sound quality, causing far more work than needed, creating potential problems, and making any future speaker service a nightmare even worse than construction.
Hope metal filings from all those rods have not entered the magnetic gap..
ok it sunk in what you are saying...that is...I don't need anything but proper bracing. I think the bracing the threaded rods provide is very good for the walls facing the rear of the woofer...I just need to brace the large 32x29 backwall and call it a day.
Last edited:
It's not being against PPSL, it's more likely about being against the long, steep, winding path of little return.
I applaud your effort. But it seems a bit unnecessary and overly difficult when you could achieve 99% of the same thing using some small thin bits of wood around and a bit of glue, as well as regular screws for the drivers.
Edit:
I hope you're going to secure the threads properly to the cabinet walls so they don't just rub about after a short while.
Wood + glue, just sayin'.
Edit2:
Yeah, I see you edited your previous post.
Hope you make it easier on yourself next time 😀
That must've been tough putting it together like you did 😀
Last edited:
I often tout importance of prototyping. A proto will show difficulties in construction as well what the performance is. A prototype is merely mental concept, it is easy to throw away and start over with better plan with the new knowledge 😉 It is hard to accept a plan carefully planned is not actually that good and people just plow through it with hard work thst will result mediocre outcome. And then they are disappointed at the end. Been there many times 😀 Cheerios, try to keep it in the fun territory! 🙂
Last edited:
I saw the drawing and I just ran with it....if I ever have to take these apart...maybe I can saw the whole thing in half lol!!!! It took a while but it wasn't nearly as frustrating on the second set....just majorly time consuming....
Trying to justify my effort spent several hours mounting...I came up with the idea that It would have took the same amount of time for the glue to fully cure so it kinda evens out....that was a joke....lol!!
Each baffle has threaded inserts so no rubbing or vibrating....its tight and the threads sing a high resonante note due to the tension....I'll run some type of heavy thick tape around them.
The back wall I'll stick to wood and glue because I don't want to see threaded rod for a while now...
I don't foresee a reason to open the boxes after they've been closed up for good....at 2000rms and 105db sensitivity they'll never break a sweat. It would have to be a case of bad luck or worse case scenario...then I'll likely get a chance to explore my idea of 3d printing an enclosure.
When finished theres no reason why sound quality should be expected to suffer from this type of mounting so no harm no foul...
Now I can begin, after I go to sleep and wake up again, applying the mortar to the sub boxes (which has nothing to do with trying to dampen and everything to do with chasing the look of carved stone), I spent some time learning some painting techniques and texture rolling this stuff...it will look pretty cool when finished.
Last edited:
- Home
- Loudspeakers
- Subwoofers
- Clamshell, Push-Pull Slot loaded, Alternatives....who wins?