I have been wet sanding the outer panels using water and detregent and results are ok. What can be done to protect the surface (without the expense of anodizing)? I have tried brushing on a coat of clear polyurathane varnish (lacquer?), but the results is an uneven textured finish.chipco3434 said:When sanding aluminum, always use a little detergent soap in the water (a thimple to a gallon?), and always sand with a block. (Obviously using he black, silicon carbide wet or dry paper.)
As for a brushed finish on aluminum, you can count on it looking good for a couple of weeks. That's it. I have found the best thing is to clean the aluminum thoroughly with soap and water after the sanding followed by alcohol washing. It will look pristine after the alcohol washes. Follow up immediately with a clear lacquer finish. If you preheat the oven to about 150 degrees F (doubles as a spary booth), you can blow on a couple heavy coats in a few minutes and let the finish bake for an hour.
I would have never used lacquer to paint aluminum.
The attached pic shows a preamp that was made 20 years ago, none of the panels were protected with any treatment. Besides some finger marks, which can be easily wiped off, the aluminum does not show any sign of aging. I guess in large extent it depends on the way it's brushed.
http://www.diyaudio.com/forums/attachment.php?s=&postid=144399
One quick method I'm using now to protect aluminum (if I don't want to go trough anodizing process) is dipping the panels in alodine. If you do it quickly enough, the surface will not develop any goldish hue and it will be protected. You can also brush it a bit more after alodining (with scotch brite pads) to achieve desired color/shine. It definitely looks better than raw aluminum, and is protected against corrosion. The Patek panels are treated this way.
http://www.specializedkits.com/patek.html
Try a couple washes in clean water with a little detergent. Rinse under water and force dry with a little heat. Be sure to follow up with a decent solvent wash. I prefer methyl alcohol.
For the final finish, try a SPRAY lacquer. A urethane material should produce a decent finish but a spray lacquer should be much easier to use. Lacquer will dry in less than a minute.
For the final finish, try a SPRAY lacquer. A urethane material should produce a decent finish but a spray lacquer should be much easier to use. Lacquer will dry in less than a minute.
Hi Vikash,
I've sanded aluminum , then dunked it in a sodium hydroxide solution ( possibly 20 % solution ) . It froths quite a bit. Do it in a ventillated area as the fumes will make you choke or cough.
After 5 to 10 minutes I take it out and wash it with soap and water . Then water wash it and dry it with a clean cloth and leave it for 1/2 an hour to dry fully in air. Then I spray it with a can of lacquer. One thin layer at a time with several minutes in between to let it dry before the next layer. Preferably keep the panel horizontal to avoid any flow of excess lacquer.
The finish is fine. If you want lettering , use rub on stencils before lacquering . Make sure the first layer of lacquer is thin to avoid the letters from dissolving and running. It lasts years. Only problem is that some old type lacquers turn yellow with age. The modern generation ones seem to be far better. Automotive clear (acrylic) lacquer should be good I think.
Cheers.
Ashok.
My method for cleaning is good...
Ashok's is excellent. Those are GREAT instructions. The H2O2 makes the cleaning a "sure thing".
Ashok's is excellent. Those are GREAT instructions. The H2O2 makes the cleaning a "sure thing".
I've had excellent results with acrylic laquer, which is quick and easy, but even better using the traditional method:
Gently warm conventional laquer (ideally over water, to avoid any fire risk) until it's 'thin', and heat the workpiece until it's hot to the touch, but bearable (I'd guess about 60*C). Pour the laquer onto the centre of the piece, and quickly tilt and turn it until the coating is even - easier than it sounds - allowing the surplus to run off. The result is a thin, even coating with absolutely no 'orange peel' etc.
Gently warm conventional laquer (ideally over water, to avoid any fire risk) until it's 'thin', and heat the workpiece until it's hot to the touch, but bearable (I'd guess about 60*C). Pour the laquer onto the centre of the piece, and quickly tilt and turn it until the coating is even - easier than it sounds - allowing the surplus to run off. The result is a thin, even coating with absolutely no 'orange peel' etc.
I forgot to add....V. Important.
If you are sanding the metal sheet by hand ( like I do )
You must use a lubricant. I've tried various things but I find kerosene best . I don't know if this is available everywhere .
But I have tried enamel paint thinner ( not very volatile ) and it was OK.
Be careful , these are highly inflammable but not with the friction of sanding. They will need an open flame .
You don't need too much of it . Just enough to keep the piece wet.
So you might have to add some as you go along and get more aluminum particles.
Cheers.
ftjandra said:This is a piece I made completely by hand using a flat block and a straight-edge as a guide. I don't know how it compares to other people's work (or even PD's), but I am pretty satisfied. It's hard getting it completely even, not to mention that it takes hoursI think that I am only going to brush the front/sides and maybe try sandblasting the top/bottom/rear. What do you guys think?
An externally hosted image should be here but it was not working when we last tested it.
I think it looks much better than my first try outs 😀
Btw - I wonder - to acchieve such look - should I brush Al plate with dry brushing paper, with adding some water; maybe something else?
power tools
the guy i got the bandsaw off of has a website if anyone is looking for power tools on the cheap😀
just picked up a disk belt sander for $39.99🙂
http://www.halfpricetools.ca/
looking forward to seeing my hydro bill
the guy i got the bandsaw off of has a website if anyone is looking for power tools on the cheap😀
just picked up a disk belt sander for $39.99🙂
http://www.halfpricetools.ca/
looking forward to seeing my hydro bill
All holes have been cut and we're getting closer. How anyone (that means you PD) manages to do all this in a few days is beyond me. 😉
Actually I have one more hole to cut for the volume control but need to figure out how the shaft extender and knob will fit first.
I'm going to try some spray acrylic lacquer and use inkjet printer iron on transfers instead of rub-on stenciling. I may be able to get a creative logo of sort using this method. Anyone tried this?
Here's a pic of her rear-end. Quite nice don't you think.
On passing by a hifi store I noticed a Music Fidelity preamp (£1500) yesterday and started taking a closer look at the finish. I found it intriguing that even the socket cap screws were miles of centre. Funny how I start noticing this stuff now...
Actually I have one more hole to cut for the volume control but need to figure out how the shaft extender and knob will fit first.
I'm going to try some spray acrylic lacquer and use inkjet printer iron on transfers instead of rub-on stenciling. I may be able to get a creative logo of sort using this method. Anyone tried this?
Here's a pic of her rear-end. Quite nice don't you think.
An externally hosted image should be here but it was not working when we last tested it.
On passing by a hifi store I noticed a Music Fidelity preamp (£1500) yesterday and started taking a closer look at the finish. I found it intriguing that even the socket cap screws were miles of centre. Funny how I start noticing this stuff now...
Vikash said:All holes have been cut and we're getting closer. How anyone (that means you PD) manages to do all this in a few days is beyond me. 😉
Yep - I had similar question in last days ...
Around 10 days ago I've decided to build new chassis for my MC preamp - and indeed - after first evening it was "almost" finished - maybe just a hole "here and there" and then I'll just need to brush the plates and voila ...
Khhhm - well this "here and there" part became very exhausting part ... So after some 6-7 evenings it's still not finished yet ... 🙁
But I know where I did make mistakes - I was not organized well and I had to change drills and so too often - and that takes time ...
So when building up an enclosure for my Aleph preamp - I hope it will be a little faster ...
the "finishing" work is what takes so much time. im doing the last 90% on my aleph 3's, and its taking forever. i also decide to redo things and make them better, which doesnt help.
for karma
Hey karma, how was the service at that halfpricetools.ca website? Just looks a bit sketchy. Thinking of ordering some stuff from him.
Hey karma, how was the service at that halfpricetools.ca website? Just looks a bit sketchy. Thinking of ordering some stuff from him.
very Professional no problems what so ever😉
he is allso on ebay😀
its just the webpage it looks to good.
he is allso on ebay😀
its just the webpage it looks to good.
I wanted to know if there is big difference between table saw blades for aluminium. I was reading how Peter gets an almost milled like finish with two passes through his table saw, and I on the other hand have only tried the cheapest blade I could find which gives a very jagged finish relatively speaking. I'm wondering whether this is the difference between a £60 and my £14 blade.
Yes, there is difference. The geometry of teeth for metal blade is different, it's optimized for cutting non ferrous metals.
But if the results with your cheap blade are satisfactory, I wouldn't look any further. When I'm using Freud metal blade, the finish is indeed very good. I can easily cut up to 1" (or even more) thickness of aluminum or copper, the cut is almost milled like quality. All I have to do is to run it couple times through belt sander and it's all.
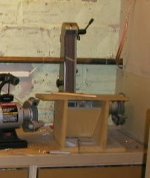
Here's the belt sander setup I'm using for finishing the edges.
But if the results with your cheap blade are satisfactory, I wouldn't look any further. When I'm using Freud metal blade, the finish is indeed very good. I can easily cut up to 1" (or even more) thickness of aluminum or copper, the cut is almost milled like quality. All I have to do is to run it couple times through belt sander and it's all.
Here's the belt sander setup I'm using for finishing the edges.
Attachments
The blade I'm using is for metal. But I bought the cheapest metal blade I could find as opposed to the freud. I'm happy with the accuracy of my cuts on the table saw but after the edges are sanded down on the belt I no longer have a perfectly straight piece. If a Freud or similar expensive blade will reduce the need to sand down afterwards then I think it may be worth investing in one.
This is the finish I get with my £14 metal blade:

This is the finish I get with my £14 metal blade:
- Status
- Not open for further replies.
- Home
- Amplifiers
- Chip Amps
- Case and metal working