The power connector cut out was done using a scroll saw. I picked one up for £20 and used the wood blade that came with it. It was difficult, but then I was only doing two cuts. Finished off with a file.
For panel sanding, 100 strokes for each grit (or 200 if you count up and down movement) and double that for the 150 grit to get rid of the initial scratches. I clean off the residue on the paper and add more water on the piece every 20 - 40 strokes depending on the grit. I also found better results by sanding in one direction rather than back and forth across the piece, but this was too time consuming to do for all the panels.
Unfortunately there are still some deep scratches which I can't do anything about. Now I place aluminium panels on old carpet underlay to prevent scratching when working on them.
i disagree. the carpet (in my shop) gets pretty dirty at times. i have metal shavings all in it, and its hard to get out because it sticks in with the fibers. when i put metal on the carpet, it typically gets scratched by something in it. i use shop rags, or t-shirts given away by vendors at my work. that works pretty well.
Using carpet is not my idea, but after working at Bombardier metal shop, I found it to be actually the best surface for metal handling. Just find the type that vacuums easily and has proper length of fibres.
Rags are not very convenient, as if you drill through them, they can be messy.
Rags are not very convenient, as if you drill through them, they can be messy.
Re: power tools
Only someone from Ontario would call electricity "HYDRO" because the electricity is supplied by Hamilton
HYDRO Electric.
One should think twice before using regional slang such as this.
🙄
BTW: I just moved out west from Ontario, so please don't take this too seriously!😀
karma said:<SNIP>
looking forward to seeing my hydro bill[/B]
Only someone from Ontario would call electricity "HYDRO" because the electricity is supplied by Hamilton
HYDRO Electric.
One should think twice before using regional slang such as this.
🙄
BTW: I just moved out west from Ontario, so please don't take this too seriously!😀
Hello there-
After reading some of this post, I decided to try and help you guys out a bit with your metalwork/finishing...
Regarding the question about the "guillotine", what you are in fact referring to is a shear, and you can expect a fairly close cut, although it is generally used to "rough out" a piece of sheet or plate, which would normally be followed by milling, depending on the accuracy required. If you ask the local shop nicely, they may take the time to get your sizes fairly close, say +- .062" (1/16th). If this is not close enough, file with a double cut ******* file until you are fairly close, then use a single cut mill file to fiish to size. For a nice finished, square edge, I would suggest "draw filing", in where one holds the file firmly at both ends and alternately pushes and pulls the file across the work. The file should be held at right angles to the line of stroke, and try to keep the pressure the same and constant for both strokes. This can also be used when finishing all sides of the work, instead of polishing or brushing. Remember to clean files with a "file card" often, before they start to clog, and check the workpiece for square and flat with a square or scale. Most of you probably have a combination set for woodworking, this would work well.
When using a hack saw, make sure you get a blade that has the proper number of teeth (pitch or T.P.I.) for the material being cut. The thinner the material, the more teeth, and ideally you want about 2-3 teeth to come into contact with the material when cutting thin stock. 18 TPI works well for general use. Also, you may find it helpful to clamp the material between two pieces of wood or other scrap material, as the blade "sees" a larger piece to cut. Remember to clamp your work in a vise for all of these operations, and don't forget to mount the blade with the teeth AWAY from the handle, and use long, even strokes.
When cutting aluminum, brass, copper or other non-ferrous materials on the table saw, it is a good idea to use a blade designed for such work. See Mr. Daniels posts regarding this, and use a constant feed (i.e. try to push it through at a constant speed). When using a band or scroll saw, try to use the correct type of blade, and remember to slow down the speed as far as it will go (when using a machine designed for wood, anyhow).
When laying out holes, etc., for drilling, use a type of punch called a "center" punch (as opposed to a "*****" punch, rimes with rick...). This will make it much easier to drill all of those holes as the bit won't wander off-center. Also, use a piece of backup material when drilling, and clamp that sucker down!! Try to use a constant pressure once again, and remember that smaller holes need to be drilled with a higher RPM (if adjustable) and feed (pushed through faster) to maintain correct surface footage (if you really want to know, I'll explain...email me). Use plenty of cutting fluid.
As for finishing, that seems to have been covered pretty well, but I would suggest some of you try using scotch-brite pads for brushing operations...they tend not to clog as much, and give a nice, even sheen. Look for them at hardware or industrial supply houses, even though you could probably get away with using the ones the dishes are done with. Give it a try and let me know what you think.
I've left a lot of info out, such as different grinds on drill bits, etc, but I hope this info helps, and if some of you really get in a bind, email me or post something, and I'll try to help out as much as I can. I do have access to a machine shop, so I may be able to help out with some of those really ambitious designs. And hopefully I'll finish my own stuff someday...presently working an a rack design out of aluminum/alum. honeycomb...post pictures when it's done. Oh, yeah, loudspeakers, too!!
Chris
Re: Re: power tools
electricity😀
Frazzled said:
Only someone from Ontario would call electricity "HYDRO" because the electricity is supplied by Hamilton
HYDRO Electric.
One should think twice before using regional slang such as this.
🙄
BTW: I just moved out west from Ontario, so please don't take this too seriously!😀
electricity😀
Peter Daniel said:I would have never used lacquer to paint aluminum.
One quick method I'm using now to protect aluminum (if I don't want to go trough anodizing process) is dipping the panels in alodine.
Hi Peter, may you try to translate what 'Alodine' is ?
I tried to use some translators online but I didn't find the italian term. do you know any commercial product that can guide me in finding what's the italian equivalent for alodine?
Thank you very much!
Faber said:
Hi Peter, may you try to translate what 'Alodine' is ?
I tried to use some translators online but I didn't find the italian term. do you know any commercial product that can guide me in finding what's the italian equivalent for alodine?
Thank you very much!
Look HERE😉
Great! Actually I understood that in Italian, alodine is... alodine 😱
I just have to find out where to buy it and how to manage the waste.
Thank you a lot!
I just have to find out where to buy it and how to manage the waste.
Thank you a lot!
A mock assembly of the amp. The beech panels have yet to be finished and attached, but I just couldn't wait to see all the amp parts together. 😀
Now it really looks like PD's design. Although it began unintentional, it's finished a clone chasis for a clone amp. 😉

Now it really looks like PD's design. Although it began unintentional, it's finished a clone chasis for a clone amp. 😉
woods is good gives it some style verry nice.😉
to mount the wood will the screws be on the outside or inside for that clean look?
to mount the wood will the screws be on the outside or inside for that clean look?
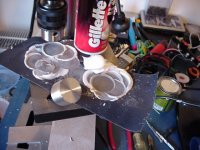
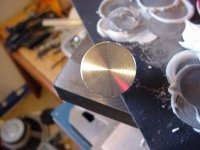
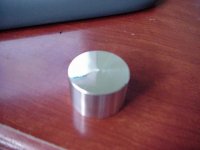
repairing that aluminum knob
not sure if it would work with other ones but i have this solid
aluminum knob that had some scratches. not anymore.
i used a drill press. i first tryed oil on the sandpaper but it went
all over. hmm i have a idea lets try shaving cream and guess what it works. here are few pics😉
not sure if it would work with other ones but i have this solid
aluminum knob that had some scratches. not anymore.
i used a drill press. i first tryed oil on the sandpaper but it went
all over. hmm i have a idea lets try shaving cream and guess what it works. here are few pics😉
Attachments


NICE WORK KARMA
Nice work, I have a few knobs I will try this technique with.
Hey is that the JOBMATE drill press Canadian Tire had on sale a while back? I purchased one while I was in Hamilton and with the rebate it cost less than $30 (thats CAN$)
😀
Nice work, I have a few knobs I will try this technique with.
Hey is that the JOBMATE drill press Canadian Tire had on sale a while back? I purchased one while I was in Hamilton and with the rebate it cost less than $30 (thats CAN$)
😀
I mounted them on the outside using recessed socket head bolts. Just the front panel to do now.karma said:to mount the wood will the screws be on the outside or inside for that clean look?

Vikash said:
I mounted them on the outside using recessed socket head bolts. Just the front panel to do now.
An externally hosted image should be here but it was not working when we last tested it.
but that is better
😀
nice work
- Status
- Not open for further replies.
- Home
- Amplifiers
- Chip Amps
- Case and metal working