Here is the place to post Tips Tricks and a vast array of knowledge about Subwoofer construction.
Please add if you see anything missing.
Mikee55 🙂
Please add if you see anything missing.
Mikee55 🙂
Nice idea Mike. I have been reading this forum for a few years now and I have to giggle sometimes at some of the construction advise offered.
I am a licensed journeyman carpenter by trade, so it's fair to say that I am a reliable source.
Tools: I am spoiled, I have everything.🙂 With that said, you don't need much to get excellent results. If you lack tools and the skill to use them, keep your project simple.Plan your project carefully. Prepare a cut list - this will be the size of all of the sides, top and bottom of your box. Take the list to your lumberyard (Homedepot, etc.) have them cut the parts. Measure the parts before you leave to make sure they are the right size. The worst is over!
You should have some basic hand tools such as hammer, saw , drill + common size bits, screwdrivers and clamps - big ones, as in big enough to clamp acroos the box. A jigsaw in a must( maybe you could borrow one) and if you want to get fancy, a router. Routers and router bits are expensive though and strictly speaking, you can make it without it.
Screws: Save yourself some grief - don't use drywall screws. They are brittle and the head can break off while driving them. Buy the best screws you can find, usually the ones for screwing down floors are very strong. Use #8 or #10 2 inches long if you are going through 3/4 inch stock into a solid wood corner brace. Don't use too many as they may split or weaken the material you are driving them into. Do not overtighten as they may break, and always drill a pilot hole.
Glue: Glue comes in a bottle, sealant comes in a tube. Modern glue makes a joint that is actually stronger than the surrounding wood. When it comes to wood, and wood products(MDF, plywood, particle board) there are only two types of glue I will use: Yellow carpenter's glue (PVA) for all interior work, and polyurethane glue for exterior or wet applications. Both of these will form the strongest, permanent bold possible. Both of these glues work best when applied liberally to the tight fitting joint and clamped till dry. The excess will squeeze out. If you find that your joints are not tight and you lack the ability to fix it, use of the polyurethane glue will actually bridge the gap, as it foams during the drying time. It can easily fill an eight inch gap( 2 MM).
Just the basics.
Have fun
John
This seems a suitable thread to ask in and should be very useful overall 🙂 . When veneering, would you wrap the veneer around edges or must it never be folded? I'm talking about the iron on veneers such as these:
https://secure.wilmslow-audio.co.uk...26_42&osCsid=01184530342bb42604c096ad0a661887
My B&W speakers seem to have it wrapped around but it doesn't look like real wood anyhow.
https://secure.wilmslow-audio.co.uk...26_42&osCsid=01184530342bb42604c096ad0a661887
My B&W speakers seem to have it wrapped around but it doesn't look like real wood anyhow.
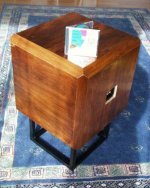
Oh Joy! ... sub box makin' ... Got any pics?
(That glue tip from MJL21193 is a great help. The screws, too)
(That glue tip from MJL21193 is a great help. The screws, too)
Dr.EM: You should veneer one face at a time. Cut your pieces slightly larger, iron on and then CAREFULLY trim off the excess. Save the face of the box for last. Patience is key.
Dr.Em,
My old 602's were wrapped with black ash effect vinyl. Thats probably why it goes round the corners nicely - it's not veneer!
Rob.
My old 602's were wrapped with black ash effect vinyl. Thats probably why it goes round the corners nicely - it's not veneer!
Rob.

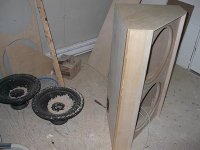
soiled my drivers ... is that like spottened your briches ?? 😀
Carefully, with the shop vac set to lowest, right?
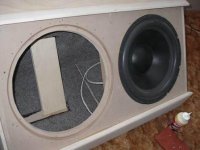
What did you end up stuffing that box with?? Or did it need any?
" ... and were very liberal with internal bracing! ..."
That's the hot tip from GR-Research.com as well = lots of bracing, corners, across the "flat lands" = the broad surface area between the corners. Check out his plans (pdf files on line).
Carefully, with the shop vac set to lowest, right?
What did you end up stuffing that box with?? Or did it need any?
" ... and were very liberal with internal bracing! ..."
That's the hot tip from GR-Research.com as well = lots of bracing, corners, across the "flat lands" = the broad surface area between the corners. Check out his plans (pdf files on line).
I wish I had some pictures of the insides of some cabinets I saw while working at a pro audio company. They only used baltic birch plywood and were very liberal with internal bracing! I've seen some of the cabs with 2 15s take a 10 foot drop onto a stage and the damage was mainly cosmetic.
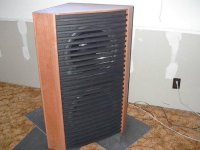
" ... two layers of 3/4"MDF ... plus an outside layer of 1/2" maple veneer ply ..."
!! no wonder it weights 200 plus pounds !! I would bet the amp and speakers are only about 1/4 of the total.
The result is quite handsome ... keep up the good work. Canadian wood, naturally 😉
!! no wonder it weights 200 plus pounds !! I would bet the amp and speakers are only about 1/4 of the total.
The result is quite handsome ... keep up the good work. Canadian wood, naturally 😉
No amp inside. Seperate 500++ watt amp chillin' on the rack.
The drivers have 8 pound magnets on each so that's 16 of the 210. It stays put.
The drivers have 8 pound magnets on each so that's 16 of the 210. It stays put.
MJL21193 said:A fairly robust enclosure weighing in at 210 pounds.
I'll say! Are the panels laminated or screwed together (or both)? Remember to lift with your legs... or a handtruck 😉
More tips:
Don't use solid wood unless you are an experienced builder who knows all of the challenges involved with solid wood.
Solid wood (every, all) is not very stable, as in it expands and contracts with varying moisture content. Raw wood will absorb moisture directly from the air unless fully sealed on all sides. Most wood will be at it's most stable at 4% to 6% moisture. The only reliable way to measure this is with a moisture meter.
Using sold wood means applying a coat of sealer to the inside of the box as well as the outside. Solid wood is more stable along it's grain than across it, therefore joining two panels with the grain perpendicular (as in the top joined to the back etc.) will cause BIG problems.
The dangers of solid: You build your beautiful pine speakers, with two coats of your favourite stain and 3 coats of high quality polyurethane, mount your new 7" midwoofer and tweeter inset flush with the surface. AWESOME! Two weeks later you notice a crack above and below the woofer. It gets bigger, and bigger as the weeks pass and other cracks open up, especially at the corners... all you effort gone to waste.
This is due to the wood loosing moisture as it was not dry enough to use when you used it.
As well as the box cracking, there is the real possibility of damaging the drivers, literally by crushing them.
Some people find knots appealing, giveing a rustic charm. Knots are the MOST unstable areas of any board. They will warp and distort the board. They can loosen and fall out. They can endlessly leach sap. They are not your friend!
For best results in all your speaker building endeavers, stick with a stable material such as MDF, particle board or plywood. For the most part, veneer will look just as good if not better than solid, if applied properly.
Have fun.
- Status
- Not open for further replies.
- Home
- Loudspeakers
- Subwoofers
- Cabinet Building Technique of the Fanatics