Try aluminum oxide ceramic insulators and a little goo, no problems with thermal breakdown or peacing; they may not be the best thermal conductor but they are certainly good enough; a good compromise I think.
That's what I eventually used and you are right - the are good enough. Arctic Silver as paste. But I still want to experiment with some of the others.
Attachments
McBob,
is your "artic silver" squeezing out and shoting the transistor to the heatsink?
The problem you are describing with mica is unknown to me. Mica always works, provided it is not cracked and it is between the metal interfaces.
The clamping method is very good for Thermal resistance, but there is no "location" of the mica sheets. This means that slight movements (or large) can occur between the mica and the metal surface of the transistor. Care must be taken to stop the mica becoming too misaligned.
But for class A output devices I'm sticking with the Keratherm. Just a pity they are not re-usable...
I have used aluminum oxide ceramic insulators in all my class A amplifiers, never had any problems, so I have not had any reason to go back to mica or sil pads, both of which I have experienced failures.
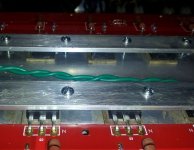
I am thinking of attaching the power boards for a BA-3 design to the heatsinks. Possibly 10mm standoffs in metal or nylon.
Is this too close? Will it effect the cooling capacity of the heatsinks?
Good to get some feedback.
Chris
Is this too close? Will it effect the cooling capacity of the heatsinks?
Good to get some feedback.
Chris
Hey Andrew, I put the compound on so thin that I doubt there was enough to squeeze out. Alignment and the width of the mica was most likely the problem. Next time I try it I'll use a size that has a margin on both sides. Top to bottom had plenty of coverage.
 I never thought about it before now, but the "silver" element - which is great for CPUs, might not be the best choice for FETs when using super thin pads. That product is designed for use where the top of the processor is current isolated - I believe. At one mil there could be some continuity through the paste itself. I'll make sure I use a grease without a metallic element in the compound on the next application.
I never thought about it before now, but the "silver" element - which is great for CPUs, might not be the best choice for FETs when using super thin pads. That product is designed for use where the top of the processor is current isolated - I believe. At one mil there could be some continuity through the paste itself. I'll make sure I use a grease without a metallic element in the compound on the next application.
Last edited:
All heatsink compounds are thermally conductive, but some are specified as electrically conductive. So just check for the latter spec.
Ceramique 2, tri-Linear Ceramic thermal Compound, By arctic Silver 😀... I'll make sure I use a grease without a metallic element in the compound on the next application.
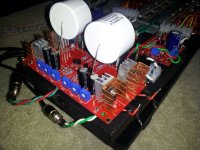
Back to the sound - I just installed the Mundorf EVO-Oil caps. Sometimes it seems like all the circuitry in an amp is there just to support the input cap. The BA-3 really came alive with this implant. The already clean output got even cleaner with more space between instruments and voices. Bass so defined I can almost hear the cycles in pads and electric bass notes. Maybe the most impressive is hearing the extended airy tail on a cymbal hit.
The only thing missing is a little depth of stage, but that may occur after extended use. I'm running the Isotek accelerated burn-in now and expect even better performance later in the day. A very nice cap for a super clean amp.
Note the unusual shape - short end to end - with a larger diameter.
BTW: I used a temporary mount, as on the MyRef FE tuning process, the rotation of the cap(s) produced real differences in the character of the sound. Don't know if that will apply here.
Attachments

Last edited:
FWIW: This amp/cap combination is making me smile. On small groups like New York Voices, Manhattan Transfer, Phoebe Snow, Miles Davis Quintet and Bobby McFerrin - the sound is scary good. Some passages could even be called breathtaking. The body and dynamics are much better than I expected. The reputation of Pass amps to deliver distortion free clarity has certainly been supported by what I'm hearing so far.
I'm not quite as happy with how massive orchestral pieces are reproduced. There still are no undesirable artifacts, but selections like The Planets, Pines and Fountains of Rome and other complex works are less dynamic - slower resolution and have an apparent shortage of headroom. I haven't added a preamp yet and some of that may be resolved when I do.
I got a reply from NP about bumping up the VA of the transformers stating the 32 volt examples in the article is right at the top edge of acceptability, so I won't go there. I'm assuming the extra two output boards should increase the "head room" but I'm not sure if increasing the bias will also help. I'll find out when the final build happens.
But all in all - this is a great amp and I'm looking forward to some tweaks and tips from the experienced builders.
Single ended I believe.
I have complimentary output and one of the nice things about it to me is that it sounds great playing girl with guitar as well as more complex music. This may also have a lot to do with the speakers that are used.
I have complimentary output and one of the nice things about it to me is that it sounds great playing girl with guitar as well as more complex music. This may also have a lot to do with the speakers that are used.
Looks like those Sunflowers drop below 8 ohms and you may be just running out of current. A push-pull output stage like the BA-2 is able to deliver quite a bit more current into lower load impedances. Everything is a trade-off. If your heatsinks can handle it, you can do something like swapping the 1 ohm source resistors for say .68 ohms, which would take it up to 2.6 amps or so. Of course always set the DC offset back to zero after warm-up when changing anything in the circuit. Guys will usually run as much bias as they can get away with for the best performance.
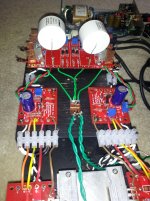
Single ended. I chose it because it was reported to run hotter and I took it as a challenge for liquid cooling. Might have made a different choice had I known how good these sound.
I'll push the bias when I get the outputs on the permanent heatsink.
I'll push the bias when I get the outputs on the permanent heatsink.
Last edited:
It should squeeze out. I would be tempted to say it must squeeze out to ensure the whole interface has no air in between. The squeezed layer is likely to be <0.5mil and has very little volume. All the excess should become a tiny rim of compound running around the perimeter. The top and bottom excesses will merge. There is the potential for an electrical short if the compound is electrically conductive. This cannot be avoided in a good thermal joint. The tighter it is clamped the thinner the compound layer.I put the compound on so thin that I doubt there was enough to squeeze out................
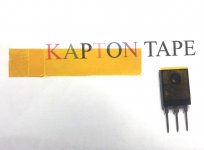
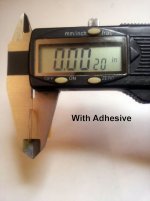
The Kapton is some interesting stuff. It feels thinner that office and package sealing tape. If used with the adhesive, I guarantee there will be no pad shifting/movement. On a piece of printer paper 0.08 mm. it compresses to 0.12 mm with the adhesive on. I'll try some bare when I find the correct solvent. It would be quite easy to trap air bubbles if used without rolling it carefully on the chip. Looks promising.
Listed as 5/8" X 1 mil.
EDIT: $21.18 w/Shipping = 432" / .68" per pad = 635 pads @ $0.033 ea. 😀
Listed as 5/8" X 1 mil.
EDIT: $21.18 w/Shipping = 432" / .68" per pad = 635 pads @ $0.033 ea. 😀
Attachments

Last edited:
Bob,
why you don't use professional pre- cutted Kapton based insulator pads specified for TO247 transistors (IRFP240/9240) which provide already a thermal conductive silicone rubber coating, available from DigiKey, Mouser etc. mentioned already in a previous post.
The DigiKey part number is SPK10-0.006-00-114, or SPK10-0.006-00-90.
These parts are well suited for your application which don't need any additional work as cutting, drilling etc.
The time and money you have spend for your DIY approach is more expensive and contains many risks as buying proven and established parts.
Gerd
Bob,
I forgot to mention that by using these professional parts you will not have any trouble to get air bubble free assemble. In addition you have enough space arround the transistor to avoid shorts between package and headsink.
Gerd
I forgot to mention that by using these professional parts you will not have any trouble to get air bubble free assemble. In addition you have enough space arround the transistor to avoid shorts between package and headsink.
Gerd
GKU, You know how sometimes you get a tune in your head and can't stop singing it? I discovered the tape many, many months ago and it fell into a "I got to try that" groove. I have learned about several excellent pads including Keratherm from the forum store and the pads you recommend (thanks for the stock numbers) - but sometimes when you get an itch, ya just got to scratch it 😉 😀
As you are probably aware, I'm experimenting with liquid cooling amps. Within that process I'm looking for the best combination of efficiency and cost to get the heat from the transistor into the cooler. When I have all the thermal interface options at hand I will do the comparisons using the two FET Amp Camp and/or the F5. That should point to the best solution for a build with up to 24 transistors. There may not be a significant difference between the pads for what I'm trying to do, but I'll know only from some hands-on tests.
Besides all that - There are a bunch of dudes around the threads who have been trying to bust my chops about being too "Romantic" in my approach to this audio/amp/DAC stuff. This way I can counter with - "Remember when I did that science based............"
More to come.........😀
Attachments
Last edited:
6L6 tells that if I wanted a Pre for my now completed F5turbo the BA-3 Would be a good thing to bring the audio source (Pc-Laptop) up to driving F5t full level.
am I going in a good direction ? but mostly ... do I need to modify anything or do I just plug BA-3 output into F5t input ?
Cheers
am I going in a good direction ? but mostly ... do I need to modify anything or do I just plug BA-3 output into F5t input ?
Cheers
I would go for something a little different, personally. THe ba3 FE is fantastic, but has more drive capability than is needed for the F5T. I would look at the "Preamp ideas for an F5" thread. THese are specifically dialed in for an F5. Juma has a nice PP amp with only a little gain.
BA3 driving a buffer is hard to beat, but a buffer has no personality, per se. The F5T does. I cannot guarantee the BA3 will mix well with the F5T.
BA3 driving a buffer is hard to beat, but a buffer has no personality, per se. The F5T does. I cannot guarantee the BA3 will mix well with the F5T.
- Home
- Amplifiers
- Pass Labs
- Burning Amp BA-3