I actually remember when I was 5 years old and wondered what would happen if I bent my sister's bobby pin and inserted it into the power outlet. 😱
An update to my blown fuses... and thanks!
It was simply the result of my amateur mistake of not paying attention when inserting the measurement probes into my DVM. I inadvertently plugged the black into red hole and the red into black the previous time I'd used it to measure ACV. So at the tip of the probes +31V and -31V were reversed!
Thankfully, I figured it out the night before BAF. I'm even more relieved that when I applied power correctly I was able to easily adjust zero offset and the thing worked! It is dead quiet and a HUGE improvement over my old Parasound phono pre. It was great spinning vinyl through Nelson's F8 prototype at Burning Amp! Carlos Santana never sounded better!
Thanks Wayne!, for sharing your design of an incredible piece of equipment. Also thanks to all of you, especially Jim, for all of your guidance and encouragement that helped me overcome my fear of messing things up! It was well worth the effort!
When I have time I'll post some pics. 🙂
I am in the midst of finishing the boards of the Pearl 2. My first advanced DIY electronic project. I realized that I need to get better at soldering, especially big caps 🙂 While I am waiting for a soldering wick to arrive in the mail, does anyone have recommendations for a good switch that I can install for changing impedance on the fly? I am going to use this preamp with a cart I have not used before, an Audio Technica Art7, that has a very low output of .12 and there is not a consensus on the best loading value. Right now I installed resistor sockets but I want to avoid opening the case every time.
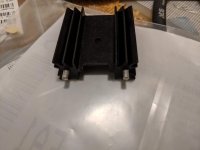
Also, I have never installed regulators with heatsinks before, I noticed that the heatsinks don't have threaded posts, do I have to solder them to the board? If so, that will test my skills for sure. 😱
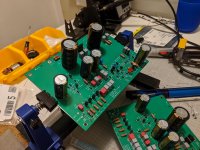
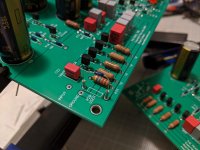
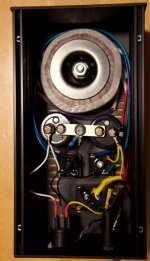
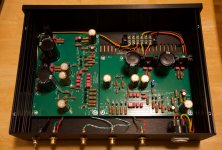
Here are some pics of the progress. I had some soldering mistakes that I need to fix and one of the smaller caps I mistakingly installed backward. It's getting there. I had a bad injury so I had to put this on hold for a while.
Also, I have never installed regulators with heatsinks before, I noticed that the heatsinks don't have threaded posts, do I have to solder them to the board? If so, that will test my skills for sure. 😱
Here are some pics of the progress. I had some soldering mistakes that I need to fix and one of the smaller caps I mistakingly installed backward. It's getting there. I had a bad injury so I had to put this on hold for a while.
Attachments
Last edited:
How often are you actually planning on changing carts? I'd personally keep the sockets on the resistor and loading cap and call it good, since once you have it dialed in you'll not change it anymore.
The heatsinks solder to the board. It takes a while to get some heat into them, because after all, they are heatsinks...
The heatsinks solder to the board. It takes a while to get some heat into them, because after all, they are heatsinks...
How often are you actually planning on changing carts? I'd personally keep the sockets on the resistor and loading cap and call it good, since once you have it dialed in you'll not change it anymore.
The heatsinks solder to the board. It takes a while to get some heat into them, because after all, they are heatsinks...
That's a good point 6L6 and much appreciated!! Once I get the phono stage up and running, I'll have a listening evaluation and then call it done.
I'll probably post a lot more about the power supply and appropriate voltage checks.
By the way 6L6, thanks a bunch for answering a previous post about parts for my Pearl 2, I forgot to reply after I got back from being sidelined. Your help is invaluable!

OK I have boards and I’ve downloaded BOM. Where do you start with purchasing parts? Looking at caps I could spend 84 pounds each on Audionote ones or under 10 dollars. Some resistors are $20 others 87cents. Where do you get best bang for your money?
Re the caps 25mm for the 10000uf 35volt seems very restricting in choice 30mm dia looks better but would be tight fit with the heat sinks. If I had a diy Audio store case with 10mm thick front could you use the case as your heatsink and Mount the regulators off board?
Re the caps 25mm for the 10000uf 35volt seems very restricting in choice 30mm dia looks better but would be tight fit with the heat sinks. If I had a diy Audio store case with 10mm thick front could you use the case as your heatsink and Mount the regulators off board?
Vishay Dale RN series mil spec for resistors and Nichion or Panasonic electrolytics seem to be a the go-to components. No need for exotic stuff here.
I suggest you start with mouser, digikey, etc. ... they should have most of the parts you need. If you need more "audio specific" parts you can try hifi collective.
25mm 10000uF caps for example: https://www.mouser.at/Passive-Compo...aded/_/N-75hqwZ1yzvvqxZscv7?P=1z0wqs8Z1z0j7l0
25mm 10000uF caps for example: https://www.mouser.at/Passive-Compo...aded/_/N-75hqwZ1yzvvqxZscv7?P=1z0wqs8Z1z0j7l0
I'd like to put the two boards end to end in a Slimline 1U case if possible so it would fit in front of my record player in a long low case. Power supply can go at ground level below it.
I'd need to keep the caps short if board mounted 30mm height max that still leaves a big choice on Digikey and mouser but plenty of brands i've never heard of - anything to avoid?
I'd need to keep the caps short if board mounted 30mm height max that still leaves a big choice on Digikey and mouser but plenty of brands i've never heard of - anything to avoid?
I used a grab-bag of PRP, Dale, and Vishay resistors. I doubt there is any audible difference; I picked based on availability and how spiffy they look. I use Nichicon caps almost exclusively. The 30mm caps will cut into the spread-fin heatsinks, but I use leftover sinks from my BA-3 project and there are still others who don't use sinks on the regulators at all.
I love this board great answers thanks as always. Caps I want to use are 30 x 30mm but the regulators could be mounted just off board on the 10mm thick case front that can be optioned from the store. Lots of fun to be had.
Cheers
Steve
Building stuff is proving a bit addictive though 🙂
Cheers
Steve
Building stuff is proving a bit addictive though 🙂
The heatsinks don't need to be very big, so something suitable that fits in the chassis will work fine. 1". 25mm, etc... There are short capacitors, and they could be the next value smaller (8200uF) and have zero effect on overall noise performance.
Here's a great cap for the regulator, 30mm dia and 25mm tall -
661-EKMQ350N103MR25S
As for choosing RIAA capacitors, modern MKP (PP or Polypropylene) capacitors are getting better and better every generation. There's little reason to spend money on boutique caps when Wima, Kemet, Epcos, etc... (the ones easily available from normal electronic distributors) are fantastically good, even if you take price from the equation. People buy expensive caps because it makes them less nervous, as far as I can tell...
The film caps are all 5mm lead spacing, these will all fit within the outlines and work and sound perfectly -
0.033uF 80-PHE426DJ5330JR05
0.01uF 505-MKP2D021001BJC00
0.1uF 80-PHE426DJ6100JR05
100pF 505-FKP2O101001D00JO
As for resistors, my preferred is the dale RN55 series, they say 1/8w on the data sheet but are actually 1/4w because they are 100% derated for a mil spec. Metal film 1% 1/4 from Yeago and Xicon are also quite good.
6L6 Thanks for that. I'll work through the list and put costs into the spreadsheet and see what I get for a total. My Job's up in the air but keen to finish what i've started provided the total cost doesn't put it on hold.
Last edited:
Very nice. I’m thinking and out building the PSU the same way. How does everything?
How does everything SOUND?
- Home
- Amplifiers
- Pass Labs
- Building a Pearl 2