Now that I have tried this amp in different configurations, I can confirm that one of the most worthwhile adjustment upgrades (free!!) available (at least with Fairchild FE MOSFETs), is to pump up thr FE bias. There is a quite remarkable difference between 45 and 65mA Iq per device. Try it 🙂 Different PSUs and rail voltages, same results. Higher Iq is more defined, cleaner but at the same time warmer sounding. FE set for minimum distortion and yet don’t miss a thing.
I have the AJ Zen and the F2. Still, this PP amp is seductive. Very much so.
1 amp Iq per device in the 3 deep OS also helps of course.
I have the AJ Zen and the F2. Still, this PP amp is seductive. Very much so.
1 amp Iq per device in the 3 deep OS also helps of course.
Last edited:


^ Hmmmmm.... I may do that trick with the Fairchilds ... and compare to the other board with the Toshibas.
Thanks for the idea!
🙂 🙂
Thanks for the idea!
🙂 🙂
Since it works so well, I may put in those new R11-12’s I ordered a few years ago, so as not to loose so much voltage across the 22R’s. May keep the extra gain that will provide.
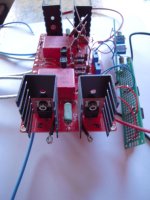
there's a hole in the front-plate!It may not be a SissySIT, but at least I am enjoying my tacos Zen Mod style
Nelson says in the article 100mA (more than double the spec) is perfectly fine ad long as we sink the Q’s properly, iow use other sinks than specced. He also suggests going even higher, which will make it nescessary to lower the values og R10-11 and 13 respectively to avoid loss of voltage swing in the output stage. When he writes that, I suppose advantages can also be made with your Toshibas. Beware if you run high voltage rails, the «stock» sinks can’t really take much more than stock if you run 32v. I used to bias them slightly higher than spec, @56mA using 32v rails. Got very hot.^ Hmmmmm.... I may do that trick with the Fairchilds ... and compare to the other board with the Toshibas.
Thanks for the idea!
🙂 🙂
Would you care to come over and fill it up? LEDs are for sissies, and my amp is a first timer, so I am not pushing it.there's a hole in the front-plate!
I need that hole for ventilation, that amp is so hot you can feel it entering the room. My own living room Jenna. 140 watts per chan.
I hear the air being sucked into the box, ca 2.5kHz, from here where I am 🙂
Yes, yes. On good days, my Jenna reaches even the top octaves.I hear the air being sucked into the box, ca 2.5kHz, from here where I am 🙂
77mA even better. All bass mudiness gone. Continuing in time to 100mA+ (need more sink, and pots with more range )
)


I’ll try not to. In the meantime: you have any tips how to supersink the FE mosfets in a supersmart Cubicincher way?
Hello Andy,
there is no 'supersmart' Cubicincher way. Why? Because Cubicincher isn't that smart! 🤣
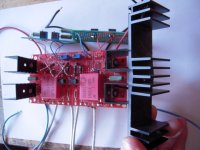
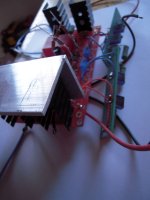
When I run output-transistors in my preamps or driverboards the 'hot way', I often make my heatsinks on my own. Take a simple piece of aluminum (flatbar of ca. 2 - 3mm thickness / right angle bar). If I use a 90degree
aluminum angle, then I bore holes on the topside (the horizontal part), so that there is some better airflow.
Many options. Big surface of the aluminum heatsink and good airflow help.
Or you could mount the output-Mosfets to the case of your amp and put/solder the gate-resistor directly to the leg of the Mosfet and prolong with some short wires to the pcb?
Cheers
Dirk 😉
there is no 'supersmart' Cubicincher way. Why? Because Cubicincher isn't that smart! 🤣
When I run output-transistors in my preamps or driverboards the 'hot way', I often make my heatsinks on my own. Take a simple piece of aluminum (flatbar of ca. 2 - 3mm thickness / right angle bar). If I use a 90degree
aluminum angle, then I bore holes on the topside (the horizontal part), so that there is some better airflow.
Many options. Big surface of the aluminum heatsink and good airflow help.
Or you could mount the output-Mosfets to the case of your amp and put/solder the gate-resistor directly to the leg of the Mosfet and prolong with some short wires to the pcb?
Cheers
Dirk 😉
Attachments
- Home
- Amplifiers
- Pass Labs
- BA-3 Amplifier illustrated build guide