Wood panels are extremely expensive at the moment because the US pays very high prices in the whole world market. In Canada there is currently a major problem with pests, which is why only little wood can be delivered to the States from there.
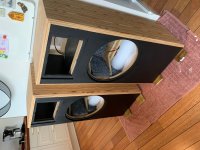
The resonances from the horn are in a frequency range that lies outside the usual transmission range and they are also significantly lower when the horn is installed. Therefore it is not absolutely necessary to dampen it. But of course it doesn't hurt either.
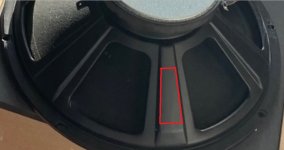
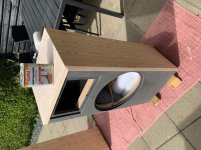
In the case of the woofer, the bitumen in the middle of the struts works best. I would simply stick on the area marked in the picture.
The resonances from the horn are in a frequency range that lies outside the usual transmission range and they are also significantly lower when the horn is installed. Therefore it is not absolutely necessary to dampen it. But of course it doesn't hurt either.
In the case of the woofer, the bitumen in the middle of the struts works best. I would simply stick on the area marked in the picture.
Attachments
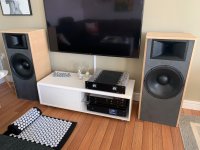
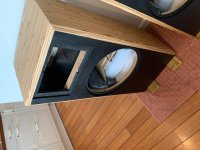
So finally i got it all set up...
Must say, that we bought a new couch recently, waiting for delivery late may, first june 🙂
So speaker's will have some more space then.
I tried moving them a bit around, they don't seem to be very sensitive to placement, stereo holographapy'nes 🙂 is there, and they spread the music in room perfectly, excatly what i wanted.
We just did a 2 hour session with an old retro playlist we created with the grownup kid's some year's back ... Speaker's don't have but a few hour's on them but they sound crispyclear and fullbody'ed so to say. With fullbody'ed i mean whatever volume level i choose, the music is "warm" and present.
Didn't tryout my 300B SE yet (I have installed the impedance filter btw.), i donno how she would sound, problem here is that my AlephJ Mimi is so good to my ears, 300B sound different on my other speaker's... but honestly not better, let's see how them tubes behave on thoose speakers 😉
Jesper
Must say, that we bought a new couch recently, waiting for delivery late may, first june 🙂
So speaker's will have some more space then.
I tried moving them a bit around, they don't seem to be very sensitive to placement, stereo holographapy'nes 🙂 is there, and they spread the music in room perfectly, excatly what i wanted.
We just did a 2 hour session with an old retro playlist we created with the grownup kid's some year's back
... Speaker's don't have but a few hour's on them but they sound crispyclear and fullbody'ed so to say. With fullbody'ed i mean whatever volume level i choose, the music is "warm" and present.Didn't tryout my 300B SE yet (I have installed the impedance filter btw.), i donno how she would sound, problem here is that my AlephJ Mimi is so good to my ears, 300B sound different on my other speaker's... but honestly not better, let's see how them tubes behave on thoose speakers 😉
Jesper
Attachments
Nice to hear that you like the sound. 
It's always a little exciting when other people rebuild your project.
That's right, the loudspeakers are not that critical in terms of placement. But I have angled them a little towards the listening position. You can test for yourself what you like best.
The Aleph J is a good amplifier - even if it is not very powerful, that should be enough for high levels. I have a Marantz PM66 SE with only 2x50 watts. You don't need more in living rooms.
In any case, I wish you a lot of fun with your great speakers.
You might consider an alternate placement, such as this video recommends:
How to position Klipsch Cornwall IV and other horn speakers. - YouTube
I tried this with my non-horn speakers last night and experienced a noticeably wider sweet spot. YMMV.
Nice work!
How to position Klipsch Cornwall IV and other horn speakers. - YouTube
I tried this with my non-horn speakers last night and experienced a noticeably wider sweet spot. YMMV.
Nice work!
Nice video...
Will try things out for sure.
@Rese66, my AlephJ is ~12-15watt only and my 300B is ~9-10watt.
With my AlephJ & my 2xgain DCG3 preamp i can play soooooo loud 😀
Jesper.
Will try things out for sure.
@Rese66, my AlephJ is ~12-15watt only and my 300B is ~9-10watt.
With my AlephJ & my 2xgain DCG3 preamp i can play soooooo loud 😀
Jesper.
That's when you realize how loud a 90dB average actually is...😀
The video isn't bad, but it's very generalized. It's not that simple after all, but a test can't hurt.
In the end, it has to fit the room optically.
The video isn't bad, but it's very generalized. It's not that simple after all, but a test can't hurt.
In the end, it has to fit the room optically.
Four sheets of Baltic birch have been delivered and I am taking a vacation day on Friday to start.
After coming across multiple comments and articles on spiking lumber prices, I was starting to worry that at $44 USD a sheet, I had somehow ordered the wrong material.
But after unloading, the delivery guy commented that I was very lucky to get this price. So yay for me.
Hoping I don't screw it up. I've built a handful of cabinets in the past and well remember the various mistakes I made. They were primarily MDF builds and the mistakes were easy to hide. This is the first time I've used plywood for a cabinet.
@Ultrachrome. focus on the outside panels. If anything goes wrong the braciing can be done with MDF without much deterioration. Else you can calculate 15mm baltic birch is about equivalent to 1" of MDF. Use masking tape to avoid ripping, best to already wood and sharp blades for the saw and router. I used to like to lacquer the baltic birch first before cutting to avoid edge rip and it helps to prevent glue drip stains. Cut everything within about +1 cm on all sides, laquer it, dry and then cut the next day to have perfect cuts. Troel explained his procedure which is the same here:Faital-3WC-15
Themost important thing is the front baffle. Do some test routings first before going for the front baffle. This can be much more difficult to do then MDF. 1mm at a time or less. take your time. Baltic birch is a great material, superior in every way to MDF except price😉
Good luck
Themost important thing is the front baffle. Do some test routings first before going for the front baffle. This can be much more difficult to do then MDF. 1mm at a time or less. take your time. Baltic birch is a great material, superior in every way to MDF except price😉
Good luck
@Ultrachrome. focus on the outside panels. If anything goes wrong the braciing can be done with MDF without much deterioration. Else you can calculate 15mm baltic birch is about equivalent to 1" of MDF. Use masking tape to avoid ripping, best to already wood and sharp blades for the saw and router. I used to like to lacquer the baltic birch first before cutting to avoid edge rip and it helps to prevent glue drip stains. Cut everything within about +1 cm on all sides, laquer it, dry and then cut the next day to have perfect cuts. Troel explained his procedure which is the same here:Faital-3WC-15
Themost important thing is the front baffle. Do some test routings first before going for the front baffle. This can be much more difficult to do then MDF. 1mm at a time or less. take your time. Baltic birch is a great material, superior in every way to MDF except price😉
Good luck
Thanks for the link. That pre-lacquering technique looks interesting but I'm left wondering if that impacts the glue bond. I'm using butt joints with biscuits for alignment.
In preparation for this build I splurged on a Makita track saw and TSO guide rail square.
It cross cuts nicely without splintering. Unfortunately, it cannot cut a straight line.
It seems that once the blade is in full contact with the wood it deflects by nearly a millimeter for most of the cut and then pulls back in as the blade is exiting the piece. Holding a straight edge against the cut edge shows the beginning and end of the cut pulling away. It's enough to throw off the square when lining up to cut the adjacent edge.
Today I practiced with some 12mm ply and used a scoring cut followed by two deeper cuts at 5 mm intervals and was able to get a straight cut. I just tried to reproduce this method on the 18mm birch but the blade is still deflecting.
I'm clamping both ends of the rail, have removed all play in the track, and am applying careful force moving the saw down the track.
Found a youtuber who had a similar issue with this saw that was solved with a new blade but it appears 165mm blades for 20mm arbors are uncommon so I have to wait until Sunday for Amazon to deliver one.
I'm going to try a couple more times but this has so far been a bust. 4 hours yesterday repeatedly, tediously measuring and cutting.
These delays imperil this project greatly. This was that one rare weekend I was going to have without childcare responsibilities.
@ultrachrome
Ahh... it's allway's annoying with such cases, but it's most proberly as the youtuber also discovered an bad (too soft) blade. I suppose you also check if there are some shaft veil; there should be next to nothing there. Also be sure that the blade is "sitting" right on the spanner arrangement (Hope you understand me, the technical word's are sometimes hard for me non native English 🙂)
When i did the cutting with my Bosch circular saw, i set the cutting deept very low, this way the blade is cutting more near the shaft of the motor. I donno if it's make a difference, but i allway's do that.
I wish you good luck.
Jesper.
Last edited:
@ultrachrome. I agree with Jesper, check how the blade is seated, make sure to exceed cutting depth only by a couple mms. You need good blades for BB.
The laquering first and then cutting leaves you a completely freshly cut section, so new problem with gluing on freshly cut, then use you biscuitsand apply glue. Also adds a little bit of strenght and avoids splinters and protects from staining.If you just want to leave it BB, ala Troels/no veneer this helps a lot avoiding dealing with glue drips. Troel is the BB man, but he uses a serious table saw.
Also when using a track saw, make sure the tack exceeds the cutting line by a good bit and really clamp that thing down. I used to use 8 clamps. Best to extend the track with a same height board underneath the "overlap" setionon a tabel. Sounds like the blade is pushed to the side at the last little bit.
I often use the Freud, Diabolo, Dewalt blades, but here any quality blade will just be the way to go. Reinforced carbide blade with enough teeth >40.
This is kind of the same for any hardwood, not just BB.
Hope that helps and good luck
So I've now squared the blade to the track, replaced the Makita blade with a more robust Freud, and finally had to shim the guide rail square. So now I can finally make straight cuts that are very close to square. In four cuts I'm a fraction of a millimeter if cuts are less than 60cm. Cutting a piece as large as the baffle in four cuts isn't quite perfect but probably close enough to be fine.
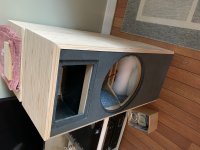
I have the top/bottom, divider, and front/back done. I need to cut the braces next and then I can begin assembly.
I have the top/bottom, divider, and front/back done. I need to cut the braces next and then I can begin assembly.
Hi...
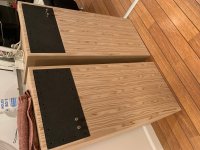
So i spent ~10h. with my veneer, glue, iron and some other stuff.
I followed the guide excatly, only thing i did besides that, was to give the veneer a bit of water with a spronge on top side.
Professionelles Finish mit SaRaiFo-Furnier - Bugelmethode - gazza-diy-audio.de
Everything went fine, and i'am really happy with the result.
I now have to try out different finish on a testpiece of wood. It proberly be hardwax on the black baffle, and lacquer on the olive-veneer 🙂 (Yes i miss Greece!)....
Jesper.
Attachments


Looks really great! With varnish or oil, the veneer will look completely different. I'm really looking forward to it.
Great job so far!
Great job so far!
Those look killer... I like the veneer... Is it that SaRaiFo stuff? Veneer work scares me, but seeing results like yours make it awfully tempting.
Thank's all!
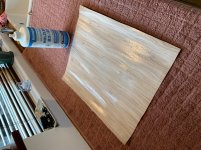
I tried as i wrote before on a piece of scrap wood, both lacquer and hard-wax-oil.
The lacquer. Same test on a piece of black mdf(hdf).
The lacquer was not the best on the black piece, and on the veneer it did not add much glow to the three... I normally like the highglossy look of the lacquer, but wax-oil is better on the build i do here 🙂 --- Soo i gave them 2 layer.
The end result is really satisfying for me, at least i am satisfiyed 😀
Jesper.
Yes it's the SaRaiFo, with fleece on backside. -I had problems finding glue which was not fast setting glue, so i ordered it in Germany (out neighbours) -While i was at it i ordered the wax-oil and lacquer there also...Those look killer... I like the veneer... Is it that SaRaiFo stuff? Veneer work scares me, but seeing results like yours make it awfully tempting.
I tried as i wrote before on a piece of scrap wood, both lacquer and hard-wax-oil.
The lacquer. Same test on a piece of black mdf(hdf).
The lacquer was not the best on the black piece, and on the veneer it did not add much glow to the three... I normally like the highglossy look of the lacquer, but wax-oil is better on the build i do here 🙂 --- Soo i gave them 2 layer.
The end result is really satisfying for me, at least i am satisfiyed 😀
Jesper.
Attachments
- Home
- Loudspeakers
- Multi-Way
- Asathor - a JBL 4367 Clone