This is how a toroidal can be wound for a ribbon tweeter.
What kind of power handling Gerhard ..... ?
great 
do you use iron powder core, as used in crossover toroid
supposed to work like an air gapped
or is it air gapped
do you use iron powder core, as used in crossover toroid
supposed to work like an air gapped
or is it air gapped
The toroidal on the picture is ca.5cm in diameter so power handling should be no problem. You could use a bigger one. I dot not know exactly what material the toroid on the picture is made from but all ferrites are a kind of sintered powder . The advantage of ferrites is that they do not have Barkhausen effect. That makes a cracking noise at low level as your physics teacher may have shown you. On the Epcos website you can learn about the properties of ferrite. The AL value tells you how much windings you need. The higher the AL, the less windings you need for the same inductance. Also choose a material that can be magnetised at audio frequencies. A lot of modern ferrites are optimised at frequencies over 100kHz for SMPS and have a very weak curve under 20kHz.
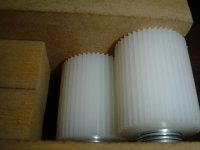
The toroid I'm using is 2.4" OD and .5" high. Based on the calculations and measurements I did for the original ribbons, it should easily handle the frequency range and 30+ watts , which should be plenty. BTW, the toroid I'm using is a type 77 all ferrite (no gap).
I think .25" X 2" might be too small as it is less than half the cross sectrional area of the .75" X 1.5" I'm planning to use.
Denis
I think .25" X 2" might be too small as it is less than half the cross sectrional area of the .75" X 1.5" I'm planning to use.
Denis
I've done a Femm simulation to optimize the field strength in the gap. I'm getting nearly 1 Tesla which is almost twice the original prototype. This should get me an efficiency in the ball park of what I'm looking for (90+ dBm).
As always, suggestions, comments or questions are welcome.
Denis
Have a look at this post (#623): http://www.diyaudio.com/forums/planars-exotics/50162-another-diy-ribbon-thread-63.html#post2273734. hhf_pm has made a nice easy to use spreadsheet to estimate the efficiency of a ribbon. Doubling the strength of the magnetic field would bring 6 db sensitivity.
Bruno
I just received the .5" X .5" X 2" N45 magnets from CMS Magnetics and man, are these things STRONG! I'm having trouble pulling them apart. This is going to take some planning to get them pulled apart and then get them positioned on the frames.
I just received the .5" X .5" X 2" N45 magnets ............... man, are these things STRONG!
I'm having trouble pulling them apart.
yeah, that size would be pretty strong
slide them apart using you thumb, and get it into your hand
be sure to hold it tightly inside your hand
dont open your hand or let go even one bit

keep other magnets well away
when placing a magnet, place it with some distance to other magnet, and slide it in place
before placing each magnet I like to move it over other magnet, holding it tightly inside my hand
this way I get a clear "picture" of correct polarity
but without knowing details of your magnet design its hard to say what kind of problems you are facing
but as you say yourself, bigger systems will need careful planning
tinitus - Good advice on the magnets. The site lists them as having nearly 55 lbs of pulling force. I'm able to get them apart by sliding them apart and twisting the magnet so it is at a 90 degree angle to it's neighbor. Then I can pull them apart.
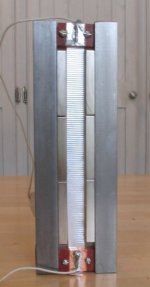
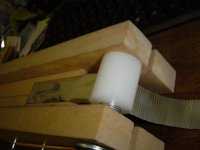
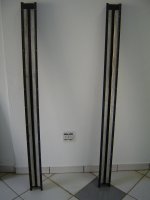
FYI, the ribbon is basically the same as my original prototype (attached) except the magnets are twice the thickness and the frame is also bigger stock.
BTW: I got my ferrite toroids today but I just found out the steel is back ordered so I don't know how much longer it will be. I won't be making much progress until it gets here.
Attachments
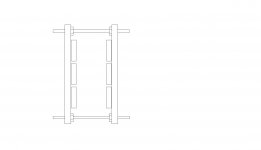
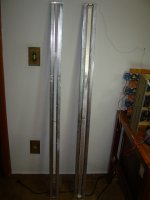
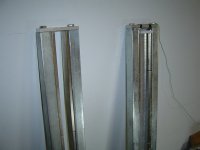
I dont know if this drawing makes sense
threaded bolt rods are holding the steel bars
when magnets are in place, the steel bars can be brought closer together by turning the nuts
when placing magnets I would wrap opposite bar with thick cloth, just in case
threaded bolt rods are holding the steel bars
when magnets are in place, the steel bars can be brought closer together by turning the nuts
when placing magnets I would wrap opposite bar with thick cloth, just in case
Attachments
Still working my way through all the thread, but I am wondering if anyone knows how to work out the thiele small parameters?
It seems really easy to do, just need to play with FEMM for a while before breaking out the cash...
It seems really easy to do, just need to play with FEMM for a while before breaking out the cash...
tinitus - Interesting approach. When I made my original ribbons, I assembled the vertical frame rails separately. I then put them together separated by 1/2" Styrofoam sheet and applied the cross bars. I then removed the Styrofoam. I'm a little worried that the stronger magnets will make it difficult to remove the Styrofoam with this design so I may have to try the threaded rod approach.
wrinkle - I'm not sure thiele small parameters apply to ribbon tweeters. I've not seen them published for commercial ribbon tweeters.
wrinkle - I'm not sure thiele small parameters apply to ribbon tweeters. I've not seen them published for commercial ribbon tweeters.
Hi folks,
I'm just here to show my work in a little ribbon tweeter that will be installed in my line array asap 😀
I hope you enjoy it.
Nanocrystalline core that im using in the ribbon:
Corrugation machine:
Ribbon tweeter almost assembled:
Some tests:
YouTube - Diy Ribbon Tweeter prototype
YouTube - Diy Ribbon Tweeter prototype
YouTube - Diy Ribbon Tweeter prototype
Specs:
2 bars of sae1020 steel, with 7/8"x7/8" to act as pole pieces.
30x (15 each side) 100x20x6mm Grade N50 neodymium magnets with a 22mm of gap.
20mm aluminium foil (0,0125mm=12,5 microns).
I have a lot of work to finally finish my line array and ribbon too, im on last year of college and i have to make a final paper, but when i got a little time to spend i will post all the work spent on this little baby.
[]'s
Murilo
Ps: take off th. from images url to see these ones on higher resolution.
I'm just here to show my work in a little ribbon tweeter that will be installed in my line array asap 😀
I hope you enjoy it.
An externally hosted image should be here but it was not working when we last tested it.
Nanocrystalline core that im using in the ribbon:
An externally hosted image should be here but it was not working when we last tested it.
Corrugation machine:
An externally hosted image should be here but it was not working when we last tested it.
An externally hosted image should be here but it was not working when we last tested it.
Ribbon tweeter almost assembled:
An externally hosted image should be here but it was not working when we last tested it.
An externally hosted image should be here but it was not working when we last tested it.
An externally hosted image should be here but it was not working when we last tested it.
An externally hosted image should be here but it was not working when we last tested it.
An externally hosted image should be here but it was not working when we last tested it.
An externally hosted image should be here but it was not working when we last tested it.
Some tests:
YouTube - Diy Ribbon Tweeter prototype
YouTube - Diy Ribbon Tweeter prototype
YouTube - Diy Ribbon Tweeter prototype
Specs:
2 bars of sae1020 steel, with 7/8"x7/8" to act as pole pieces.
30x (15 each side) 100x20x6mm Grade N50 neodymium magnets with a 22mm of gap.
20mm aluminium foil (0,0125mm=12,5 microns).
I have a lot of work to finally finish my line array and ribbon too, im on last year of college and i have to make a final paper, but when i got a little time to spend i will post all the work spent on this little baby.
[]'s
Murilo
Ps: take off th. from images url to see these ones on higher resolution.
Last edited:
Wish I could see larger vesions of the pics. I click on them and they donna get any bigger!
But looks great.
Mark
But looks great.
Mark
Wish I could see larger vesions of the pics. I click on them and they donna get any bigger!
But looks great.
Mark
Thumbnail
http://a.imageshack.us/img822/8028/dsc01171.th.jpg
Real image
http://a.imageshack.us/img822/8028/dsc01171.jpg
Open the image in a new window, edit the link and done, full sized image 😉
I have tens of other images here, i will bring soon my post on brazilian forum to here, but if you don't wanna wait u can try (Line Array com Ribbon Tweeter)
Htforum has the same problem as diyaudio with imageshack images. Maybe someone has any tip for me.
Htforum has the same problem as diyaudio with imageshack images. Maybe someone has any tip for me.
when uploading click on go advanced, and upload from your own PC documents/pictures
you dont need other hosting
I just host on imageshack because its more simple put thumbnails and doesnt make a heavy page to open, my internet its only 128~256kbps (3g), i live in a place that doesnt have any other kind of connection 😡, but i uploaded from imageshack url, maybe this is better for the post.
It doesnt matter, i posted it again.
Thanks 😉
It doesnt matter, i posted it again.
Thanks 😉
Attachments
-
 dsc00895.jpg634.8 KB · Views: 287
 -
 dsc00926m.jpg921.4 KB · Views: 250
 -
 dsc00880sg.jpg824 KB · Views: 264
 -
 dsc00762f.jpg500.2 KB · Views: 259
 -
 dsc00761j.jpg472.7 KB · Views: 293
 -
 dsc00876y.jpg805.1 KB · Views: 238
 -
 dsc01171.jpg500.6 KB · Views: 236
 -
 dsc01177cg.jpg542.5 KB · Views: 286
 -
 dsc01176x.jpg420.2 KB · Views: 331
- Home
- Loudspeakers
- Planars & Exotics
- Another DIY Ribbon thread