Over on the SPL forums, there were a lot of people saying they didn't want to learn Hornresp to make a tline.
I can understand that thinking. I first learned hornresp over a decade ago. At the time, it was complex. The tricky thing about Hornresp is that it's become MORE powerful over time, so the learning curve is harder in 2019 than it was in 2009.
To address that challenge, I wanted to show how to make a transmission line in Hornresp AND NOTHING MORE. I'm not going to show you how to make a sealed box, or a vented box, or a multi-entrant horn or any of that.
I'm going to show you how to make a tline, and I'm going to show you that it can be done in under five minutes.
So, if you have five minutes to spare, and you want to build a tline, here's how you do it.
Patrick - thank you for taking the time, and putting in the effort, to post this thread.
(Is there a way to upload and post pictures?)
A ~ML-TQWT, my fave, so works for me. 😉
Yes, in the 'advanced' posting window use the 'manage attachments' option.
GM
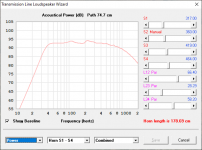
Thanks - yes, I am happy with these results. I need to see if I can tweak it a bit to be a little easier to build, and learn how to using the Filling number in the Hornresp Loudspeaker Wizard, to get an idea of how much stuffing and where in the line it needs to be. I'd like to tame the spikes, obviously. I am amazed at how broad this type of TL covers.
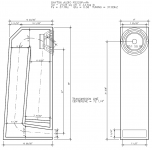
Maybe the small void can be done by 3 layers of plywood, without altering the response too much?
I ordered the Dayton RS225P-4A woofers last night - they are on sale at Parts Express for $50 each.
Maybe the small void can be done by 3 layers of plywood, without altering the response too much?
I ordered the Dayton RS225P-4A woofers last night - they are on sale at Parts Express for $50 each.
Attachments

Last edited:
You're welcome!
Yes, that's what scraps too small for bracing/whatever is for. 😉 Fill in any gaps with a sawdust/glue mix and you don't even need the finished plate. Better to pack it with old lead tire/fishing weights and even then it's probably not going to make them heavy enough to properly mass load them.
GM
Yes, that's what scraps too small for bracing/whatever is for. 😉 Fill in any gaps with a sawdust/glue mix and you don't even need the finished plate. Better to pack it with old lead tire/fishing weights and even then it's probably not going to make them heavy enough to properly mass load them.
GM
I need to see if I can tweak it a bit to be a little easier to build,.
Neil,
My first thought actually was that you could probably get virtually the same performance with a less complicated build. Have you tried modeling a similar geometry but with only 90 deg angles? If you have a CNC it doesn't matter so much, but if not, a simpler design would be nice.
And what's the purpose of the 7-31/32" piece? Is that related to the "void" you mentioned? It seems to me that with a little tweaking of the design you wouldn't need that extra piece. Of course I may be missing something...
Eric
RS225 is a great choice. I use with 4.5-inch full ranger above in waveguides, sounds ace to my aged ears.
I have continued to work on this, and have made some important progress, using the fill in the Loudspeaker Wizard.
And I have made further adjustments, like narrowing the cabinet. I will post what I settle on, but this is pretty close already.
And I have made further adjustments, like narrowing the cabinet. I will post what I settle on, but this is pretty close already.
Attachments
Last edited:

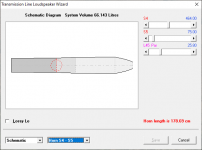
For my own education, I tried reproducing Neil's model in Hornresp. But when I did it, the "path length" was shown as 0 cm, compared to 74.7 cm in Neil's. How do you set path length?
Eric
Eric
GM,
Okay, I see it now. But I can't set it. Unlike the rest of the slider bars, it seems to be inactive. There's no button on the Path slider bar, and the arrows at the ends of the slider bar are greyed out. I think I've tried all three versions of Transmission Line in the Input Wizard. Do I need to be in a different speaker type?
Eric
Well, it does have to be in the 'power' window for it to work..........if it still doesn't work, Export the file for us to have a look-see.
GM
GM
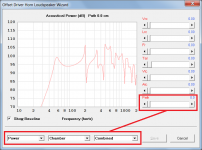
Unlike the rest of the slider bars, it seems to be inactive. There's no button on the Path slider bar, and the arrows at the ends of the slider bar are greyed out.
In the Loudspeaker Wizard, select the Power, Chamber and Combined or Combined 1 options.
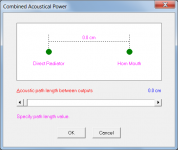
Alternatively from the main Acoustical Power chart window, select the Tools > Output > Combined menu option.
Attachments
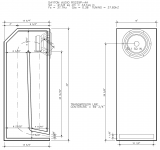
Okay, now that I have the path length figured out, I tried designing my own variation of Neil's TL design. The idea I was wondering about was if there would be any compromise with a design of the same overall dimensions but with only right angles. The attached shows the design I ended up with. My next post will show the HR results. Note, I didn't bother to draw in the driver location, however, it's in the same place that Neil put it (top of right side face).
Eric
Eric
Attachments

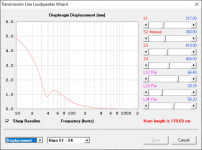
And here below are the HR results (assuming I didn't mess up).
Filling settings are not shown, but I used 100 in the full length of the first 2 segments.
I was a bit surprised that the size of the port was so much larger than Neil's but still resulted in similar, maybe lower, fundamental frequency. (It makes me wonder if I messed something up).
Does this version of the design compromise anything that Neil achieved with his version? If not, it seems it would be easier to build.
Please note, this is not intended in any way to be a criticism of Neil's design. I undertook this as an educational exercise for myself. And maybe it even helps Neil if he likes it.
Does it look like I modeled the box correctly? And if so, what are the pros and cons of this design vs. Neil's?
Thanks,
Eric
Attachments

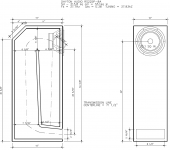
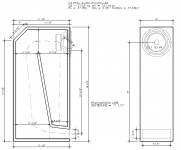
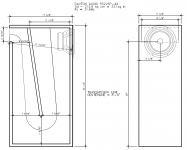
These three designs are where I am ending up. The first is using the 8 ohm version of the Dayton Audio RS225P woofer, and is intended to be used with a Radio Shack built 1.5" high Linaeum tweeter.
The next two are different possible cabinets for the 4 ohm woofer for use with the 6" high Linaeum TLS tweeter / midrange. It is higher efficiency, to be a closer match with this tweeter. The two are showing very similar results in Hornresp, and I would like to hear folks advice / comments on all three?
The next two are different possible cabinets for the 4 ohm woofer for use with the 6" high Linaeum TLS tweeter / midrange. It is higher efficiency, to be a closer match with this tweeter. The two are showing very similar results in Hornresp, and I would like to hear folks advice / comments on all three?
Attachments
-
 RS225P-8A Transmission Line for Linaeum RS Tweeter.png59.3 KB · Views: 246
 -
RS225P-8A FrBtm.txt1 KB · Views: 92
-
 RS225P-4A for Linaeum TLS Tweeter.png89.7 KB · Views: 220
 -
RS225P-4A FrBtm.txt1 KB · Views: 74
-
 RS225P-4A at Closed End with One Fold Drawing.png81.3 KB · Views: 202
 -
RS225P-4A RrTop.txt1 KB · Views: 80
Eric - it has a smooth response! What driver did you use?And here below are the HR results (assuming I didn't mess up).
Filling settings are not shown, but I used 100 in the full length of the first 2 segments.
I was a bit surprised that the size of the port was so much larger than Neil's but still resulted in similar, maybe lower, fundamental frequency. (It makes me wonder if I messed something up).
Does this version of the design compromise anything that Neil achieved with his version? If not, it seems it would be easier to build.
Please note, this is not intended in any way to be a criticism of Neil's design. I undertook this as an educational exercise for myself. And maybe it even helps Neil if he likes it.
Does it look like I modeled the box correctly? And if so, what are the pros and cons of this design vs. Neil's?
Thanks,
Eric
Eric - it has a smooth response! What driver did you use?
Neil,
I used the 4 ohm version of the Dayton Audio RS225P.
Eric
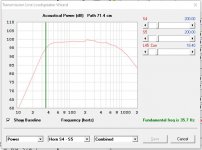
Awesome - I will try your settings and then draw it. It looks like you got it done better than I managed. And in a smaller package to boot. How are you getting the fundamental frequency to show? When I am on that dialog, I see the Horn length 179.90 cm rather than the frequency.
I have been chatting with my brother, about building these, and he made several good points: 3/4" Baltic Birch plywood comes in a 5'x5' sheet (not 4'x8' typically) and it may well be better to use a straightedge clamped to the sheet, with a circular saw, rather than a table saw, for the main cuts.
Question for folks: are these acting as low pass filters? Will they roll off the higher end of the woofer's output, as shown on the response?
Last edited:
- Home
- Loudspeakers
- Full Range
- An Improved Transmission Line Alignment