You melt them all at once by using a wide tip on the air gun. That's why it is so efficient because it does lots of parts at once. If you had an oven you can simultaneously solder a thousand components at once once they are placed on their solder paste covered pads. The surface tension of the solder self-aligns the parts.
You melt them all at once by using a wide tip on the air gun. That's why it is so efficient because it does lots of parts at once. If you had an oven you can simultaneously solder a thousand components at once once they are placed on their solder paste covered pads.
Thanks, X - you've confirmed what I had always thought; that SMD components are designed for mechanised PCB-stuffing ... but are not really appropriate for DIY constructors. 🙁
And this is "DIY Audio"! 😀
The surface tension of the solder self-aligns the parts.
Aah, that is a very interesting point. However, I suspect this surface tension self-alignment works better when an oven provides the heat than when a stream of hot air provides the heat?
Andy
Andy,
To ease your assembly bring it to me and I will assist.
HD
Thank you for very kind offer, Hugh but, at this stage - given Gary's excellent instructions - I will see how I go with conventional soldering for the remaining 3 SMD components on each Snubber board.
It's a real shame the Snubber boards weren't set up for through-hole components, though. The way I am going to mount them (on a CPU cooler pad) the MOSFETs will be located against the copper pad - but the rest of the Snubber board will be in free space ... so through-hole components could've been used.
Andy
Andy,
This is just change, and we are ageing.
SMDs are smaller, cheaper, and easy to robotise, so they are always used in manufacture, often in high end audio. We have to get used to it and X has made the change, and even JHofland, who is older than both of us!
HD
This is just change, and we are ageing.
SMDs are smaller, cheaper, and easy to robotise, so they are always used in manufacture, often in high end audio. We have to get used to it and X has made the change, and even JHofland, who is older than both of us!
HD
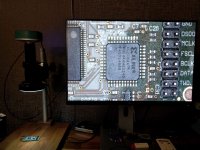
I find SMD soldering much easier with a 60fps hdmi microscope.
The 60fps hdmi makes it real-time without lag.
Take a 180x zoom lens and a 0.5x barrow lens to double the working distance.
I's nice to see those small critters 20x bigger,
also very helpful for checking the soldering quality afterwards.
The 60fps hdmi makes it real-time without lag.
Take a 180x zoom lens and a 0.5x barrow lens to double the working distance.
I's nice to see those small critters 20x bigger,
also very helpful for checking the soldering quality afterwards.
Attachments
Andy,
This is just change, and we are ageing.
SMDs are smaller, cheaper, and easy to robotise, so they are always used in manufacture, often in high end audio. We have to get used to it and X has made the change, and even JHofland, who is older than both of us!
HD
What you say is absoloootely correct, Hugh! 🙂 And through-hole components will increasingly become harder to source. 🙁
But what I suggest this means is "DIYAudio" will disappear - as all that will be left for "DIYers" is to mount 'stuffed' PCBs into cases and add the I/O wiring and the power transformer(s).
This is the bizniz model you've been following for the last 15 years or so ... so it shouldn't make any difference to you. 🙂
BTW, I'm curious to know whether JHofland actually does 'hands-on' ... or merely works on the computer?
Andy
Last edited:
BTW, I'm curious to know whether JHofland actually does 'hands-on' ... or merely works on the computer?
Andy
Hi Andy,
I’ve personally seen the fabulous tiny SMD work that JHofland performs. He’s definitely hands-on and gives excellent advice!!
There is too much passion involved with this hobby to die off because of a type of soldering technique. We will all adapt, learn and carry on. 🙂
Here is a brief tutorial I wrote a while back:
Soldering SMD components
You can see the self aligning nature - this is true with hot plate, oven or small hot air pencil at low speed flow.
YouTube
But for the 4 parts on the snubber conventional iron works fine as there are only a few parts. You can use a conventional soldering iron to melt the paste too. That’s actually a neater joint than rope on spool solder.
Last edited:
Here is a brief tutorial I wrote a while back:
Soldering SMD components
You can see the self aligning nature - this is true with hot plate, oven or small hot air pencil at low speed flow.
YouTube
But for the 4 parts on the snubber conventional iron works fine as there are only a few parts. You can use a conventional soldering iron to melt the paste too. That’s actually a neater joint than rope on spool solder.
I agree, earlier in the thread I covered this... I have solid skills with iron, just put very small dia tip and had no issues at all.
Here is another quick summary of SMT soldering that I linked in post 1 of the GB thread.
Alpha Nirvana 39w 8ohm Class A Amp
But for the parts on the Alpha Nirvana, a conventional iron works fine. Put a dab of solder on one pad, place the part, hold it still with tip of tweezers pressing down while reheating the dab of solder until it flows and part wets. Then solder the other end.
If you put two dabs of solder paste, place part and hold in place with pressure from tweezer tip while heating one end to flow solder. Then heat other end until it flows and wets the part.
I actually placed the part on the pad and used the quad hands with tweezers in it's grip, adjust it to have a little downward pressure and solder as normal. I have a reverse pressure, for lack of better words, tweezers. The default is closed, squeeze to open. Works like a champ.
JT
JT
I have a problem with one of the 220pF caps (C1002) on the Snubber boards - and seek your advice.
After having soldered it in place (using a needle-tip iron), I am only getting 3-4pF when I measure between Gate & Drain (the holes for pin1 & pin2).
The others I've done measure around 220pF (so they are fine).
It seems to me that either:
1. the cap was actually faulty, to start with
2. or I've damaged it whilst soldering
3. or, somehow, I'm not getting a good solder connection?
So - Q1: What do you guys think?
And Q2: If I use a narrow nozzle on my air-soldering gun (so the air stream hits just the cap) - will it be able to melt the 'real solder' I've used ... so I can remove the cap and either:
* replace it with a new one (if #1. or #2.)
* or re-solder it (if #3)?
Thanks,
Andy
Andy,
Remove the cap, check the capacitance in your meter unconnected.
If it is still 3-4pF, replace it.
HD
Remove the cap, check the capacitance in your meter unconnected.
If it is still 3-4pF, replace it.
HD
Andy,
Remove the cap, check the capacitance in your meter unconnected.
If it is still 3-4pF, replace it.
HD
Thanks, Hugh.
I was hoping that my hot air gun would be able to heat up the solder pads at both ends of the SMD cap - to enable me to remove the cap. But will it melt the 'normal' tin/lead solder that I've used?
If not - I can't quite see how I can use my soldering iron to heat up both ends of the cap, together, so I can remove it??
Andy
Last edited:
Insert a thin screwdriver blade just under the midpoint of the cap, heat one joint with the iron, lift it half a mm, then reheat the other side to remove the cap completely.
HD
HD
Thanks Hugh - but I just tried the hot air gun on the mis-soldered capacitor - and, yes, at 400 deg C ... it certainly does melt the 'real solder'! 🙂
It also blew off R1002, next to it ... but that was easy enough to solder back in again.
So have re-soldered C1002 - and it's reading 226pF!
Only the diode to go, on the Snubber boards. 🙂
Then I can put the nightmare of SMD-soldering behind me. 😀
Andy
It also blew off R1002, next to it ... but that was easy enough to solder back in again.
So have re-soldered C1002 - and it's reading 226pF!
Only the diode to go, on the Snubber boards. 🙂
Then I can put the nightmare of SMD-soldering behind me. 😀
Andy
- Home
- Amplifiers
- Solid State
- Alpha Nirvana 39w 8ohm Class A Amp