Thanks I've seen those before. Does it lower the voltage or what?Here’s what you need to fix that: Router Speed Control
Kyngfish how is the project going? 😎 Mine are assembled, no finish yet but sound amazing, really 3D. The stuffing is giving me headache though. Also wiping excess glue off with a wet cloth was not a fantastic idea, may need to either sand or paint if I want a perfect finish.
I’d love to see some pictures when you’re ready. I finished up bracing for one side but assembly is paused for a week while holiday things sort of happen. Hope to get back to it next weekend.
Thanks I've seen those before. Does it lower the voltage or what?
Kyngfish how is the project going? 😎 Mine are assembled, no finish yet but sound amazing, really 3D. The stuffing is giving me headache though. Also wiping excess glue off with a wet cloth was not a fantastic idea, may need to either sand or paint if I want a perfect finish.
I'm pretty sure the POF 1400 has speed adjustment, at least the 1200 does (and it appears in bosch's promo photos for the 1400 as well). It should be a little red dial on the body next to the right grip.
Good looking build so far. I made Planet 10’s trapezoidal onkens for A10P and absolutely love them. I’ll admit that one reason I like building their traps is that there’s no fiddling with stuffing. ��
Looking forward to your listening impressions.
Looking forward to your listening impressions.
Update
So I just wanted to make an update. I haven't had a chance to work on these much lately, but I got a little time today. And I was able to finish up the bracing for one of the cabs. All things considered, I'm very happy with the fit and the look. I'll be out for a week for the holidays, but I should be finishing them up next weekend.
(No idea how to get the thumbnails to rotate - but they show properly when you click)
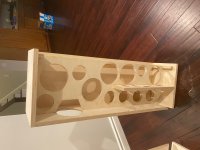
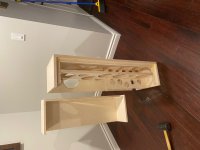


Doneskis
So I came back from the holidays and did two full days in the workshop to get these bad boys done. Pics below. Main takeaways and questions.
As for listening impressions, I'm not really detecting weak bass, it kicks pretty well, but my amp is pretty reasonably good in that department, not sure if that makes a difference. If anything I'm less impressed with the mid and the treble, not sure if that's a function of the stuffing, or break-in. I'll keep listening but open to pointers.
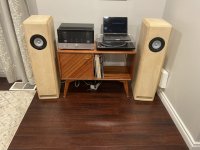
I probably won't veneer the speakers, I'll just go with my Osmo wax and call it a day. The lighter birch goes well with my dark floors. My crappy table to set the amp is pretty ugly, but for now it's all I have that will fit in that part in the living room, the next order of business is building a cabinet for my turntable and amp to go between the speakers.
Anyone in Portland than can come over and let me know what they think?
Pics below:
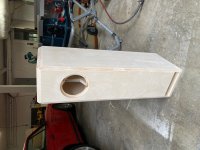
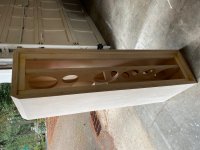
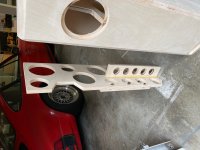
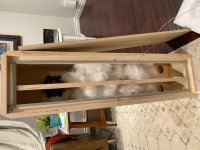
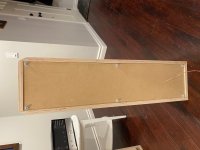
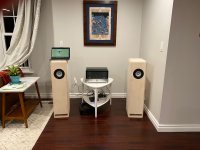
So I came back from the holidays and did two full days in the workshop to get these bad boys done. Pics below. Main takeaways and questions.
- If I ever do this again I'm going to take the time to cut dados and rabbets, it'll just make the glue-up so much easier
- I totally messed up the bevel on the top of the cabinet, I meant to cut 30 degrees from the top down, but once it was done I just went with it
- Went with MDF for the back panels, after I'm happy with the tuning I'll get some baltic birch and just glue it up to seal it
- For stuffing I just went with regular poly batting, I made it less dense in the bottom third, and denser near the cone
As for listening impressions, I'm not really detecting weak bass, it kicks pretty well, but my amp is pretty reasonably good in that department, not sure if that makes a difference. If anything I'm less impressed with the mid and the treble, not sure if that's a function of the stuffing, or break-in. I'll keep listening but open to pointers.
I probably won't veneer the speakers, I'll just go with my Osmo wax and call it a day. The lighter birch goes well with my dark floors. My crappy table to set the amp is pretty ugly, but for now it's all I have that will fit in that part in the living room, the next order of business is building a cabinet for my turntable and amp to go between the speakers.
Anyone in Portland than can come over and let me know what they think?
Pics below:


Last edited:
You might find that 6 screws is insifficicient to secure the back panel, especially with MDF. We put a screw every 6 inches or so on ours.
dave
dave
Nice job, those bevels look great! I don’t know how much time you have on them yet, but I think I remember 100-200 hours or more recommended.
You might find that 6 screws is insifficicient to secure the back panel, especially with MDF. We put a screw every 6 inches or so on ours.
dave
Fair point, but those are 1/4" machine bolts going into threaded inserts. The sealing strip I used also has a lot of squish before getting firm and I was able to torque those down pretty hard with no bending in the panel.
For now, we'll see.
As for listening impressions, I'm not really detecting weak bass, it kicks pretty well, but my amp is pretty reasonably good in that department, not sure if that makes a difference. If anything I'm less impressed with the mid and the treble, not sure if that's a function of the stuffing, or break-in. I'll keep listening but open to pointers.
Go easy on them for the first 200 hrs, as others have suggested. The mids should open up after that amount of time. You don't have much stuffing in the line, so if the bass is still more prominent after a reasonable amount of break-in time, add some more poly.
Looks like you did a great job on the cabs.
jeff
Fair point, but those are 1/4" machine bolts going into threaded inserts. The sealing strip I used also has a lot of squish before getting firm and I was able to torque those down pretty hard with no bending in the panel.
It is the spacing, not the force. MDF is not stiff, you will have 2 passive radaitors the size of width x height/2. If the bolts in the middle are not exactly in the middle that would helps a bit.
Bolts, screws into the holey brace are also highly recommended, both for resonance control and to maximize the driver brace transmitting driver reactive force to the back (sharing that energy w the baffle/top/bottom reducing the load on any one panel.
dave
Go easy on them for the first 200 hrs, as others have suggested. The mids should open up after that amount of time. You don't have much stuffing in the line, so if the bass is still more prominent after a reasonable amount of break-in time, add some more poly.
Looks like you did a great job on the cabs.
jeff
So the batting will tone down the bass and boost the midrange?
So the batting will tone down the bass and boost the midrange?
Extra batting will tone down the bass a bit, therefore giving the speaker a more balanced presentation. The 10p is not a "bright" sounding driver like the 12p.
jeff
Last edited:
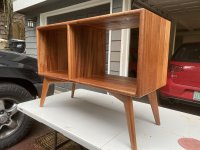
Very cool. I like the diagonal grain on that door. Did you make the legs out of boards?
What species of wood did you use?
What species of wood did you use?
Very cool. I like the diagonal grain on that door. Did you make the legs out of boards?
What species of wood did you use?
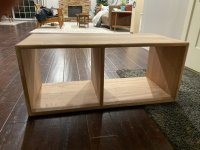
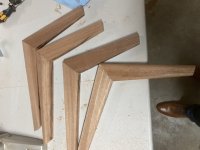
All solid wood. No plywood or veneers. Materials cost was roughly 200 bucks. The legs are made from one inch boards cut with a leg cutting jig and rounded over with a router. The diagonal doors were the same wood cut into 2 inch boards running at 45 degree angles.
The wood is Sapele. Looks really good with a little oil or wax.
The Alpairs are also breaking in nicely - if anyone in the Portland area feels like coming over and making comments or giving me pointers. I’d be open to it. I don’t feel a need to change the batting.
Very nice build, and nice console! Care to expand on the leg cutting jig?
I recently played around with stuffing in my 10p pensils and going from 300g to 500g did something good, more punchy sound, tighter low end. A bit less extensions maybe but slight if any. It’s subtle, so I think the room probably dominates the low end. Like yours my pensils are up against a wall pretty close, so depending your stuffing so far it might be worth a shot just to hear the difference.
I recently played around with stuffing in my 10p pensils and going from 300g to 500g did something good, more punchy sound, tighter low end. A bit less extensions maybe but slight if any. It’s subtle, so I think the room probably dominates the low end. Like yours my pensils are up against a wall pretty close, so depending your stuffing so far it might be worth a shot just to hear the difference.
Best if I just share the video I got the jig from. Depending on the size of leg you need a different sized jig. I think I’ll probably make 2-3 different sizes.
Good point on the stuffing. I may do the same.
https://www.instructables.com/id/Tapering-Jig/
Good point on the stuffing. I may do the same.
https://www.instructables.com/id/Tapering-Jig/
- Home
- Loudspeakers
- Full Range
- Alpair Pensil 10p Build - and Questions
