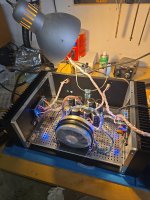
This would be an excellent plaform to experiment with separate banks of motor run capacitors for each channel.
CBB60 type, 80uF
CBB60 type, 80uF
She floats!
Bit of a scare when one of the leds failed to light, but i was able to confirm it was just dead. Held a spare against the leads and it lit up. Not sure if it's worth disassembling to replace it.
Would appreciate input.
All other measurements check out.
Bit of a scare when one of the leds failed to light, but i was able to confirm it was just dead. Held a spare against the leads and it lit up. Not sure if it's worth disassembling to replace it.
Would appreciate input.
All other measurements check out.
Attachments

Edit: Please ensure you have that chassis properly grounded to the mains ground!!!
Maybe it was installed backwards? I still make that mistake from time to time. Should be an easy replacement if you're willing to unbolt, disconnect, and swap in new LED. If it were me, I'd power it all down, wait a few hours for caps to discharge, then look inside the LED for the "anvil" on the cathode (-) and confirm if it was installed right.

Nice looking build 😉 Big fat 33kuF filtering caps and a nice transformer mount.
It's gonna sound amazing!
Also, more "amp porn" please!
Maybe it was installed backwards? I still make that mistake from time to time. Should be an easy replacement if you're willing to unbolt, disconnect, and swap in new LED. If it were me, I'd power it all down, wait a few hours for caps to discharge, then look inside the LED for the "anvil" on the cathode (-) and confirm if it was installed right.
Nice looking build 😉 Big fat 33kuF filtering caps and a nice transformer mount.
It's gonna sound amazing!
Also, more "amp porn" please!
Last edited:
Probably, but unless there is something I don't know (likely), I'm inclined to leave it alone.Maybe it was installed backwards? I still make that mistake from time to time. Should be an easy replacement if you're willing to unbolt, disconnect, and swap in new LED
P.S. thank you for your contributions to this thread. I referenced your build photos a LOT. Really helped me.
I know it seems like a lot more work than needed, but "do it right the first time" is always a good approach to follow in my book (I've learned that the hard way many times). I'm not smart enough to know if leaving it in backwards matters at all (probably doesn't??), but why not take time now while it's all accessible and get it right. This is the one chance you have to "easily" make the fix and the extra 30-60 minutes is pretty minimal overall. Just my opinion though. The satisfaction of having it all done up right will outweigh the short term pain of making the "fix" in my book.
One random question is why such large gauge wire for the inputs? It'll likely work just fine, but you don't need much copper on the inputs for the signal. People often use CAT5 twisted pairs there (or microphone wire...Mogami for example) so you can route the inputs up to the top of the chassis to be around and away from the power lines. A minor thing to note, but again, "do it right the first time" is always a good practice. Those little details can mean the difference between "dead silent" and a "slight hum" at the speakers. A handy part to use is these 3D printed wire posts you can use to zip tie wires for secure guidance and separation.

I'm happy to know the build pictures I posted are helpful to others! I was brand new to all this just 10 months ago and photos of others builds helped me tremendously (hence why I'd love to see lots more photos).
One random question is why such large gauge wire for the inputs? It'll likely work just fine, but you don't need much copper on the inputs for the signal. People often use CAT5 twisted pairs there (or microphone wire...Mogami for example) so you can route the inputs up to the top of the chassis to be around and away from the power lines. A minor thing to note, but again, "do it right the first time" is always a good practice. Those little details can mean the difference between "dead silent" and a "slight hum" at the speakers. A handy part to use is these 3D printed wire posts you can use to zip tie wires for secure guidance and separation.
I'm happy to know the build pictures I posted are helpful to others! I was brand new to all this just 10 months ago and photos of others builds helped me tremendously (hence why I'd love to see lots more photos).
Last edited:
Power entry module incoming. Will ground to chassis. Just testing for now.
Input wires are large because I don't know any better. Thanks for the tip.
I may change now and fix the led. I am a little reticent to unmount the board because it works and the build guide kind of hints at some degree of permanence once you get the mosfets in place. Just being lazy too.
Input wires are large because I don't know any better. Thanks for the tip.
I may change now and fix the led. I am a little reticent to unmount the board because it works and the build guide kind of hints at some degree of permanence once you get the mosfets in place. Just being lazy too.
It definitely is no fun to desolder that LED and put in a new one, but I don't think it's an issue as long as you're diligent on re-install of the MOSFETs with the keratherm pads (and wait an adaquate amount of time for capacitors to discharge). I've definitely done it a....aheeemmm...few times when I made mistakes (which I often do). I agree that sometimes the "repair"/"fix" can lead to additional errors, so it requires diligence and patience. I think long term you'll be happy that you took the time to do it 'right'. I bet you can remove that LED in place while everything else is still attached to the heat sink and put a new one in if you're careful (one lead at a time with the soldering iron to both remove and install).
Nuff said. This is DIY and it's your amp to play glorious tunes for hopefully decades to come.
I think that making sure the input wires are distanced from the speaker outputs and power lines is definitely "best practice" to follow.
Seeing your build makes me want to swap my F5m Redux amps (thank you @N Brock ) back to the Aleph Jzm just to crank up the smooth sounds.
Last edited:
@birdbox and @SeeRockCity -
Note that not all LEDs are created equal, which is why the build guide for the AJzm kit specifically says (in Step 27)...
"DO NOT use the relative size of the Anvil and Post to determine anode and cathode; you'll likely get it backwards."
I've never run across an LED where the longer of the two legs was not the anode, but I've run into a few, including the lovely blue Cree LEDs sometimes associated with that lovely PASS labs glow... where using the relative size of the anvil and post can get you into trouble if you reference it against some of the common diagrams like below.

Here is a recently taken photo (less than a few minutes ago) of one of the LEDs included in the kit.

Here is the photo I used in the build guide. The guide also explains that for that particular LED (LED+) that the "+" is the notation of the LED for the positive rail of the PSU vs. the orientation of the LED.

A sure fire way to know which way is which is to use the diode test mode on your DMM. Will it work for ALL LEDs, no, but for the ones we typically use, it's a safe bet.
Note that not all LEDs are created equal, which is why the build guide for the AJzm kit specifically says (in Step 27)...
"DO NOT use the relative size of the Anvil and Post to determine anode and cathode; you'll likely get it backwards."
I've never run across an LED where the longer of the two legs was not the anode, but I've run into a few, including the lovely blue Cree LEDs sometimes associated with that lovely PASS labs glow... where using the relative size of the anvil and post can get you into trouble if you reference it against some of the common diagrams like below.
Here is a recently taken photo (less than a few minutes ago) of one of the LEDs included in the kit.
Here is the photo I used in the build guide. The guide also explains that for that particular LED (LED+) that the "+" is the notation of the LED for the positive rail of the PSU vs. the orientation of the LED.
A sure fire way to know which way is which is to use the diode test mode on your DMM. Will it work for ALL LEDs, no, but for the ones we typically use, it's a safe bet.
there is "C" as cathode in LED footprint
no reason to remove pcb to desolder one led and solder another
just heat damn thing from top, use solder sucker to clean pads
if easier - cut led from leads, desolder it one by one
no reason to remove pcb to desolder one led and solder another
just heat damn thing from top, use solder sucker to clean pads
if easier - cut led from leads, desolder it one by one
I would just cut off the head of the led, leaving its legs intact, and solder new led onto ends...
(done this to jfets on input of some amp i was lazy to disassemble, it worked)
It may look ugly but who cares?
(done this to jfets on input of some amp i was lazy to disassemble, it worked)
It may look ugly but who cares?
I'd just leave it alone... LEDs are pretty... but...
@SeeRockCity - If you decide you want to swap out the LED, and if you're using the ones included in the kit in the other three spots, and if you want them to be identical, and if you don't want to buy some, and if ... ... ...
Shoot me a PM, and I'll send you a few.
@SeeRockCity - If you decide you want to swap out the LED, and if you're using the ones included in the kit in the other three spots, and if you want them to be identical, and if you don't want to buy some, and if ... ... ...
Shoot me a PM, and I'll send you a few.
Well feel free to delete my post regarding anvil size. Learn something new every day. That's why I'm the dodo and thems the experts. Sounds like LED can just be left alone all backwards and dark, so that's two learnings for me and I haven't even had a cup of joe yet.
Last edited:
Thank you. Very kind of you to offer.I'd just leave it alone... LEDs are pretty... but...
@SeeRockCity - If you decide you want to swap out the LED, and if you're using the ones included in the kit in the other three spots, and if you want them to be identical, and if you don't want to buy some, and if ... ... ...
Shoot me a PM, and I'll send you a few.
I've got a bag of them somewhere, I'll start there if I decide to change it from above as suggested here.
Thank you to everyone for all the great input.
BTW, amp sounds really good, even through my cheap bench speakers.
Can't wait to get it sealed and in the living room.
That's inspiring, I've just started my build journey

You will love the result. Listening to Son Volt Trace. My cheap Sony bench speakers have never sounded better.That's inspiring, I've just started my build journey
BTW, I replaced the LED from the top. It's ugly, but it is lit 🙂

Just saw this rereading? Apex jr. Not Alex!Alex or Apex? Where are you getting it?
I need some guidance on determining my Aleph Jzm build:
I have a pair of horizontally bi-wired 3-way loudspeakers (1-amp for the tweeters (amp camp amp) and 1-amp for the mids/woofer (crown XLS 1502) currently) Ideally I would prefer close to 50 watts to drive each channel of the mids/woofers.
What are the recommendations from you as to how I should approach the build: monoblock vs. dual mono vs. ? Maybe a refresher on why one would choose monoblocks vs. dual mono would be a good education for me to start? Hope this makes sense....thanks in advance!
- Home
- Amplifiers
- Pass Labs
- Aleph Jzm