

@yarozebob
Did you follow the build guide and first power up just the PSU section without the amp boards connected to be sure the PSU is fully functional?
Did you follow the build guide and first power up just the PSU section without the amp boards connected to be sure the PSU is fully functional?
almost every detail I'm seeing is done wrong
too late for me to make a list, must go zzzzzzz now, but I hope some other Greedy Boy will make a list while I'm zzzzzzzz
just for starters ........... cut all the wires, disassemble everything and clean all solder pads
stop using fat solid core wire everywhere - soldering those to pcbs is just bad practice
leave amp disassembled for week or so and invest that time in reading Build Guide and especially looking at pictures there
prepare process is half of job

To Zen Mod's point. The smart move here is disconnect the amp boards completely from the PSU. Don't just "see what will happen" by trying to keep powering it on or you're going to let out smoke and then really be in "fix it mode", or worse, you're going to make sparks.
I've learned over the years to "Do it right the first time". I know it's often a lesson one must learn through experience, however, please take some steps back, do not apply power anytime over the next week and get to fixing all the issues that are going to be listed here soon.
Also, more pictures....different angles, all clear (not fuzzy), with good lighting. This can be sorted out and it's just going to take some diligence, patience, and a slow methodical approach. The folks here in this thread are extremely helpful and you just have to pay attention, ask questions, "listen"/understand the advice, and follow through. It's going to take time. It's not a race, so get ready to put some energy and time into fixing this.
i tried to but i did make some misteps that i corrected but im not sure what i have done wrong that i havent corrected yet@yarozebob
Did you follow the build guide and first power up just the PSU section without the amp boards connected to be sure the PSU is fully functional?
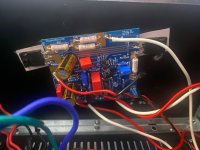
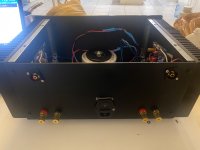
it seems to stick out some when fuses are loaded inIt looks like your IEC fuse drawer is sticking out a little. Is that making a good connection?
ok ill probably disconnect it tonight and step away from it i have been working on this since sunday or saturday night and probably should take a breakTo Zen Mod's point. The smart move here is disconnect the amp boards completely from the PSU. Don't just "see what will happen" by trying to keep powering it on or you're going to let out smoke and then really be in "fix it mode", or worse, you're going to make sparks.
I've learned over the years to "Do it right the first time". I know it's often a lesson one must learn through experience, however, please take some steps back, do not apply power anytime over the next week and get to fixing all the issues that are going to be listed here soon.
Also, more pictures....different angles, all clear (not fuzzy), with good lighting. This can be sorted out and it's just going to take some diligence, patience, and a slow methodical approach. The folks here in this thread are extremely helpful and you just have to pay attention, ask questions, "listen"/understand the advice, and follow through.
Good call on stepping away for a little bit. Clear your mind, let folks respond to all the pictures you'll be posting. The extra effort is going to be worth it in the long run. This is an amazing amplifier when done right!
@yarozebob
I'm going to kick off a list of items you need to consider. Please read through the Aleph Jzm build guide (and the F5m build guide) thoroughly to pick up all the great tips and tricks shared there.
I'm going to stop there as I'm sure others have much better advice. If someone want's to add to the list, please just copy the list above and keep adding on to it so we build a "to do" and "to consider" list.
I'm going to kick off a list of items you need to consider. Please read through the Aleph Jzm build guide (and the F5m build guide) thoroughly to pick up all the great tips and tricks shared there.
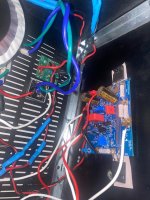
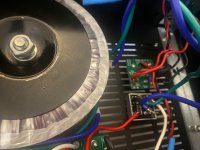
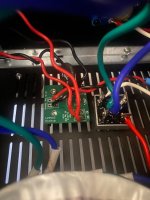
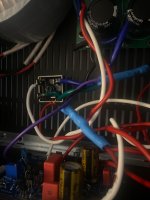
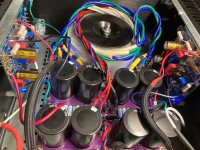
- Your wiring need to be improved significantly.
- You need to be consistent with your color choices for AC line, AC nuetral, DC+, DC-, Ground, Signal+, Signal-, Output+, Output-
- The type of wire you chose is not ideal and how you're soldering it to everything is not very clean. There's a good chance of causing a short with expose wiring and heat shrink is going to be key to helping avoid shorts (aka smoke and sparks)
- Wire separation of the AC lines and the other DC and signal lines needs some real consideration or you'll have some serious hum issues. Get this right the first time and avoid the dreaded "hum hunt".
- It's clear you are new to soldering so you need to slow down and practice. Rushing here is only going to hurt you.
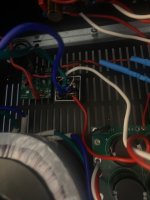
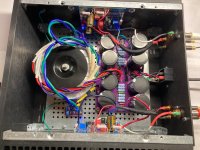
- The Amp boards look pretty rough. We can only hope that all the connections are solid, but you'll want to do a thorough quality assurance (QA) check on every single joint using a well lit and well magnified inspection.
- It's well worth practicing soldering on something else to dial in your temperature, technique, and overall quality checks.
- Safety with AC mains is of the upmost importance. This can kill if done wrong.
- You must have your safety earth well grounded to the chassis and secure so it cannot break free.
- Your AC line and neutrals need to be solid connections and well insulated so there are no exposed portions and can't be pulled loose.
I'm going to stop there as I'm sure others have much better advice. If someone want's to add to the list, please just copy the list above and keep adding on to it so we build a "to do" and "to consider" list.
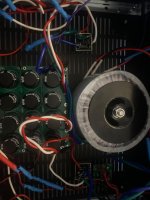
- mosfet pins formed all wrong - contrary to proper way, ending in lesser pcb clearance to heatsink; now is too late to change that, any other fiddle with pins will break them; anyhow, clearance is necessary and even if new mosfets are needed, it must be done in proper way
- no washer and no split washer under mosfet screws
- can't see bridges properly, but split washer is necessary there too
- pretty much every even slightly more massive soldering point is bad, especially important at IEC
- fat solid core wires are allowed just for very experienced builders, very well aware of own choices
I gotta chime in again for fun as I'm listening to the Aleph J Zen Mod edition right now. I swapped this amp into my main system and I am truly enjoying the sound.
System: Phone Amazon HD via Bluetooth to SMLS-D6 to Iron Pumpkin to Aleph Jzm to Aerial Model 9's.
The sound is full and "sweet". The 600W capable speakers are very happy with the Aleph Jzm stereo amp power and there's nothing lackin' as far as I can hear. This amp continues to "WOW" me with it's musicality. Serious bass and an amazing sweet sounding top end. Anyone considering this build should pull the trigger and build it. Damn good amp!!!! I love the sound!!!
Sounds so good I don't dare screw it up by trying to describe the sound. I'm so happy I built the Aleph J Zen Mod edition!
Thank you @Zen Mod and @Nelson Pass (and of course @ItsAllInMyHead )!!! Ya'll be givin' me some lovin' every day with this amp.


If the iec fuse holder isnt sitting flush, then you have a problem there.
Probably damaged by soldering the wires on the back pins instead of using quick connects.
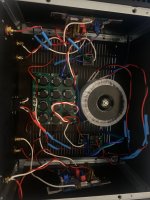
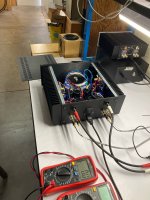
The upside down mounting of the transformer is just begging for future shorts.
I don't believe the binding posts are mounted correctly.
Looks like the insulating bushes have not been taken off and installed on either side of the panel work.
Very likely both are shorted to the case.

Probably damaged by soldering the wires on the back pins instead of using quick connects.
The upside down mounting of the transformer is just begging for future shorts.
I don't believe the binding posts are mounted correctly.
Looks like the insulating bushes have not been taken off and installed on either side of the panel work.
Very likely both are shorted to the case.
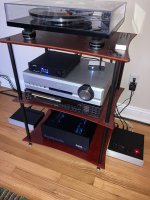
Not my best work as I chose to shoe-horn this into a 3U 300. The mosfet placement on the sinks isn't ideal but she sings & is warming in by playing ZZ Top's Deguello on vinyl in the living room. Thanks @Zen Mod and @ItsAllInMyHead for re-imagining this classic with workingman's parts & making yet another easy and accessible amp rolling project for the paint-by-numbers crowd!
Attachments
- Home
- Amplifiers
- Pass Labs
- Aleph Jzm