Thank you, ZM. I noticed some discoloration on two of the adjacent .47 resistors, R16 and R18. I guess these might be characterized as "small critters". I'm going to replace them and see if that works. If not I'll start working on the mosfets.
with small critter I meant on T0-92 ones 😉
whatever , there is so many parts on pcb , so you can check and replace all of them 😉
whatever , there is so many parts on pcb , so you can check and replace all of them 😉

I am thinking of starting over: get a new set of boards and put together a package of materials myself.
The passive parts are probably fine. The input section is also probably un damaged. In all likelihood you probably just need a set of output mosfet for one channel, and perhaps a ZTX or two.
The ZTXs I think will be easy. But my understanding is that the JFets, Zms small critters, and the Mosfets need to be selected carefully and matched. Downside of just ordering from Mouser or Digikey?
Pcb Dimensions
G'day,
As yet not found the dimensions for the pcb of the DA Aleph J clone, someone please tell
Rgds
Bruce
G'day,
As yet not found the dimensions for the pcb of the DA Aleph J clone, someone please tell
Rgds
Bruce
25 cm = 9.8425197 inch´s
5.2 cm = 2.0472440944904 inch´s
This is Aleph J pcb dimensions from DiyAudio Store.
Greetings 🙂
5.2 cm = 2.0472440944904 inch´s
This is Aleph J pcb dimensions from DiyAudio Store.
Greetings 🙂
Getting in on the J action...
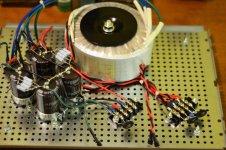
Got the Deluxe chassis yesterday, so I am just starting to put all the pieces together. Here is where I am. Does anyone know what to do with the purple static wire coming out of the transformer? This is a 400VA Antek.
This chassis is quite nice.
Got the Deluxe chassis yesterday, so I am just starting to put all the pieces together. Here is where I am. Does anyone know what to do with the purple static wire coming out of the transformer? This is a 400VA Antek.
This chassis is quite nice.
Attachments


Attach it to the chassis as close as possible to the transformer. It's the electrostatic shield.
Hi Whaleman and Diyers
I am too in build process of Aleph J DiyAudio store pcb´s with 6L6 kit 😀
My pcb´s is 95 % populated but what is right position of radial bourns trimmers ?
This -> symbolise position of little screw pot to regulate ?
What resistances on trimmers before offset and bias procedure ?
That be more easy happy ending diy story thanks !
Best regards 🙂
Have a nice day
Christophe
Attachments

Hi Whaleman and Diyers
I am too in build process of Aleph J DiyAudio store pcb´s with 6L6 kit 😀
My pcb´s is 95 % populated but what is right position of radial bourns trimmers ?
This -> symbolise position of little screw pot to regulate ?
What resistances on trimmers before offset and bias procedure ?
That be more easy happy ending diy story thanks !
Best regards 🙂
Have a nice day
Christophe
I think it does not matter the direction of the pot. I just placed them with the label facing up so I know that I have the right one in the right place.
IIRC, the initial setting for the BIAS pot is 68K ohms. There are taps on either side of the pot to measure this in case you already installed it...

whaleman - set the pot marked 'LTP bias' to 1K, and don't touch it, or replace with 1K resistor.
EDIT - on second thought, it's all ready installed, so you can't read across it properly to set it...
Turn the pot all the way in one direction until it clicks, then turn the other way 12.5 turns.
EDIT - on second thought, it's all ready installed, so you can't read across it properly to set it...
Turn the pot all the way in one direction until it clicks, then turn the other way 12.5 turns.
Last edited:

Attach it to the chassis as close as possible to the transformer. It's the electrostatic shield.
Thanks, I did exactly that. I imagine it has some kind of purpose...
whaleman - set the pot marked 'LTP bias' to 1K, and don't touch it, or replace with 1K resistor.
EDIT - on second thought, it's all ready installed, so you can't read across it properly to set it...
Turn the pot all the way in one direction until it clicks, then turn the other way 12.5 turns.
Thanks, no problem. I just replaced the pots with 1K ohm resistors...a snap.
6L6 and Whaleman great you be connected
i soldered 1kOhm and two trimm´s in real time with your councils.
Thx gentleman's
Vive le DiyAudio 🙂
Me too, we have good oversight here--thanks!
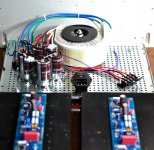
Tomorrow, more assembly. The power section is done. Just wires to the boards need to be assembled. Home Depot trip tomorrow to find those darn M3 screws to hold down the power transistors.
Some pics of tonight's progress:
Attachments

Whaleaman,
How are you connected with Cathedral Speakers? They have a great web site. I am very interested in replacing my pre-amp and they have two options that I am interested in.
Have fun with your Aleph J. I built one this past Spring and am in the process of another. 6L6 is the MAN!
How are you connected with Cathedral Speakers? They have a great web site. I am very interested in replacing my pre-amp and they have two options that I am interested in.
Have fun with your Aleph J. I built one this past Spring and am in the process of another. 6L6 is the MAN!
- Home
- Amplifiers
- Pass Labs
- Aleph J illustrated build guide