This is 6.5", 210 mm baffle width. Starting with the smallest feasible.What woofer size? I have some 18sound 8NMB420 that need a new home

So, something like an SB17 chassis? Cool! My printer is good for 220 mm, so I'd be right there.
Sure, anything of that size, it's just a matter of different cutouts (STEP file without the cutouts will be available).So, something like an SB17 chassis? Cool! My printer is good for 220 mm, so I'd be right there.
I'll be making a full design with Dayton SIG180 (not sure about the HF driver yet) including the crossover etc.
I like the idea of adding just a simple box to the printed parts. This can be done in a kitchen 🙂
Last edited:
A quick sim including an intended enclosure.

1" throat:

0.63" throat (BMS 4526 / 4526HE):

1" throat:
0.63" throat (BMS 4526 / 4526HE):
Last edited:
I REALLY like that print!Working on a 3D-printable modular enclosure face kit for Tritonia XS -
View attachment 1470589 View attachment 1470590
I wish my PA speakers looked like that with a slot port at the bottom.
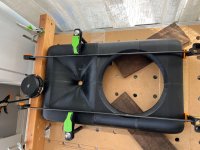
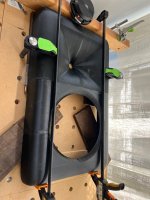
Printed 🙂
(This is with B&C DE7, a pair of BMS 4526HE arrived yesterday.)
What remains are 1) a part with a bassreflex port and 2) a resizable empty "spacer".
I think this is a pretty general kit, either for a small two-way, or a floorstander (2,5 or 3-way).


(This is with B&C DE7, a pair of BMS 4526HE arrived yesterday.)
What remains are 1) a part with a bassreflex port and 2) a resizable empty "spacer".
I think this is a pretty general kit, either for a small two-way, or a floorstander (2,5 or 3-way).
Last edited:
This way of integrating the waveguide do make the final product rather similar to whats out there before. Only better performance of course.
My take on a 12"+ Tritonia M turns out looking like a first gen JBL EON of sorts.
Its a rather clumsy attempt as I do not master any 3D CAD programs, I just cut and paste in the slicer program.
My take on a 12"+ Tritonia M turns out looking like a first gen JBL EON of sorts.
Its a rather clumsy attempt as I do not master any 3D CAD programs, I just cut and paste in the slicer program.
Attachments
What material did you use for printing and gluing?
Looks like I need to start up my printer more often ... 🤓
Looks like I need to start up my printer more often ... 🤓
I like the roundovers, it's the great thing about 3D printing that's for free. The performance should be exemplary.
Is that the original (not modified) Tritonia M?
Is that the original (not modified) Tritonia M?
Last edited:
As this is just a test I used some cheap Anycubic PETG. 2 walls and 4% Gyroid infill. This means there is a good chance that I do have to fill the walls even if I dampen the inside with Rockwool.What material did you use for printing and gluing?
Looks like I need to start up my printer more often ... 🤓
Used a 2-component plastic glue.
Its the original Tritonia M. You can see the contours, I forgot to cut away the part extruding from the cabinet shape....I like the roundovers, it's the great thing about 3D printing that's for free. The performance should be exemplary.
Is that the original (not modified) Tritonia M?
This is the XS with the 16mm throat.
So far so good, no manual work required. Now it will be harder...

So far so good, no manual work required. Now it will be harder...
From the photos it's not really obvious how cute it is 🙂


Last edited:
- Home
- Loudspeakers
- Multi-Way
- Acoustic Horn Design – The Easy Way (Ath4)