... Any other cheaper sources, including the 100K 50W, would be greatly appreciated.
Some cheaper options from Mouser:
10Mohm, 4W, 7.5kV
ROX10010M0FKLBS Vishay / Dale | Mouser Australia
For segmentation resistors I have been using series/parallel combinations of the Vishay VR68 series resistors.
75.4K/3W/10kV = parallel combination of 220K, 220K, 240K
680K/3W/30kV = series combination of 220K, 220K, 240K
220K, 240K 1W, 10kV
VR68000002203JAC00 Vishay / BC Components | Mouser Australia
VR68000002403JAC00 Vishay / BC Components | Mouser Australia
Cool story. Acoustat speakers are nearly indestructible, which is why I'm still here helping second, third, and even fourth owners. Of course fireplace pokers are no match. We once had a speaker returned to the factory for repairs with bullet holes in it, and another one that had been knifed by an angry wife. Those needed a bit more work than a new grille sock!
Which reminds me of when I worked at Hafler, and we received an amp for repairs, which had been drenched with cat urine. There was much argument among the technicians as to who would be the unlucky one to work on it. I don't remember who worked on it, but being the low man on the totem pole at the time, it was probably me.
Angry wife knifing, yikes!! I used to work on a Motorola radio that lived sometimes questionable condition radio sites. If there was a rodent issue there it was soon known as they would crawl on top of the radio and destroy the line card, nice warm spot. We had to clean those up before sending into the factory, yuk!
Some cheaper options from Mouser:
10Mohm, 4W, 7.5kV
ROX10010M0FKLBS Vishay / Dale | Mouser Australia
For segmentation resistors I have been using series/parallel combinations of the Vishay VR68 series resistors.
75.4K/3W/10kV = parallel combination of 220K, 220K, 240K
680K/3W/30kV = series combination of 220K, 220K, 240K
220K, 240K 1W, 10kV
VR68000002203JAC00 Vishay / BC Components | Mouser Australia
VR68000002403JAC00 Vishay / BC Components | Mouser Australia
Excellent advice Bolserst and it aligns well with the advice I received 2 years ago, but could not remember. Explains the resistors I had and all good that I will now have a few "fancier" options in the parts box to compare.
Cheers
Grant
I'm 99.19% sure that these are indeed what I am looking for. I found (4) on E-Bay for $6.00 shipped, so I bought them. Once they are here, I will see for sure. I already used the other (4) on one speaker and they are just the ticket. They work really well.
Makes me chuckle to think that Jim (Strickland) re-purposed these for this situation. Sounds just like him. I was an Acoustat dealer from almost the beginning to almost the end. I became very good friends with Jim and Dave, (Hafler). I opened my first high-end store when I was just 22. Without the help and guidance of those two, I wouldn't have made it.
Got these in the mail this afternoon. They are EXACTLY the same as the ones I have. Geez, these work really well for this purpose. Got speakers all put back together now. Will have 200 hours of burn in on the new Mundorf caps here in just a few days. Will report back with my impressions on the "C" mod...
Attachments


Acoustat 2+2 "C" mod info & impressions
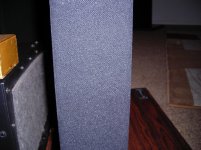
Sorry this has taken so long. I had to have the help of several people and was at the mercy of their schedules. I not only did the "C" modification to my 2+2's, but also reinforced the frames, tightened up all the panels, vacuumed the panels several times, painted all the black metal parts and replaced the fabric. So, more or less, a complete restoration. They turned out AWESOME! Look like I just took them out of the box.
Now on to the "C" mod:
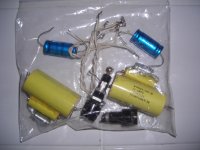
I used the following parts for my "C" mod:
Vishay/Dale 10 Ohm/50 Watt aluminum housed resistors
Mundorf EVO Alum+Oil Caps (all 3 values .01, 10, 47)
Kimber TCSS Chassis Wire (you only need 4 short pieces)
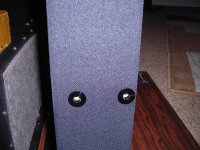
Cardas Binding Posts with 12 Gauge Vampire wire to the board
Monoprice 14 Gauge shielded AC Power Cables (12 ft)
Radio Shack Deluxe Fuse Holders (for the "audio fuse")
Cardas Silver Solder (while inside, I touced up all of the solder joints)
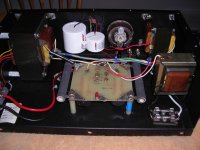
I'm pretty decent with a soldering iron, (certainly not in the same league as Andy or most of you guys, but not too bad). This was a pretty easy and straightforward mod. I just followed the picture and really didn't even read the steps. The picture was easier for me to follow and I checked my work like 100 times.
I let the speakers charge for 3 hours before I turned my system on. My initial listening session was several hours, taking notes along the way. Then I put on a Tune-In radio station 24/7 for 9 straight days. I put over 200 hours of burn-in on the Mundorf caps before I started my serious listening. I did periodically step in and listen throughout this period, hearing improvements each time.
I've done enough cap mods/upgrades to various preamps and phono stages, that I have a pretty good take on burn-in/forming of higher end caps. I'm still not convinced that the caps are fully broken-in yet, but they are close. Just a smidgen of a hardness and edge, but way better then before.
Within the initial 30 seconds of "Delta" by CS&N, the first word that popped into my head was "blossom". The high frequencies just blossomed. I thought they sounded very good before, but holy moly, I was missing a lot.
More air, presence, openness and everthing just smoothed out. It has an even wider soundstage and it was vast before, but now! There is more "there", there.
One of the surprises for me was the bass response. The bass is now much tighter and seems faster to me than before. I'm sure the frame work and tightening of all the panel bolts that I did, helped a lot, but this was even more than I was expecting.
IMHO, I now have a pair of Acoustat 2+2's that have been brought into the 21st Century. These turned out so well that I just sold my Magnepan MG3.6s, (although I'm keeping my Martin Logan CLSIIA in Rosewood) and don't intend to ever look back.
The "C" Mod is HIGHLY RECOMMENDED!!!
Sorry this has taken so long. I had to have the help of several people and was at the mercy of their schedules. I not only did the "C" modification to my 2+2's, but also reinforced the frames, tightened up all the panels, vacuumed the panels several times, painted all the black metal parts and replaced the fabric. So, more or less, a complete restoration. They turned out AWESOME! Look like I just took them out of the box.
Now on to the "C" mod:
I used the following parts for my "C" mod:
Vishay/Dale 10 Ohm/50 Watt aluminum housed resistors
Mundorf EVO Alum+Oil Caps (all 3 values .01, 10, 47)
Kimber TCSS Chassis Wire (you only need 4 short pieces)
Cardas Binding Posts with 12 Gauge Vampire wire to the board
Monoprice 14 Gauge shielded AC Power Cables (12 ft)
Radio Shack Deluxe Fuse Holders (for the "audio fuse")
Cardas Silver Solder (while inside, I touced up all of the solder joints)
I'm pretty decent with a soldering iron, (certainly not in the same league as Andy or most of you guys, but not too bad). This was a pretty easy and straightforward mod. I just followed the picture and really didn't even read the steps. The picture was easier for me to follow and I checked my work like 100 times.
I let the speakers charge for 3 hours before I turned my system on. My initial listening session was several hours, taking notes along the way. Then I put on a Tune-In radio station 24/7 for 9 straight days. I put over 200 hours of burn-in on the Mundorf caps before I started my serious listening. I did periodically step in and listen throughout this period, hearing improvements each time.
I've done enough cap mods/upgrades to various preamps and phono stages, that I have a pretty good take on burn-in/forming of higher end caps. I'm still not convinced that the caps are fully broken-in yet, but they are close. Just a smidgen of a hardness and edge, but way better then before.
Within the initial 30 seconds of "Delta" by CS&N, the first word that popped into my head was "blossom". The high frequencies just blossomed. I thought they sounded very good before, but holy moly, I was missing a lot.
More air, presence, openness and everthing just smoothed out. It has an even wider soundstage and it was vast before, but now! There is more "there", there.
One of the surprises for me was the bass response. The bass is now much tighter and seems faster to me than before. I'm sure the frame work and tightening of all the panel bolts that I did, helped a lot, but this was even more than I was expecting.
IMHO, I now have a pair of Acoustat 2+2's that have been brought into the 21st Century. These turned out so well that I just sold my Magnepan MG3.6s, (although I'm keeping my Martin Logan CLSIIA in Rosewood) and don't intend to ever look back.
The "C" Mod is HIGHLY RECOMMENDED!!!
Attachments
Good work, mraudioguru! I don't doubt the SQ is much improved. I've got all the parts to completely update my Model 3 interfaces - just waiting until I retire in April and looking forward to the results.
mraudioguru - Glad you like the C-Mod for the MK-121 Series interface. The circuit change was actually suggested by David Hafler, who owned Acoustat at the time. David knew a thing or two about transformers and the circuits driving them. I remember well the lunch with David and Jim Strickland where David sketched his idea on a napkin.
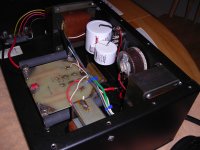
It appears in your photos that some wires may be resting on the large 50K resistors soldered to the board. These resistors can get hot under hard driving conditions, so take care to keep wires from touching these potential hot-spots.
It appears in your photos that some wires may be resting on the large 50K resistors soldered to the board. These resistors can get hot under hard driving conditions, so take care to keep wires from touching these potential hot-spots.
mraudioguru - Glad you like the C-Mod for the MK-121 Series interface. The circuit change was actually suggested by David Hafler, who owned Acoustat at the time. David knew a thing or two about transformers and the circuits driving them. I remember well the lunch with David and Jim Strickland where David sketched his idea on a napkin.
It appears in your photos that some wires may be resting on the large 50K resistors soldered to the board. These resistors can get hot under hard driving conditions, so take care to keep wires from touching these potential hot-spots.
Andy, thanks for the advice! I pulled the interfaces off and the wires really aren't touching the 50K resistors, but I moved them anyway just to be safe.
I had mentioned in a prior post that I became really good friends with both Jim and Dave while I was a dealer. Dave was the one who actually taught me how to solder, (well I already knew, but wasn't doing it quite right).
Last edited:

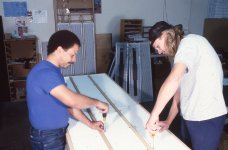
Hi Andy, I removed the socks to clean and noticed a Martin L. Richardson signed his name. Just courious was he a Acoustat employee?
That name does ring a bell, from when the plant was located in Tempe AZ. I think he is the one on the left, in the blue shirt. Note they are building a Spectra 66 or 6600.
Attachments
That name does ring a bell, from when the plant was located in Tempe AZ. I think he is the one on the left, in the blue shirt. Note they are building a Spectra 66 or 6600.
Thanks Andy, round florescent stickers on top of the panels indicates 4-4-91 DM.
Maybe if that photo was taken around the same time he is assembling my 6600.
2+2 PROBLEM
Hope this is the right place. 2s have been fine after reworking couple of years ago til last week. (No major changes just replaced a panel). Have run Anthem Room Correction several times with excellent results and still have measurements. Re-ran ARC last week and discovered a new problem.....strong roll off from 200hz down.Prior measurements were fine down to about 70hz!! ?????? Any ideas????
Also had partner check MK 121(blue medallion) and after checking schematic saw that pin was in 2 panel plug instead of 4 panel. ???
These are my original 2 +2s from long ago when we were dealers.
Visited factory way back and was amazed at the efficiency of the operation (background, industrial engineering). Few years ago, Jack Shafton (originally with Acoustsat) was my Anthem/Paradigm regional SM.
AA Man, some help please!
TJG
Tom Gregory
Mr Toads Stereo/Video
Kingsport/Johnson City Tn
423 483 1364
Last edited:
Thanks Andy, round florescent stickers on top of the panels indicates 4-4-91 DM.
Maybe if that photo was taken around the same time he is assembling my 6600.
Close, but probably not your speaker. Slides are dated March 91. The initials DM aren't triggering any memories. How cool it would have been if that was YOUR speaker.
Hope this is the right place. 2s have been fine after reworking couple of years ago til last week. (No major changes just replaced a panel). Have run Anthem Room Correction several times with excellent results and still have measurements. Re-ran ARC last week and discovered a new problem.....strong roll off from 200hz down.Prior measurements were fine down to about 70hz!! ?????? Any ideas????
Also had partner check MK 121(blue medallion) and after checking schematic saw that pin was in 2 panel plug instead of 4 panel. ???
These are my original 2 +2s from long ago when we were dealers.
Visited factory way back and was amazed at the efficiency of the operation (background, industrial engineering). Few years ago, Jack Shafton (originally with Acoustsat) was my Anthem/Paradigm regional SM.
AA Man, some help please!
TJG
Tom Gregory
Mr Toads Stereo/Video
Kingsport/Johnson City Tn
423 483 1364
I remember Mr. Toads. Try swapping the interface from one speaker to the other. Most likely, the problem will follow the interface, but this check will eliminate any problems with the panels. The low frequency tap should be on the yellow position for the 2+2 (four panels). If there's a bad contact there, it will definitely lower bass output. Then it's a matter of checking parts in the low frequency circuit: LF transformer, (2) 50K-ohm resistors on the high voltage board, the 1-ohm primary resistor on the transformer tap terminal strip, and associated wiring.
Acoustat tech
Hello Andy, glad to hear from you. I have resurrected my 2MH speakers after many years in storage. Had woofers replaced and the panels are working very well. Might need you help at some point. my email is mbb3@mindspring.com
Brooks
Hello Andy, glad to hear from you. I have resurrected my 2MH speakers after many years in storage. Had woofers replaced and the panels are working very well. Might need you help at some point. my email is mbb3@mindspring.com
Brooks
Andy,
Thanks for remembering us. Thanks for the tips. Will try tomorrow. My partner Ron fondly remember our trip to the factory in the din dark past. He is a great technical person and your info will definitely help. Still have a picture of Ron, Jack and myself from way back titled "it's after 11, do you know where your kids are?"
At this point I can't swap interfaces since I cannot loosen screws on right speaker. Any ideas there?
Again thanks,
Tom
PS BTW, these 2+2s are my original ones from the glory days!
Andy,
....At this point I can't swap interfaces since I cannot loosen screws on right speaker. Any ideas there?
!
The screws may be rusted in place. First, make sure you are using anappropriately-sized screwdriver. Tryplacing the screwdriver in contact with the screw head, and then gently tap the other end of the screwdriver with asmall hammer. Often this is enough tobreak the bond, and the screw will then back out. A small drop of penetrating oil may help too,unless it’s the connection on the grille cloth, where you’d want to avoidstaining the fabric.
Mine were rusted on too. I found that if you have or can borrow a really long screwdriver that places the driver handle above the interface, you get a lot better grip and torque. You might find that the larger/longer the screwdriver, the blade tip might be too large for the screw head slot, (mine was), but I just took a file and filed off just a tad on each side of the blade tip and got it to fit just right and tight and the screws came loose no problem.
Be carefull, I've seen the heads twist off and leave the screw in place 🙂 . If that happens, buy a ccw drill bit and drill in center and it will catch and spin them out. At least mine did.
Al
Al
Anyone tried a Carver ECS-U ?
This was made for their ribbon speakers but has some bass enhancement features and the holograph function is optimized for planar speakers. Someone nearby has one for sale. I have a carver c1 and usually keep the holography turned on for my 2+2’s.
This was made for their ribbon speakers but has some bass enhancement features and the holograph function is optimized for planar speakers. Someone nearby has one for sale. I have a carver c1 and usually keep the holography turned on for my 2+2’s.
- Home
- Loudspeakers
- Planars & Exotics
- Acoustat Answer Man is here