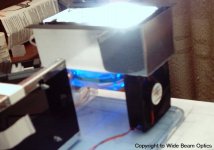
ok and here it is just sitting together in place, there will be a top cover made that seals the outer gap so that only air comes through the honeycombe, but in a test with smoke the only air that seems to get sucked in is through the honeycombe, the vents actually draw the air in through the holes because of the shape of the vent and the way they are facing and the airflow direction so its not realy that important although ill still fabricate one in the mounting stage, also talking about mounting the angle u see on the top and bottom of the box is the mounting bracket that will butt upto the end of the lcd unit and to part B. (the pyramid and condenser).
ok testing time, in the next series of pic's u will see the inital testing but before we get to that i have coverd the outer of the light box with the holographic silver covering, although a pain in the *** it beats the hell out of painting this time of year as it takes for ever to dry in the winter lol pluss it is also matched to the lcd units angles as planned, the light box runs that cool there is probally the same risk as getting hit by a meteorite then for this stuff to catch fire, the unit is still not riveted in the next shots getting rivets today, now for the results, in this pic the light is on, its 14000lm, im half blind and as u can see no light at all out of the fan.
Attachments
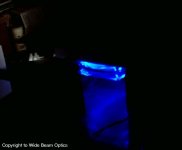
ok in this pic i have blanked out the top with a thick peice of cardboard to make sure no light is coming out of the blue led fan, if u look to the far left u can see a small line of light that escaped from the top from a small gap inbetween the cardboard and the top on the light box, as u can see no white light out of that fan, only the blue leds light!
Attachments
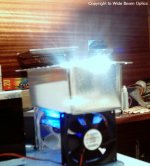
ok time for the airflow test, look at that smoke get suck in! the 2 fans u see holding the unit up are just to do that, they arent on and are there just to be used as a test bench, also in this pic what u cant see is 2 bits of alloy i used the block the outer vents off so that all air is going through the honeycombe as designed even though all air goes through it with them there or not as earlier stated, also that smoke is cigarete smoke that i blew into the air above it and it sucked it down, its not a fire! lol, hope u enjoyed the pics more to follow soon.let me know what u think.
Trev
Trev
Attachments
Ace
I wish I were further along in my DIY knowledge so I could fully appreciate what you've accomplished. But even a noob like me can see the work that you've put into this...very professional looking!
First Cruser got me all excited with his design (in fact I'm basing my first project on his design). Then you come along and get me all pumped up about the small, compact "sexiness" of the smaller projector.
I can't wait to see what the final product looks like along with the images. Thanks for the inspiration.
Tom
==========
|
\|/
|
<------ | |----->
| |
| |
is that the direction of the airflow of the 3 fans?
|
\|/
|
<------ | |----->
| |
| |
is that the direction of the airflow of the 3 fans?
 my ascii art got chopped up. hope you can decipher it
Hey Ace, I'm sure you already posted it but I cant find what model LCD your using with this design.
tmitch
heya tmitch thanks for the nice complement, did cruser sort you out in the question u emailed me? i hope it helped, as for u cant wait to see the finnished product lol neither can i!!! ive changed quite a fair bit of it around and ive modded a few things, so its taking abit longer then what i had originally planned, but ill get there, my brain dont stop working in designing it, seems to be getting more eficeint and technical everytime i touch it creating more and more work but a cooler and quieter projector in the end with more engineering to help lengthen the life of the projector, i think this projector should last a long time but projectors only last as long as thier lcd (in this type of projector), but other things can cause potentional probems too in other areas and if your carful in what your doing and have some common sence then these obsticals are easy to overcome, mines not perfect in the design but close to it, where im putting the ballast its at a risk of bending the bottom floor not by much but still bending it, (about 1mm lol) that can easily be over come by adding another foot on the floor under the ballast, also on my lcd i dont have cooling, even though i have a small barrel fan for it and can quite easily add it, the heat that it gets too it is not required and by not using and needing a fan the lcd wont get contaminated with dust, my lcd runs at about 20deg c after 6hrs of use, yep ive tested it out, other then the minor problems mentioned that could ocur there is no other problem, nothing can burn, nothing can break, nothing will fry, nothing is overdrawing any current, nothing is over rated, all is fuse protected and insulated, and all optics is aligned and true, so its a near on perfect design, when making a lcd projector from scratch it isnt easy if u want it to work correct and to last, putting a lcd panel on a projector isnt a diy projector, however ripping a lcd monitor and putting it on a ohp its starting to get to diy, making somthing out of raw materials from scratch is diy, when u make yours Tom try to look at every thing from all angles, look at heat, power comsuption, saftey, noise ect, design a light engine and lcd housing first, i like to have my lcd mounted strait away after the rip and i even design the lcd housing before the actual light engine, this way the lcd can be kept out of harms way and its easy to test the light engine you may design, the best thing to do is to draw up a plan, get all of the gear rounded up first, then work out focal lengths, sizes of componets ect then draw the plan full size on paper acuratley, then begin to build, but before u draw anything up try to have an imagination of what u realy want to create as in shape, size and where its going to be in the room, colours come later, anyway Tom best of luck with your design and hope to see some results from u soon.
Trev
jcb
hey there jcb the link to my lcd is at the bottom of this post, by the way how is yours comming along?, i havt seen any post for a while, be sure to keep us updated.
Trev
http://cgi.ebay.com/ebaymotors/ws/eBayISAPI.dll?ViewItem&category=38650&item=2439872931
P.S oh btw the speed is 30ms ill have to look up the lilliput site to get the other details but thats about it in the above link
nmd_sb
hehehe nope i dont understand the pic, ill draw one up with the overal airflow and another scematic of the new layout.
Trev
my ascii art got chopped up. hope you can decipher it
hehehe nope i dont understand the pic, ill draw one up with the overal airflow and another scematic of the new layout.
Trev
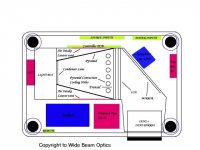
ok well here is the new design that im going to use, as u can see its starting to get quite technical, this pic basically shows the changes from the initional design and also the part B of the light engine that will be fabricated in a couple of days, also in the pic i havnt put in 2 power suplies because im abit iffy about the proposed fan and if i realy need it, i could put a psu there, or if i choose to use that fan then the psu's will go near the ignightor and cap unit, there will be a box made for the ballast for colour and cooling and also for the ignightor and cap unit although that stays cold, the controller pcb is now up the back where the inputs have very short cable runs thus eliminating any interference from anything, and the card is out of heat, the pyramid has also holes designed up the far end for any heat to escape in the natural convectional manner, air for the light box will be brought in through the side vents, they are louvers to block any light from going out, im also considering ditching the louvers and putting a fan there to push air in but i doubt ill have room for that, time will tell, ill have more schematics latter on with one for the cable runs, and air flow.
Trev
Trev
Attachments
Looks good Ace... I'll be updating my thread over the weekend. I'm wiring everything up and making the final adjustments. Now I'm trying to add a little style to the case... so we'll see how it turns out.
I'm looking forward to seeing the results from your LCD. For my next setup I might give the small diy's a try. I'd like to give the 3 LCD setup a try too. But that 7" LCD would be a little big for that.
I'm looking forward to seeing the results from your LCD. For my next setup I might give the small diy's a try. I'd like to give the 3 LCD setup a try too. But that 7" LCD would be a little big for that.
jcb
Heya jcb, thanks for the nice coment, i was wondering if you had troubles with yours or not because i havnt seen u post or the cam batteries wer gone, anyway looking forward to seeing the projector finnished and how the results are, im sure they will be bright lol.
regarding the smaller projectors now, ya 3 of these lcd's would be abit too big for a 3lcd setup but it is doable, i think i could get one not much bigger then mine now it would depend on how u made the light engine, i dont know if it would work either cos the 3 lcd setups in pro projectors have the lcds colours separated like for instance lcd 1 is just blue, lcd 2 is just green and lcd 3 is just red, somthing we would have to look into, i dont think aligning them would be very hard infact thats the easy bit compared to some of the stuff ive been making latley lol, the results of one of these lcd's i have arent too bad actually, in the quick test i did i used composite video, and u know thats a crap quality infact so crap the picture isnt sharp on the actual lcd, somthing u dont notice on a crt as its less precise than pixels, but anyway yeah it looked great, with the lens i have its top notch for the projector, with a 4.5m throw (12ft) u get about a 9ft x 7ft image maybe a touch smaller and its crystal clear, although this is only a 150w bulb it does have its limitations on brightness at that size, in the test nothing was optimised by the way so some parts of the source looked alittle dim, in dark movies u notice it not only that it was a crappy source being coposite vid, i cant wait to try it on vga then it will have alot more colour and will be sharp as a razor, also better contrast and brightness, the screen door u will see in the menu quite easily and at a 4m throw the menu is very bright, but on video the screen door and reso is great, as a monitor before the strip the lcd was about 3x clearer then my crt and u couldnt see any screen door, anyway as i get this thing going ill post up some results in the test to give u an idea on what it looks like.
Trev
I'm looking forward to seeing the results from your LCD. For my next setup I might give the small diy's a try. I'd like to give the 3 LCD setup a try too. But that 7" LCD would be a little big for that.
Heya jcb, thanks for the nice coment, i was wondering if you had troubles with yours or not because i havnt seen u post or the cam batteries wer gone, anyway looking forward to seeing the projector finnished and how the results are, im sure they will be bright lol.
regarding the smaller projectors now, ya 3 of these lcd's would be abit too big for a 3lcd setup but it is doable, i think i could get one not much bigger then mine now it would depend on how u made the light engine, i dont know if it would work either cos the 3 lcd setups in pro projectors have the lcds colours separated like for instance lcd 1 is just blue, lcd 2 is just green and lcd 3 is just red, somthing we would have to look into, i dont think aligning them would be very hard infact thats the easy bit compared to some of the stuff ive been making latley lol, the results of one of these lcd's i have arent too bad actually, in the quick test i did i used composite video, and u know thats a crap quality infact so crap the picture isnt sharp on the actual lcd, somthing u dont notice on a crt as its less precise than pixels, but anyway yeah it looked great, with the lens i have its top notch for the projector, with a 4.5m throw (12ft) u get about a 9ft x 7ft image maybe a touch smaller and its crystal clear, although this is only a 150w bulb it does have its limitations on brightness at that size, in the test nothing was optimised by the way so some parts of the source looked alittle dim, in dark movies u notice it not only that it was a crappy source being coposite vid, i cant wait to try it on vga then it will have alot more colour and will be sharp as a razor, also better contrast and brightness, the screen door u will see in the menu quite easily and at a 4m throw the menu is very bright, but on video the screen door and reso is great, as a monitor before the strip the lcd was about 3x clearer then my crt and u couldnt see any screen door, anyway as i get this thing going ill post up some results in the test to give u an idea on what it looks like.
Trev
az
hey there az, not yet bud the way i did it in a test i didnt even have a whole wall to test it on, it went out of a door aswell in the room i was in so i could test the brightness of the screen and too see if it was evenly lit, i did another test on a big sheet of paper in this room for the same thing, there was alot of light polution at the time so i thought id wait until all is in better order before id take some screen shots, all was just sitting together, not very safe for the unit so i decided to do the quick test and to make the mods and light engine before any more testing, with abit of luck next week if time permits me and depending on my progress ill have a few test shots up.
Trev
ACe would you please add me to your yahoo thing and do you have an aim name so i can talk to you about some stuff
im on it now and ive added u lol on yahoo that is, i dont have aim messenger , i take it this is ac
Trev
Trev
- Status
- Not open for further replies.
- Home
- General Interest
- Everything Else
- The Moving Image
- DIY Projectors
- Ace_3000....pictures of Projector?