Thats what I get for assuming you were going to plop it on top of an OP. 
I don't even know why I said it was impossible... that was misleading... sorry.
You could definately have the screen at a 90+ degree through the slot, but that leaves too much board on either side of the lcd fpr MY purposes. If I tried to lay it on the OP like that, it would either be sitting at an angle or the card would lay on top of and block part of the lcd
With just a little more length on the ribbon you could lay them both flat, end-to-end. Would be More convenient for me.
And it does make it upside down, but I can just turn the whole thing upside down on the OP. Something you also have to accomodate for on your enclosure.
I just got a sony qa-1500 for pretty cheap on ebay so I'm fiddling with that right now... But im thinking about making an enclosure for the PSone screen too.
I'm looking forward to keeping up with your project as it progresses. You should start a new thread when you get pictures and what-not
Yeah - i should have mentioned I was building a custom enclosure for this one. I actually got it working tonight! I went to gamestop, and the had a car adapter for $8, so I hooked that up to my emergency car jump starter, and viola, it powered up and I got a nice picture. I plopped it on my overhead, and was got a nice reversed image, just what I wanted. I'm using the guts of a 3m 9200 for the optics ($40 shipped off ebay)and lighting, and will stop by salvation army later in the week to pick up an old tower case to put it all in. My goal with this one is a cieling mounted unit above the pool table projecting a 45" image on to a pull down slide projector screen salvaged from mom's atttic. I'm going for under $100, and so far I'm at $72
i also have a qa 1500, here's a link to my setup: (I added one pic of the psone screen tonight) Who says you can't have a projector in every room 🙂
http://www.diyaudio.com/forums/showthread.php?postid=327374#post327374
It's page 14 of post your results
Since then, I've added a nextvision 5, and connected the ps2 thru an s video cable, and both of those actions led to a crisper, much improved image. I also have an infocus 3600, and an old dukane with 16 colors, and I have to say, the build quality on the sharps are very good. Good luck with yours, and thanks again for your help and encouragement so far
opening lcd
Anybody that has taken apart the psone lcd I could really use some help. I dont exactly know where to start i unscrewed the part with the controls on it then i kinda pryed it up but i dont know what to do, should i keep on prying?
Anybody that has taken apart the psone lcd I could really use some help. I dont exactly know where to start i unscrewed the part with the controls on it then i kinda pryed it up but i dont know what to do, should i keep on prying?
Well, My screen was sans Case when I got it, so you might wanna wait until Doc or one of the other fellows gets back with the disassembly still fresh in their heads.
My dislaimer of sorts... 🙂
That being said... Just take out all the screw and crack that baby open.
Just be careful not to put pressure on the screen and crack it while doing it.
You can't really mess anything up, Your not gonna need the case afterward are you?
My dislaimer of sorts... 🙂
That being said... Just take out all the screw and crack that baby open.
Just be careful not to put pressure on the screen and crack it while doing it.
You can't really mess anything up, Your not gonna need the case afterward are you?
taking it apart
I found two more screws under the speaker grilles after I cracked them off with a screwdriver. I don't know how you can get the grilles off without ruining them, so it seems like either you ruin the grilles, or you crack off the plastic prying it open all around the edges. Mine came apart fairly clean, and I actually re-used almost all the parts to protect all the electronics.
Hope this helps 🙂
Attachments
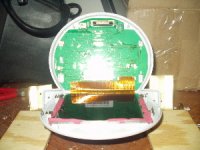
Re: opening lcd
LoL no, do not pry it!! most casings for electronic equipment disassemble without force once all the screws and what not have been removed. for the ps screen heres my advice:
1. the rubber pads that sit beside the screen hide screws beneath them, carefully use the corner of a razor to lift the pads. they are adhered with glue.
2. the speaker covers conceal screws as well. once again, carefully with a razor remove the speaker covers. (works best by sliding the blade in between the edges of the speaker cover and where it meets the case of the unit.) take your time and be careful, they should come off without too much hassle. once again, they are simply glued on.
besides the obvious three screws you can see with to begin with, thats about as much work as it takes to get that thing open. good luck everyone.
dettman23 said:Anybody that has taken apart the psone lcd I could really use some help. I dont exactly know where to start i unscrewed the part with the controls on it then i kinda pryed it up but i dont know what to do, should i keep on prying?
LoL no, do not pry it!! most casings for electronic equipment disassemble without force once all the screws and what not have been removed. for the ps screen heres my advice:
1. the rubber pads that sit beside the screen hide screws beneath them, carefully use the corner of a razor to lift the pads. they are adhered with glue.
2. the speaker covers conceal screws as well. once again, carefully with a razor remove the speaker covers. (works best by sliding the blade in between the edges of the speaker cover and where it meets the case of the unit.) take your time and be careful, they should come off without too much hassle. once again, they are simply glued on.
besides the obvious three screws you can see with to begin with, thats about as much work as it takes to get that thing open. good luck everyone.
Re: taking it apart
i hear all this about "cracking" and "ruining" and i must say, its a bit funny, i went and bought that screen brand new at a store, (i know waste of money considering how much i paid, but i needed to experiment and it was the only lcd i could get my hands on at the time.)
anyway, brand new in the box, take it home, spend like 30 minutes trying to remove the sony seal carefully from the box (as to make it appear unopened) i take the thing apart all the way down to just the screen and two main boards and use it for and ohp setup.
now i never intended on keeping this screen, i purchased it only for experimentation and educational purposes. my whole point to this post is that i was able to completely take the unit apart down to its bear innards (without cracking and ruining things). i used it for one day on my ohp while i got a better understanding on how light projection works. once i was finished, i reassembled the unit just as it once was, repackaged the whole thing and took it back for a refund. and the next person to go out and buy it will never have any idea the things it was being used for, and it will still look and function like its brand new. 😎
docbrown said:I found two more screws under the speaker grilles after I cracked them off with a screwdriver. I don't know how you can get the grilles off without ruining them, so it seems like either you ruin the grilles, or you crack off the plastic prying it open all around the edges. Mine came apart fairly clean, and I actually re-used almost all the parts to protect all the electronics.
Hope this helps 🙂
i hear all this about "cracking" and "ruining" and i must say, its a bit funny, i went and bought that screen brand new at a store, (i know waste of money considering how much i paid, but i needed to experiment and it was the only lcd i could get my hands on at the time.)
anyway, brand new in the box, take it home, spend like 30 minutes trying to remove the sony seal carefully from the box (as to make it appear unopened) i take the thing apart all the way down to just the screen and two main boards and use it for and ohp setup.
now i never intended on keeping this screen, i purchased it only for experimentation and educational purposes. my whole point to this post is that i was able to completely take the unit apart down to its bear innards (without cracking and ruining things). i used it for one day on my ohp while i got a better understanding on how light projection works. once i was finished, i reassembled the unit just as it once was, repackaged the whole thing and took it back for a refund. and the next person to go out and buy it will never have any idea the things it was being used for, and it will still look and function like its brand new. 😎
Re: taking it apart
I have been building a case for this sony LCD but it seems I have not that much pace left to put the controller board. What is the size of the controller board? Can you tell me this? Wat is the largest distance between controllor board and tft? I have not ordered a lcd yet because i want build my case first.
Thanx
docbrown said:I found two more screws under the speaker grilles after I cracked them off with a screwdriver. I don't know how you can get the grilles off without ruining them, so it seems like either you ruin the grilles, or you crack off the plastic prying it open all around the edges. Mine came apart fairly clean, and I actually re-used almost all the parts to protect all the electronics.
Hope this helps 🙂
I have been building a case for this sony LCD but it seems I have not that much pace left to put the controller board. What is the size of the controller board? Can you tell me this? Wat is the largest distance between controllor board and tft? I have not ordered a lcd yet because i want build my case first.
Thanx
the controller board is roughly a 6" circle.. i cant imagine how in the world your designing your projector case without having the insides there with you.. seems like it would be rather tough. 😕
the max angle you can get with the ribbon cable connected to the pcb is about 100 degrees, maybe 110. be aware, the controller board will not lay flat while attached to the lcd.. it must be positioned at an angle to function.
the max angle you can get with the ribbon cable connected to the pcb is about 100 degrees, maybe 110. be aware, the controller board will not lay flat while attached to the lcd.. it must be positioned at an angle to function.
Member
Joined 2004
i don't see how anybody could build the case for their screen without knowing the exact dimensions of the screen......
it's possible i guess but seems like it would make things extra hard for no reason....
it's possible i guess but seems like it would make things extra hard for no reason....
Lowjacker said:i don't see how anybody could build the case for their screen without knowing the exact dimensions of the screen......
it's possible i guess but seems like it would make things extra hard for no reason....
Why? Look at my first steps: click. I don't want to rush things and I first want to know if i could get any projection at all. (I only use 70 watt MH). I can, so then the next step is an lcd. If i have to rebuild my case or modulate it, so be it. Do you think that large car factory's build only one design and thats it. Building a prototype will give you more insite.
Jroxx said:the controller board is roughly a 6" circle.. i cant imagine how in the world your designing your projector case without having the insides there with you.. seems like it would be rather tough. 😕
the max angle you can get with the ribbon cable connected to the pcb is about 100 degrees, maybe 110. be aware, the controller board will not lay flat while attached to the lcd.. it must be positioned at an angle to function.
90 degrees is no problem?
Member
Joined 2004
well, if it works for you then go for it....it just seemed to me (at first) to be building a puzzle when you know all the pieces aren't there.......
but if you're doing alright, and it looks like you are, then by all means keep going......who knows you might just break into a new field of DIY projection
but if you're doing alright, and it looks like you are, then by all means keep going......who knows you might just break into a new field of DIY projection
Member
Joined 2004
Lowjacker said:gettin' closer to getting my screen....keep your fingers crossed
cool man, i just ordered one of those 7" lilliput monitors myself. if youre considering getting one also, i HIGHLY recommend you do. these things are awesome!! i was blown away by the clarity of the picture as well as the brightness and response time. these are great little monitors everyone!! between the psx screen i had and the lilliput, there simply is NO comparison whatsoever. another thing i noticed is screentext is much more visible with the lilliput (obviously, but the difference is huge) than with the ps screen. i have good vision and the ps screen text was next to impossible to read, even on the lowest resolution. with the lilliput there is no difficulty at all, i can read text with no problems now on my new screen.
Member
Joined 2004
I would like to get one of those screens but first i wanna try my hand at a PSX screen so I can get an idea of exactly how things work....
when I get more experience and money I'll move up in quality, but for right now I'm going with the cheap stuff......
when I get more experience and money I'll move up in quality, but for right now I'm going with the cheap stuff......
THat's what I keep saying too.
Unless you are getting the psonescreen for free or dirt cheap, you might as well go ahead and get a lilli.
The price is comporable to a new psone screen.
You'll thank yourself for getting the better screen
Unless you are getting the psonescreen for free or dirt cheap, you might as well go ahead and get a lilli.
The price is comporable to a new psone screen.
You'll thank yourself for getting the better screen
Lowjacker said:I would like to get one of those screens but first i wanna try my hand at a PSX screen so I can get an idea of exactly how things work....
when I get more experience and money I'll move up in quality, but for right now I'm going with the cheap stuff......
i understand not wanting to blow an excessive amount of money or taking risks with otherwise valuble hardware.. however, i must tell you, you more than likely will not be satisfied with that screen!! take it from my personal experience with the thing. i mean literally, i hooked it up, projected the image onto my wall, and was like, "ok, this is cool, but if i had only bought a better screen..."
now, i too sadly went out and bought one of those ps screens brand new for $150 dollars! but on the other hand i was never intending on keeping it, and i eventually took it back for a full refund, which went towards my new lilliput. i must tell you that if youre willing to buy (and not return for a refund), one of those ps screens, they are really worth no more than about $30 bucks. it is my experienced belief that these screens just arent good enough for what us DIY projector enthusiasts are looking for..
dont waste your money man, just save up for a better screen that you can afford. youll be so much more satisfied with your results. i can already imagine the difference in projected images i will have with my lilliput without even taking it apart. like i said, no comparison.
good luck!
- Status
- Not open for further replies.
- Home
- General Interest
- Everything Else
- The Moving Image
- DIY Projectors
- ace3000_1......psx lcd screens?