hi,I ask if they can fit the mlityc (4700/40) for the C1 output electrolitc capacitor (I have two of them advanced from another project).Regards Sergiog
btw when it comes to kits it would be nice if the same housing could support different iterations of the amp.
We hear you and we gave this a lot of thought actually, and Nelson had to re-layout the board just to fit the new "Mini Dissipante" 2U heatsink, when we found the heatsink brackets hit the old PCB shape.
We do plan on re-using the same chassis for multiple projects in the future. The "Transformer" amp should (bad idea to confirm things that aren't tangible reality yet) use the exact same chassis as the ACA, and that will be very much by choice.
Likewise for other projects that need slightly bigger chassis (such as a 2Ux300 (heatsink)x330 (wide) Mini Dissipante chassis). We are trying wherever possible to standardize so you can re-use more stuff and make more stuff and prevent obsolescence.
The ACA V1.5 / V1.6 chassis use our new 2U UMS pattern. This is now a standard, we just haven't got around to publishing the new UMS PDF yet (coming soon). This new layout is considerably better than the old one for the 2U format - the transistor holes with plenty of whitespace around them for good dissipation. So it's something we needed to do, now it's done, and we can move forward with this great new layout which shouldn't change again in a hurry.
The 2Ux200 and 2Ux300 UMS is exactly the same (they share the same center, and all the same holes), so you will be able to mount a 2U UMS project (like the ACA 1.5/1.6) on both chassis (2Ux200x230 and 2Ux300x330 (which we'll release in the future)), depending on how much cooling you need.
We default to using the smallest chassis possible that will handle the required heat, because it saves you money compared to a larger chassis, and makes these projects more affordable. I think most people will agree they look pretty darn "cute" too, quite literally a miniature "big" amp!
right now the braces prevent mounting the original ACA boards; and we have no idea of the boards for the upcoming iteration with a transformer (whatever that one will be called
Future projects will re-use the new 2U UMS and existing chassis wherever possible. We want people to make lots of amps, and make them as affordable as possible. Part of that is being able to re-use chassis as we know they are a significant investment, and we want that investment to pay off for you for years to come.
The ACA 1.5/1.6 chassis uses this 2U UMS pattern, we just haven't got around to publishing the new UMS PDF yet. This new layout is considerably better than the old one - the transistors are ideally placed at 33% / 50% width / height on the heatsink and there is more spacing.
I have 4 channels of the original ACA and if I was to repackage them in two stereo/or bal mono housings is there a way the old heatsinks could be tied to the new front, back and top/bottom boards or the height and front-to-back hole spacings are all new for the 1.1. and there is no backwards compatibility whatsoever?.
If I read it correctly, you want to use your ACA1.0 heatsinks (The small custom chassis with steel unibody that wraps around the heatsink), with the ACA1.6 boards. That should be possible - you would use the top 2 PCB mounting holes, and run wires to your choice of transistor mounting holes. I believe someone posted a picture of this earlier in the thread.
EDIT: Please see this post for an example of how you can make the 1.0 or 1b (or 1.1 given away at Burning Amp '17) fit in the new 2U profile: Amp Camp Amp - ACA
(Also added as picture)
Attachments

Last edited:
24 is the comfortable max.
Heat becomes a big issue, as does the voltage rating of the capacitors. Also the increase in power would be small, as we're dealing with a logarithmic scale.
The most direct way to make a genuine increase in power is run 2 as monoblocks.
Hmmm. How much power for Option 1 and Option 2 (from your build instructions)? I assume distortion will be lower in Option 1?
1) What is the output impedance of this amp (below 1khz), for the lower gain (10dB), higher feedback option?
2a) In the bridged monoblock version, I take it that the overall gain using two of the 10dB versions strapped together is 16dB? And the overall gain using two of the 14dB versions is 20dB?
2b) How does the output impedance change in the bridged monoblock version? Assume XLR inputs with a true balanced source.
Thanks,
Anand.
Hello friends!!
I'm really tempted to pre-order this batch and receive it after July as a self birthday present! 🙂
I have read and enjoyed this thread, as well as the videos, photos and explanations.
The possibility of having a DIY amp is just too tempting to pass. My question really is the matching up with my speakers. I have Totem Rainmakers, which are 4Ohms and only 87.5 dB/W/m. They are speced as requiring 30 - 100 W.
Am I fooling myself into hoping they would work with 8W (of the new 1.6 version). Would the monoblock configuration actually be any better at half the minimum suggested wattage? I currently have a NuPrime ST-10 at 150W per channel, so you can imagine the power hit, LOL!
Any idea (and if someone has heard both that would be incredible!), what kind of a sonic performance difference can I expect? Would it be better? Worse? More or less similar? More detailed? Less dynamic? Besides the thrill of making your own amp, do you think it would really be worth it?
I don't know for others, but I would be paying almost half the price of the amp in shipping, and then to deal with customs, so I may be looking at $550 for the 'finished' product (if I opt for the stereo version!, about $1000 for the two monoblocks).
Not really sure what to do, so some encouragement (or just dissuade me! 🙂 ) would be much appreciated!
Thanks, best regards,
Rafa.
for best inclusion in (small) Papamps Realm , you ought to have speakers of higher efficiency and sensitivity (not same thing)
so .......... obtain bigger speaks for ACA
or .......... obtain bigger speaks for some other bigger Papamp
or , still having them (Totems) - add pair of subwoofers , releve Totems of deepest bass , add passive or active xover , feed Totems with ACA and feed subs with Nu
or , still having them (Totems) - add pair of subwoofers , releve Totems of deepest bass , add passive or active xover , feed Totems with some other bigger Papamp and feed subs with Nu
no exact recipe without actual tryout
though , maybe this combo (see both start of text and last picture) will give you idea how funny combinations are always worth trying
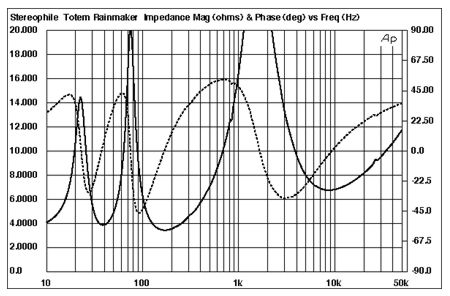
I’m currently using 86 dB speakers with 5w ACA 1.0 and am happy. Impedance curve thou is much easier to live with.
Here is the Rainmakers which have an ugly impedance curve (and likely the reason for the power recommended).
dave
Here is the Rainmakers which have an ugly impedance curve (and likely the reason for the power recommended).
dave
Thanks for the answers. That is really sad news 🙁 .
Over here, we have but one audio distributor, which carries only Totem, Paradigm and now Cabasse. The Rainmakers I have were the least expensive of all the options and I cannot purchase another set of speakers at the moment.
Same goes for a dedicated crossover and additional subwoofer (which I don't have and local options are also expensive) and involving all the pieces in the same space will be short of impossible.
I was looking at more of a fun project that will yield good sound with my current setup rather than getting involved in building a new house to make room for all the extra equipment 🙂 LOL!.
It's really a shame, I was really excited. Thanks for the brutal honesty friends. A big hug,
Rafa.
Thanks for the answers. That is really sad news 🙁 .
Over here, we have but one audio distributor, which carries only Totem, Paradigm and now Cabasse. The Rainmakers I have were the least expensive of all the options and I cannot purchase another set of speakers at the moment.
Same goes for a dedicated crossover and additional subwoofer (which I don't have and local options are also expensive) and involving all the pieces in the same space will be short of impossible.
I was looking at more of a fun project that will yield good sound with my current setup rather than getting involved in building a new house to make room for all the extra equipment 🙂 LOL!.
It's really a shame, I was really excited. Thanks for the brutal honesty friends. A big hug,
Rafa.
Why not build the ACA and get some experience what such an amp can do?
If you can measure your RMS and Peak levels on your speaker terminals with the setup you have then this will be an indication if ACA has sufficient power.
RCA input bridging instructions added to post #7 -
http://www.diyaudio.com/forums/pass-labs/320867-aca-v1-1-illustrated-build-guide.html#post5390540
Here are a few photos in the time being. 🙂 🙂 🙂


http://www.diyaudio.com/forums/pass-labs/320867-aca-v1-1-illustrated-build-guide.html#post5390540
Here are a few photos in the time being. 🙂 🙂 🙂
pre-ordered two ACAs 1.6 yesterday, planning to build them as SE monos 🙂
never ever even just attempted soldering (will practice every day while waiting)
a couple of questions:
- the chassis with front power switch... also has an hole for the rear one? hope it does not
- as a 2A3 SET owner... I'm really scared by 15W: can the max power be reduced (5 or 6W would be ideal) and, in case, will this have any benefit on SQ?
thank you all 🙂
1 channel - 1 output device - of ACA will be the same as 2a3 set regarding power.
No such thing as too much power, just user indescression.
No such thing as too much power, just user indescression.
I don't know for others, but I would be paying almost half the price of the amp in shipping, and then to deal with customs, so I may be looking at $550 for the 'finished' product (if I opt for the stereo version!, about $1000 for the two monoblocks).
Rafa,
If you're looking at those kinds of customs fees for your country, and you really want to build this amp, keep in mind that you can DIY it for a fraction of the price. At the end of Nelson's Amp Camp Amp article, he has a BOM detailing the individual core electronics parts prices from Digikey which come to $14.25 and he grabbed a surplus power supply for $5. Of course, the devil is in the details, and this doesn't include PCB, RCAs, XLR, binding posts, DC jack, power and toggle switches, LEDs, heatsinks and chassis, drilling and tapping workshop fees or machining tools, wire, nuts, bolts, washers, standoffs, insulators/grease, a premium reliable and tested PSU with warranty, etc, etc... you get the picture. And of course the peace of mind that you are actually going to complete this project and it's not going to just sit on the shelf until you "find time" to get all the bits together.
Last time I looked, the kit we're offering had more than 60 completely different line items in the BOM. You don't have to spend days (if not weeks) hunting for all those parts, making sure everything fits and everything works, you get trick components like Keratherm, it's beautiful, etc.
Although the complete kit price is $317, if you tried to buy all the parts individually at retail prices it would cost you a lot more than that, and you don't have to waste your time hunting around, so if you want the complete package $317 is a bargain for what's included and it saves you days of hunting for parts, machining chassis, etc. So yes it's... "DIY on a platter" which for me personally is exactly what I like - a cool project I know I can finish but that doesn't make it too easy so I feel a sense of accomplishment at the end and I've learned something new and improved my skills. A DIY dojo, if you will... and then level up to the next project and learn some new skills.
But if for some reason it costs a lot to get the platter to your country, don't forget that if you really want to experience the magic of this simple amp, you can DIY it on a very modest budget using a breadboard, buying surplus parts, and being creative with the heatsinks and chassis/enclosure. Once you've built it, you'll want to build more 🙂
Last edited:
I have the previous version mono blocks. So would they be able to be bridged just like the new version? They have a power supply for each channel and slightly smaller heat sinks. It looks like we could use either the RCA mono block attachment or an external cable to go from XLR to 2 RCAs to go into each mono block. Reason is I am changing speakers to less efficient ones and also building the M2X for my fronts. So I may want to use the ACAs to power my center channel which will need more power than 5W.
If I bridge two of the ACA kit 1.5, I understand the output could be as high as 20 WPC, but wouldn't that mean I have to use 8-16 ohm speakers? Is there any point bridging them if the speaker's nominal impedance is 4 ohms?
Last edited:
Okay, I'm confused: All of the documentation for the new 24v ACA ps says the so called "bias voltage" should be set at 1/2 the rail voltage, or 12v, and the documentation for the first 19v version somewhere in the neighborhood of 10v, a rough approximation of 1/2 the rail voltage. This build guide says to set the 24v operating point at 10v. Am I missing something? I know it is not a critical setting, but 2 volts is a fairly large percentage of the value...
From Meanwell 24V 5A power supply and power cord (PRE-ORDER - SHIPS JULY 31 – diyAudio Store
"To use the 24V PSU and also bring your ACA up to new 1.6 specification:
1. If you have a PCB that says revision 1.0, add bias resistor R15 (increases power to 6W)
2. If you have 1.0 or 1.0b, adjust R12 from 68k to 39.2k
3. If you have 1.0, 1.0b or 1.1, adjust the DC value on the output to 12V"
- Status
- Not open for further replies.
- Home
- Amplifiers
- Pass Labs
- ACA V1.5 Illustrated Build Guide