Just began the testing phase on the first of a pair of Silburys.
At this point I can say that I'm extremely impressed. Highs are about as you'd expect from the Alpair 10.3, but the bass extension is where it shines. There's far more of it than I ever would've imagined; in fact I suspect it's going to take a fair bit of stuffing to get it tamed. It's pretty smooth overall right out of the, er, box, but it just needs a bit of fine-tuning. BTW, I was also surprised to note that it seems to work best when it's closer to the wall (unlike my FHXLs), which bodes well for their eventual placement in the living room.
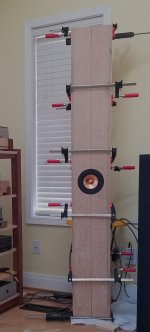
The picture shows my initial test setup prior to tuning/stuffing. I'm guessing this is one of those "stuff to taste" deals as there isn't a whole lot of information on this other than what's been posted/published for other designs. For that matter there's not exactly a wealth of info on building this design anywhere (except for this thread), so I'm considering the creation of a heavily illustrated build guide once they're both complete. Most of the concepts and techniques are applicable to nearly any flat-pack build, so this should (hopefully) have a wider appeal. Any thoughts?
Anyway, thanks to Scott for such an amazing design and for answering a lot of my stupid questions. If any of you have been on the fence on whether or not to build a set of these, just go for it. Your ears will thank you - even if your back won't. 😀
At this point I can say that I'm extremely impressed. Highs are about as you'd expect from the Alpair 10.3, but the bass extension is where it shines. There's far more of it than I ever would've imagined; in fact I suspect it's going to take a fair bit of stuffing to get it tamed. It's pretty smooth overall right out of the, er, box, but it just needs a bit of fine-tuning. BTW, I was also surprised to note that it seems to work best when it's closer to the wall (unlike my FHXLs), which bodes well for their eventual placement in the living room.
The picture shows my initial test setup prior to tuning/stuffing. I'm guessing this is one of those "stuff to taste" deals as there isn't a whole lot of information on this other than what's been posted/published for other designs. For that matter there's not exactly a wealth of info on building this design anywhere (except for this thread), so I'm considering the creation of a heavily illustrated build guide once they're both complete. Most of the concepts and techniques are applicable to nearly any flat-pack build, so this should (hopefully) have a wider appeal. Any thoughts?
Anyway, thanks to Scott for such an amazing design and for answering a lot of my stupid questions. If any of you have been on the fence on whether or not to build a set of these, just go for it. Your ears will thank you - even if your back won't. 😀
Attachments
Welcome to the world where more is more. 😉 There's a reason I design big horns (well, for my & Dave's Woden site anyway). Glad you're liking them so far, and I certainly don't recall any 'stupid questions'! Always glad to help builders answer anything I can.
Re damping, there's unfortunately a limit to how much advice it's possible to give on the subject in advance as it depends on amplifier output impedance, series R in the circuit, room size / physical construction and furnishings, so this is where there is room for a little adjustment by the builder. Silbury is a high-gain design and intended for quite close positioning to boundaries; you should find this provides the most linear response.
There aren't all that many pictures of my Woden horns around. Plenty sold actually, & I do like to be sent some, but I rarely receive any images of them If I did, a nice gallery would be an option for the site. Possibly people get concerned about the terms & conditions of use, which are simply that the design & plans are copyright & can't be shared, like any pay-for planset. No problem at all with photographs of the builds, providing dimensions etc. are not shared though -it's always nice to see pictures of builds; makes it all worthwhile. 🙂
Re damping, there's unfortunately a limit to how much advice it's possible to give on the subject in advance as it depends on amplifier output impedance, series R in the circuit, room size / physical construction and furnishings, so this is where there is room for a little adjustment by the builder. Silbury is a high-gain design and intended for quite close positioning to boundaries; you should find this provides the most linear response.
There aren't all that many pictures of my Woden horns around. Plenty sold actually, & I do like to be sent some, but I rarely receive any images of them
If I did, a nice gallery would be an option for the site. Possibly people get concerned about the terms & conditions of use, which are simply that the design & plans are copyright & can't be shared, like any pay-for planset. No problem at all with photographs of the builds, providing dimensions etc. are not shared though -it's always nice to see pictures of builds; makes it all worthwhile. 🙂
Last edited:
Very nice to see this thread here! I have been lusting after some Silburys for a number of years and I think I might be getting closer to actually building a pair. Looking forward to more pics and info!
I couldn't agree more (ouch!). 😀 Your remark about optimization explains a lot of my initial experience. I'm truly pleased. I wasn't really expecting much more than the FHXL to be honest, but now its obvious they're two entirely different designs with different requirements and goals.Welcome to the world where more is more.
Some observations:
- First, these jokers are huge. Really. But despite their mass and size they don't visually dominate the listening area as I'd initially feared. This was one of several reasons I was hesitant about this build, and it turned out to be completely unfounded. Part of it is probably the room size (I have a 16-foot ceiling), but I suspect its lighter color and its ability to perform well closer to the wall help also.
- Said mass and dimensions also make finding a way to ergonomically (read safely) lift them a bit problematic. I think I have a solution for that though.
- My one working example (the glue is drying on the other horn as I type this) has worked well with a variety of amps. A 2A3 SET will certainly drive it to a satisfying volume, but what it really likes is disciplined power. My PP amps with high(er) damping factors have achieved the most volume before hitting the driver's Xmax. Yeah, I've been there. 😱 Bass is noticeably more controlled, too - but I'll hasten to add that none of the single-ended pairings sounded "flabby" either. They were just different.
@ cogitech: I'd say lust no more, especially if your funds/space/skills/tools allow. If you're familiar with back-loaded horns then I think you'll be amazed.
I won't lie to you though, this is a challenging build. It's not particularly complex but it does take strength, skill and a good set of sharp tools to do it well. The results however, are worth it! 😎
Last edited:
Looks like i need to update the page. Besides no extents i have to add A11ms and P11 to the list.
Woden Design | Silbury
239 x 1827 x 398 mm (w x h x d)
dave
Woden Design | Silbury
239 x 1827 x 398 mm (w x h x d)
dave
Looks like i need to update the page. Besides no extents i have to add A11ms and P11 to the list.
Woden Design | Silbury
239 x 1827 x 398 mm (w x h x d)
dave
thanks Dave! I was a little off in my guesstimate. Are outriggers recommended for these? Seems like they could topple over without a lot of help.
Bob
Second horn now up and running. 🙂
Bass is somewhat "boomy", but not terribly so. It's not what I'd experienced with the single horn setup and I suspect (in fact I'm positive) that this is more of an issue with cabinet sealing and stiffness. I found that twelve clamps were sufficient to seal the first cabinet and prevent unwanted resonances. Now each has seven, so I'll have to purchase some more clamps before proceeding further. No big deal.
The old woodworker's adage is true; one can never have too many clamps!
And yes, outriggers are in the works...
It's been about three days since the Silburys have been operating as a pair so I thought I'd post an update. To cut to the chase - the more I play them, the better they sound! 😎 I was a bit hesitant to post any real listening impressions before now because 1) they hadn't been tuned, 2) the related bracing issue required attention (which I'll address shortly), and 3) the drivers haven't had time to break in properly.
The drivers are just now approaching about 100 hours, and are coming into their own. These are smooth-sounding speakers. A cursory 20 Hz-20 kHz frequency sweep showed nothing out of the ordinary, just a bit of harmonic "ripple" (nothing extreme, and to be expected). In fact, at this point I'm not even certain they need stuffing. I'll leave them clamped for a few more days and see.
Now for the details. The "boominess" I noted in my previous post was indeed due to inadequate bracing/clamping of the loose side, so I purchased a lot of clamps (which I've needed for a long time anyway) and put them to work. One trick to determining whether you've achieved good contact between the edges of the labyrinth and the loose side is to give that side a few good slaps in strategic places. If you hear a good, solid slap (or a *thock* if you're using knuckles) then you're good. If you hear *spack* then that means there's a gap; rearrange your clamps and try again.
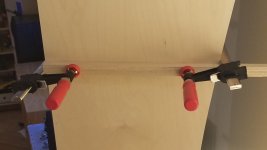
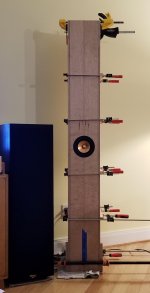
Another trick that will help your clamps go further during the stuffing/tuning phase is to use cauls (those of you who are more experienced woodworkers will know what I'm talking about). These are simply one inch (25 mm) strips cut from scraps of BB ply, and the idea here is to distribute the clamping pressure over a larger area. The first picture below shows one of these in action; the second shows the general arrangement over the whole cabinet. As an added bonus they can also be used for final glueup when the time comes.
I haven't abandoned the build guide idea, but I'd like to finish these out all the way before going too much further. There's till glueup, staining/finishing, and outrigger construction left to be done. The finishing may have to wait until better weather (it's 18 F - minus 8 C - as I write this).
The drivers are just now approaching about 100 hours, and are coming into their own. These are smooth-sounding speakers. A cursory 20 Hz-20 kHz frequency sweep showed nothing out of the ordinary, just a bit of harmonic "ripple" (nothing extreme, and to be expected). In fact, at this point I'm not even certain they need stuffing. I'll leave them clamped for a few more days and see.
Now for the details. The "boominess" I noted in my previous post was indeed due to inadequate bracing/clamping of the loose side, so I purchased a lot of clamps (which I've needed for a long time anyway) and put them to work. One trick to determining whether you've achieved good contact between the edges of the labyrinth and the loose side is to give that side a few good slaps in strategic places. If you hear a good, solid slap (or a *thock* if you're using knuckles) then you're good. If you hear *spack* then that means there's a gap; rearrange your clamps and try again.
Another trick that will help your clamps go further during the stuffing/tuning phase is to use cauls (those of you who are more experienced woodworkers will know what I'm talking about). These are simply one inch (25 mm) strips cut from scraps of BB ply, and the idea here is to distribute the clamping pressure over a larger area. The first picture below shows one of these in action; the second shows the general arrangement over the whole cabinet. As an added bonus they can also be used for final glueup when the time comes.
I haven't abandoned the build guide idea, but I'd like to finish these out all the way before going too much further. There's till glueup, staining/finishing, and outrigger construction left to be done. The finishing may have to wait until better weather (it's 18 F - minus 8 C - as I write this).
Attachments

Once you get those glued up you could add wheels to the base. Then you could have Traveling Silburys.
I see what you did there! 🙂
I'd considered that name in the context of lugging them to a hi-fi meet somewhere. But I do have a pair of furniture dollies that will be put use for finishing, etc. Like the old saying goes, "A journey of a thousand miles begins with a single step" - or in this case, "a single roll" might be more appropriate.
But cutting these does involve a lot of dust. After one garage session my wife called me the "Silbury Doughboy".
More pictures are forthcoming. The weather here has been pretty foul, and thus not exactly conducive to gluing or finishing. I'll probably have them buttoned up in another day or so.
But cutting these does involve a lot of dust. After one garage session my wife called me the "Silbury Doughboy".
More pictures are forthcoming. The weather here has been pretty foul, and thus not exactly conducive to gluing or finishing. I'll probably have them buttoned up in another day or so.
Last edited:
Since you seem to seem to be showing your (very nice) projects in the same room each year at Burning Amp as I do with my less refined ones, I hope you can get the Silburys in your checked luggage for next fall. I expect that glue will be your most effective upgrade.
Skip
Skip
Hey, Skip! I'm in good company as far as I'm concerned. Your projects sound awesome, and they're elegantly executed - especially your amp with the "chimney effect" cooling. I'm still looking for heatsinks so I can do that with my ACA boards from BA2017.
You're absolutely right about the glue as an upgrade. They underwent final assembly about two weeks ago, and they sound phenomenal! They were great even with the free side clamped, but they are really at their best when assembled as solid units. Last weekend I was able to veneer the raw edges of the BB ply, which immensely improved their overall appearance. The weather still hasn't been good enough to apply the final finish, but I'll be ready when it comes.
Build quality is everything with this design, and I suspect with the other Woden designs, too. They don't have to look good, but the dimensions have to be accurate and the parts must fit well with minimal gaps. That's not a weakness of the design at all, but rather a testament to its accuracy. I was amazed at how even a tiny leak would adversely affect the sound, the bass response in particular.
Attachments
Member
Joined 2009
Paid Member
Thanks, Bigun! I'm actually a bit embarrassed because I posted that picture before realizing the angle of the sunlight accentuated the surface flaws in the veneers. That and the big glue blob. Oh well, neither is a big deal as there's lots of planing and finish sanding to be done.
Aside from the weather the greatest impediment to building these has been the way they sound. They're like a set of floor-mounted headphones; they sound so good I can't pry my butt off the couch to finish them! Now that I think about it, that's not such a bad place to be. 🙂
Aside from the weather the greatest impediment to building these has been the way they sound. They're like a set of floor-mounted headphones; they sound so good I can't pry my butt off the couch to finish them! Now that I think about it, that's not such a bad place to be. 🙂
- Home
- Loudspeakers
- Full Range
- A Silbury Build