Drop me an email at my Woden address (see the Woden site link; it's at the bottom, I don't like writing it out on the main forum to avoid the joys of spam bots) & I'll be able to give you a fuller answer.
Nice job @Mr_Zenith !! ...and thank you for continuing to post and provide listening reports.
I definitely will be building a pair of these. It is only a matter of time. Right now I am side-tracked by a SET build. Hoping to finish that up by mid/end of April or so (realistically) so maybe Silburys will be a good project for late spring or early summer, when I can work with the garage door open.
I definitely will be building a pair of these. It is only a matter of time. Right now I am side-tracked by a SET build. Hoping to finish that up by mid/end of April or so (realistically) so maybe Silburys will be a good project for late spring or early summer, when I can work with the garage door open.
Much better stated. That's one reason why it took me so long to complete assembly: measure twice, cut once, and check three times before gluing - no kidding. That way you can make any small corrections with a hand plane or a sander before they accumulate. Prior to final glueup, I eliminated any potential gaps by placing a straightedge over the edges of all the interior members and shaving off any egregious high spots. The result was a tight, strong, leakproof box using a reasonable amount of glue and an insane number of clamps.No gaps.
Go for it! I've done both and they're excellent. 🙂Crap... I was going to build FHXL's for the a11ms I have coming. But I think I have room for these...
@ cogitech - Thanks! Considering your location it's probably wise to wait 'til summer. I've never been to Kamloops, but I've been to Lillooet and Gold Bridge. It can be chilly up there even in July.
Last edited:
@ cogitech - Thanks! Considering your location it's probably wise to wait 'til summer. I've never been to Kamloops, but I've been to Lillooet and Gold Bridge. It can be chilly up there even in July.
Kamloops is a bit different. June through August we regularly hit 35C (95F) and top out at 40C (104F). We typically get an overnight shift of 15-20C. Part of "Canada's desert". Rattlesnakes, black widows, cacti, sage brush, etc. Last May I setup the pool for the kids it was so hot.
Drive out of the city and increase your elevation by 1000 meters and the temperature is often 10C colder.
It's 13C (55F) and sunny here right now. Most of the white stuff is gone.
Same, 1/2 way up island !That’s pretty good. Only 7 and sunny over here on the South Island.
dave
That’s pretty good. Only 7 and sunny over here on the South Island.
dave
We're back to negative temps here again... Looks like a few more weeks of winter...
Funny thing this winter weather on the wet coast. Did you get any flooding on either property, Dave? When the ground is already almost completely saturated, 38mm in 24hrs seems like a lot more.
Of course, it’ll take some doing to surpass Tofino area’s total of over 1100mm for the months of this past December and January .
https://tofino.weatherstats.ca/charts/precipitation-monthly.html.
Of course, it’ll take some doing to surpass Tofino area’s total of over 1100mm for the months of this past December and January .
https://tofino.weatherstats.ca/charts/precipitation-monthly.html.
Wow, that's a lot o' rain!
Back when I lived in the hot and muggy southeastern US, I used to have trouble finding good days to spray nitrocellulose lacquer. The problem was a phenomenon called 'bloom' wherein high humidity would cloud the fresh finish almost immediately after being applied. The milky appearance usually went away if the coats weren't too thick, but there were a few occasions where I had to strip the finish and try again.
Since moving to the muggy midwest I've switched to a water-based spray finish that I consider to be much better in most respects. It doesn't bloom, it applies much more evenly, dries quickly, cleans up with water, doesn't stink, and is non-flammable. It does need to be protected from freezing, however.
That's what I'll be applying on the Silburys - when and if the weather cooperates. In the meantime I picked up a Makita random-orbit sander and a bunch of 220, 320 an 400-grit discs. That should keep me busy for a while...
Yeah, there’s no doubt you dint want to be spraying NC with an RH in the high 70s or above, and a humidity and temp controlled dust filtered spray booth is ideal.
Personally, though Ive always preferred the ease of building a thicker top coat that the post cats can offer, but yeah you definitely need to wear you VOC mask in the booth, and allow a good week for the curing process and majority of vaping off of solvents.
Might be time to try some of the new waterbornes.
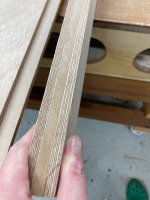
I have officially started my path towards a pair of Silbury enclosures for my Mark Audio MAOP 11's.. Plans ordered and starting my experimentation with materials, in particular carbon fiber reinforced multi-ply laminates for the cabinet and bracing. Using some scrap 5.5mm ply I have tried three constructions.
The [Wood / Carbon / Wood] (not pictured) was not sufficiently stiff, but with only 1 layer of carbon in the center thats not surprising.
The next was [wood / carbon / wood / carbon / wood] which is remarkably stiff (slightly less than full 18mm ply but considerably lighter per unit area and only 15mm in caliper) and the final was [carbon / wood / carbon / wood / carbon] which with only 2 layers of 5.5 mm ply is the lightest and equivalent stiffness to the [W/C/W/C/W] layup but exposed carbon is extremely difficult to get right..
With wood cladding on the outside and inside of the laminate it will make finishing easier and make construction / bracing easier as I can use conventional wood glue. I will try this W/C/W/C/W with 9 mm ply vs 5.5 and blends of 5.5 & 9 to optimize caliper / weight and stiffness. In order to maximize edge / face glue joints I'm leaning towards a tri-ply of 9mm as I worry epoxy saturation of the 5.5 mm core in the laminates will comprise edge wood glue penetration and leave a weak joint.
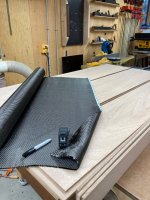
First panels in the vacuum bag!.. Cut the remainder of the panels for enclosure #1. 9 mm Meranti / 9 mm MDF / 9 mm Meranti.. With 18 mm BB ply internals (no carbon lamination) I'm gonna need rigging to move these when complete. Had to order a larger vacuum press (https://www.roarockit.com/tap-bags.html) to fit the 1850 mm panels (oversized to accommodate post lamination trim).. Plus, for those with Saw Stop table saws, dont forget Carbon is conductive and unless you want your project to include a new blade / brake mechanism, make sure you disable the sensor before cutting carbon fiber laminated boards.
Attachments

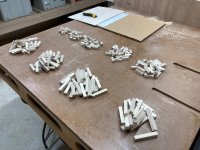
QRD diffuser, prime 241 for behind the driver. (http://actools.tunetown.de/prd/#) great site for diffusion calculations. 229 individual pieces ranging from 10mm to 90 mm. This "should" diffuse from 2k Hz to 13 kHz although I doubt given the proximity to the driver I' get complete diffusion but it will surely disrupt any slap-back off the rear of the cabinet. Will experiment w/ some felt over the diffuser when tuning the cabinet.
Attachments
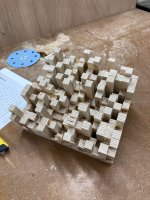

Something like the diffusor shown is also useful in the air cavity,
https://www.diyaudio.com/community/...-cavity-pre-chamber-to-the-next-level.195469/
dave
https://www.diyaudio.com/community/...-cavity-pre-chamber-to-the-next-level.195469/
dave
Thanks for the link.. If the volume of the cavity behind the driver is the critical parameter not the point-distance between driver and divider then should my "skyline" type diffuser be placed with the diffuser "mid-line" matching the divider location in the plans such that the resulting cavity volume remains constant?
Attachments
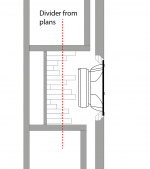
Yes it is the volume. The average distance needs to remain the same (another way of saying the same).
dave
dave
Now I see this, I wish I did the same with my Victors I recently builded, but it's too late... Will be added to my next build for sure.
I could use my 3d printer and fill the print with foam or concrete.
What is the best diffuser frequencies to choose for ? Is 2k as start freq not on the high side?
I could use my 3d printer and fill the print with foam or concrete.
What is the best diffuser frequencies to choose for ? Is 2k as start freq not on the high side?
- Home
- Loudspeakers
- Full Range
- A Silbury Build