Why deal with the hassle of fixing the existing cabinet when a better enclosure can be constructed for a few dollars and a couple of hours time? The current cabinet is eye catching but not all that practical in terms of having to repair what isn't done well. I say save the polished facia plates and move on.
soufiej said:Why deal with the hassle of fixing the existing cabinet when a better enclosure can be constructed for a few dollars and a couple of hours time? The current cabinet is eye catching but not all that practical in terms of having to repair what isn't done well. I say save the polished facia plates and move on.
Have you seen this link? We may disagree here but for a curved panel starting point, this enclosure is worth fixing up IAW that link. I am going to try the putty and then glue in some thin metal as constrained layer damping.
soufiej said:Why deal with the hassle of fixing the existing cabinet when a better enclosure can be constructed for a few dollars and a couple of hours time? The current cabinet is eye catching but not all that practical in terms of having to repair what isn't done well. I say save the polished facia plates and move on.
The only reason one could consider saving these cabinets is that most DIYers do not have the woodworking skills to make something that good looking.
curved side panels are a compromise. The way most commercial companies do it is by slotting the sides allowing it to flex. this is accomplished when one is into large scale production by using CNC wood cutting tools. For a DIY one method to use is to build a frame then take 6mm marine grade ply or 4mm MDF (MDF is tougher to bend) or a combination of both. Another method is to build a stack of ply/MDF pieces each cut to the shape (Rob wells build a subwoofer or 2 using this technique). Both methods are time consuming and require good wood working skills and tools.
Using the existing cabinet gives one a shell to work with and using resin bonded fiberglass mat will not only fill in those internal grooves but also improve stiffness. In addition to this since the cabinet wall is now using 2 different materials the resonaces will be better damped.
For your $150 seems to me that a set of FE126e in a set of Frugel Horns (or A126) or a set of FE127e in Fonkens or PAWOs would be a much better investment -- of course you'd have to build your own box.
dave
dave
From what I have seen, the basic cabinet is as cheap as they can make.... they probably picked up a pallet or two of kitchen curve mdf real cheap !! For mass production the process is probably easier than a normal rectangular cabinet !!
If ANY thought had been put into it, the slots would already have been filled !!!
If ANY thought had been put into it, the slots would already have been filled !!!
Thanks for the link. Though I now have to debate what I want to do. Should I just build a new cabinet? I have no real need for the curved sides. Yes, they look nice but why not simplify the operation and construct a wedge? Same effect at far less effort. Particularly if I'm going to stuff the cabinet full of acoustic damping material as with the original. I've tried cutting numerous parallel kerfs to bend wood for other projects and that is too time consuming when the benefits of a curved cabinet vs. a wedge don't appear to be that dissimilar. And the effect of floppy vs. solid would appear obvious.
Or, should I stick with the original cabinet with its vinyl finish and try to make it more audibly acceptable? I think the putty idea is fine except I'm still working through the driver's opening. I believe I would rather try to shave my cat's butt than do that. Again, a far simpler operation. The link did give me an idea however. I could super glue quarters in all the kerfs and that should provide sufficient rigidity, mass and damping. By the time I have this done, making a rough estimate of how many quarters this will require, I figure I'll have about a $500 pair of speakers than sound marginally better than the originals.
No, if anything the original cabinets need to go. Pretty and inneffective does not trump utilitarian and effective in speakers. I am really more inclined to agree with Planet 10 however. Do I really want to invest any amount of effort in what is a modest driver at best? I love good cheap speakers, but this is where I have to question what I will have in the end.
?$40 or $50
someone posted it is $40 when order on website and pickup at the store, but BB web has the pair for $50...
am I mistaken?
thanks,
gychang
someone posted it is $40 when order on website and pickup at the store, but BB web has the pair for $50...
am I mistaken?
thanks,
gychang
Only $31 per pair if you have access to someone who works for Best Buy. They get killer employee discounts there.
I'm a real n00b when it comes to DIY speakers. But I recently replaced all the drivers in an old pair of JBL 4800's with Dayton and Tang Band drivers and have been officially bit by the DIY audio bug! They sound great. I'm picking up a pair of these speakers today and plan on reinforcing the box with water putty and putting in No Rez. I have zero woodworking skills (GOSH!) so I thought this would be a good first project. Has anyone replaced the drivers in this speaker? What driver / crossover would you recommend? Thanks.
Before you replace any drivers have you looked at all of the links posted in this topic, there are a few mods you can do and with the driver mods, enclosure mods and crossover you might not want to do anything else. If you are going to mod the xover and swap the driver you migh as well buy some partsexpress enclosures and go from there.
Just a thought.
Just a thought.
nunayafb said:Before you replace any drivers have you looked at all of the links posted in this topic, there are a few mods you can do and with the driver mods, enclosure mods and crossover you might not want to do anything else. If you are going to mod the xover and swap the driver you migh as well buy some partsexpress enclosures and go from there.
Just a thought.
I will absolutely do the mods listed in this post. I find it very interesting. I want to replace my plastic JBL rears with these. I was just thinking that because I have no experience with woodworking (yet) and the low cost of the speakers, enclosure modification, that leaves a budget for even more improvement. I'm never one to leave well enough alone. I was thinking about upgrading the woofer, putting a tweeter where the port is and maybe moving the port to the top or someplace else, and replacing the crossover. It would be a fun project and much cheaper than buying a pair of speaker that would rival that sound.
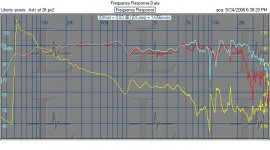

and still more measurements of Insignia
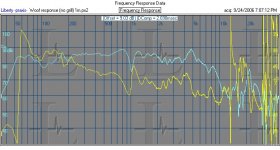
These are what I measured for the T&S parameters for the woofer only section. Followed by a shot of the woofer (only) response.
______________________________________________________
Insignia 6_5 inch
______________________________________________________
Qts = 0.527 Total Q
Qes = 0.609 Electrical Q
Qms = 3.932 Mechanical Q
Fs = 45.976 Hertz, Free Air Resonance
Res = 6.65 Ohms, DC resistance
Ls = 0 H, series inductance
Lp = 0 H, lossy series inductance
Rp = 0 Ohms, loss across Lp
Dia = 165m meters, effective
(%shift) 28.9 %, resonance with mass
Vas = 76.12 litres, air volume equivalent
mms = 10.10 grams, effective mass
cms = 1.185m m/N, compliance
bl = 5.647 T*m, motor strength
n0 = 1.168 %, max efficiency
SplSens = 92.67 dBSPL max @1W absorbed
(Added mass) 10 grams
______________________________________________________
Attachments
The 2 day sale is back ... so I picked up a set today for $39. Also got the wood putty and some 1" square dowel rods for cabinet strengthening.
Only question, I assume to remove the front baffle that you just stick a screwdriver under and pry it loose from the cabinet?
Only question, I assume to remove the front baffle that you just stick a screwdriver under and pry it loose from the cabinet?
Yes, it's that easy. Mine didn't require much pressure or prying at all for the front baffle to come lose.
>Only question, I assume to remove the front baffle that you just stick a screwdriver under and pry it loose from the cabinet?
Yes, but AFTER you remove the four torx bolts, of course!
Yes, but AFTER you remove the four torx bolts, of course!
I've had a pair of these speakers for about a week now and I am really amazed by the looks and sound for the money. I can't believe they were only $25 a piece. My daughter came over and the first thing she said was "Wow, cool looking speakers Dad!" I still need to do the water puddy and such but was wondering if anyone has replaced drivers/crossovers in this unit? I love the looks and better sound would be great!
I got one of the speakers puttied up today. I also used a 1" square dowel rod to make a side to side brace for the upper chamber, and an up/down brace for the lower chamber.
My thoughts on the enclosure are that there's more causing the cabinet resonances than just the grooves in the side panels. The top/bottom panels are just hot glued on, and the front panel (under the baffle) is actually two pieces, again hot glued together. I think one really needs to make the entire structure stiffer, not just the sides. To try and do this I first put a bead of liquid nails on all points inside where two panels meet - this wasn't easy, since the bottom joints are hard to get to - and it used almost a full tube of liquid nails. But with that, the dowel rod bracing, and a thick layer of water putty the enclosure now feels night and day better.
I'm also going to paint on a layer of something silicone based to the front panel. I wouldn't be surprised if the baffle vibrates a bit, the silicone under it should help. The 4 screws holding the baffle on aren't screwed down very tight, and it's impossible to get them really tight since the box is 1/2" mdf ... too much tightening will strip the holes.
I'll probably keep the crossover mods simple since I don't have the proper testing equipment to measure changes. And I'm just planning on using them for the presence channels on my Yamaha receiver, so going nuts would be kinda pointless. I might airbrush the front baffle some flashy color though, like cobalt blue ... just for the heck of it 🙂
- Status
- Not open for further replies.
- Home
- Loudspeakers
- Multi-Way
- A(nother) reason NOT to DIY