Member
Joined 2009
Paid Member
Member
Joined 2009
Paid Member
The outer box has to be oversized relative to the inner box. This is to allow a gap of around 1mm to accommodate a layer of Silicone which is designed to provide some vibration isolation between the inner and outer boxes. The outside box pieces will be glued firmly to each other with PVA yellow wood glue where they contact each other.
I decided it was best to start with the top of the box, trim the edges, then add the sides, trim them, and then the front baffle because each subsequent addition overlaps the last.
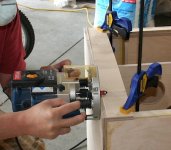
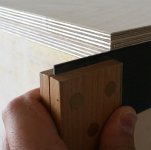
Therefore, the top has to overhang the sides and front/back of the inner box by the thickness of the Silicone, around 1mm. The best way to achieve this is to slightly oversize the top, then use a guided router to trim the edges back, using a shim of metal to set the thickness.
The first image shows a set-square held up as a temporary shim to set the overhang distance and the second image shows what we are trying to achieve. The top piece is glued in place already.
Attachments
Member
Joined 2009
Paid Member
Thanks !Very nice work.
So I managed to get the top and the sides glued in place. Next is the front baffle.
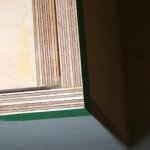
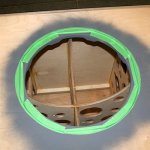
first image - shows the corner of the box, which is lying on it's back so that the front baffle is facing upwards towards the camera. The outer front baffle is 17mm thick birch plywood and it will be glued down on the top of this. It will be glued firmly to the edges of the outer box using PVA glue, but where it contacts the front baffle of the inner box it will be Silicone. You can see there's a gap between the inner box and the outer box.
I've taped (green masking tape) around the sides to prevent pva glue seeping out onto the surface during the gluing of the front baffle; it's a bugger to clean off otherwise and would badly affect the finishing later.
Not shown, but added later is a bead of silicone along the edges of the inner box, covering the gap between the boxes - this is to prevent pva glue seeping into the gap when the front baffle is pressed down - we don't want that to happen or it will provide a hard join between the inner and outer boxes whereas we only want the gap to be filled with silicone.
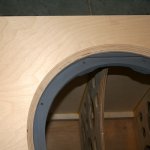
second image - taped around the driver opening to prevent silicone seeping out and making a mess there
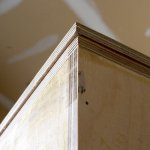
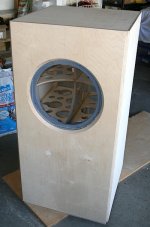
third image - the outer front baffle dry-fitted to the front of the box. It's been routed with a 45 degree chamfer and perfectly aligned with the driver opening in the inner box.
Attachments
Last edited:
Member
Joined 2009
Paid Member
looks kinda like a giant Audio Note speaker (minus the tweeter) or one of these http://www.trenner-friedl.com/download/PHAROAH-walnutnature-HR.jpg
And now here we are with the outer box in place, trimmed neatly.
Not to be superfluous, but just have to say.....that is so nice.
Cheers,
Terry
Now play some muxic. You're killing me.
I share your anticipation but as I have a pair of naked wood enclosures in my lounge I'd say finish them before you get hooked - 20:20 hindsight 😀
Member
Joined 2009
Paid Member
Thanks !.....that is so nice.
Good things come to those who wait 🙂 on the other hand, if it don't get done soon my neighbours will kill me first !Now play some muxic. You're killing me.
This thing is heavy and bulky, once it leaves my garage it ain't going back there, especially in the winter. So I will try to finish it. I'm thinking 'gel stain'.I share your anticipation but as I have a pair of naked wood enclosures in my lounge I'd say finish them before you get hooked - 20:20 hindsight 😀
For damping inside the box I'm thinking of cutting up a couple of rubber mats (yet to be purchased from a local Canadian Tire store) - what do you fella's think about gluing some rubber mat pieces to the insides of the box before I add the fluffy stuff ?
Sounds pretty good. Also check out heavily loaded vinyl. Although, I highly recommend listening to it at each stage, and be careful not to add too much stuffing.
Member
Joined 2009
Paid Member
Hi Melon - I need to learn more about this, it's new ground for me - I thought that the Vinyl was used to add mass, but I don't want mass but damping and rubber is viscoelastic and all that (it can be heavy too). Is vinyl better than using rubber ? why ? what type to use etc.
Vinyl contains plasticisers. These plasticisers are what give vinyl excellent viscoelastic properties.
Rubber is also good but it tends to have higher levels of elasticity not as viscoelastic. Having said that there are so many different rubbers and so many different ways you can modify them to get the properties you want, I wouldn't dismiss anything.
Even cork would be good if you don't want to add mass. Someone here tried it and liked the result. We also use cork at work to decouple servo-hydraulic machines from the ground so it obviously does work.
I would be inclined to play with cork sheet/tiles
Last edited:
Member
Joined 2009
Paid Member
Let your ear be the judge.
That's not practical - to do it properly I'd have to listen for awhile, then install one or the other type of damping material in the box and listen again - by which time the stuff is glued in place and ain't coming out again.
true.
I was referring more about the insulation
If you want to keep it light then cork is probably the best stuff
I was referring more about the insulation
If you want to keep it light then cork is probably the best stuff
then install one or the other type of damping material
Is there any precedence to be gleaned from the lining/ stuffing of speaker systems you have heard and liked? perhaps some of your own earlier efforts?
Terry
Member
Joined 2009
Paid Member
Hi Terry,
I'm a newbie at this, having built only two designs of speakers before, one the MARTELLO and another a small Onken style - both were small. Adding damping material would have reduced the volume beyond the design limits but at the time I simply didn't consider damping, it wasn't something I'd read about. I just used a layer of felt. They never made enough SPL that the cabinet wall vibrations worried me.
This latest project is simply much larger than anything I've seen or heard before. I don't think I'm going to sweat it too much, whatever I use is likely better than nothing but I was hoping somebody had some wisdom to share on this. It seems though most folk go for adding mass as the main goal whereas I'm looking at damping material that will absorb/dissipate energy rather than just mass-load the cabinet. It's heavy enough as it is. Some inexpensive rubber mats from Canadian Tire seems like a low cost & convenient option (Melon has me considering Cork but it looks relatively pricey). The recommendation is to have a damping layer at least half as thick as the wall itself which makes vinyl a difficult option as the tiles are usually quite thin.
Last edited:
For damping inside the box I'm thinking of cutting up a couple of rubber mats (yet to be purchased from a local Canadian Tire store) - what do you fella's think about gluing some rubber mat pieces to the insides of the box before I add the fluffy stuff ?
Why? You've already damped the panels with constrained layer construction plus added all the bracing that sufficiently stiffens up the inner shell, so all that's left is to add acoustical damping to quell all the various eigenmodes.
GM
- Home
- Loudspeakers
- Full Range
- A Big'un - the Audio Nirvana Super 15
