The holly brace 😀
It takes quite a while doing that. Nice work. Keep going. I want to see the smile on your face when you're listening to music through these suckers
Member
Joined 2009
Paid Member
thanks ! - and I think with the noise I'm making in the driveway I'll have to invite my neighbours for the opening ceremony !
Nice!!
I think the noise the finished speaker will make will be more than evident in your neighbours own homes 😛
thanks ! - and I think with the noise I'm making in the driveway I'll have to invite my neighbours for the opening ceremony !
I think the noise the finished speaker will make will be more than evident in your neighbours own homes 😛
Member
Joined 2009
Paid Member
I suspect you're right !
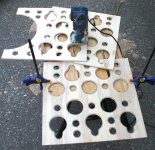
the shelf braces are coming along...
that part certainly is the most pain in the wrists, ain't it?
Last edited:
Member
Joined 2009
Paid Member
it certainly takes some time and effort to make a lot of holes !
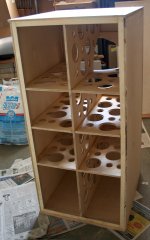
anyhow, the major braces are now installed along with cleats(?) around the back which I will use to bold the back panel to for testing.
The next step is to install a set of small braces to reduce the size of unsupported spans.
anyhow, the major braces are now installed along with cleats(?) around the back which I will use to bold the back panel to for testing.
The next step is to install a set of small braces to reduce the size of unsupported spans.
Attachments
Man i know hoe long that took. Great clean work. I am expecting you to reinforce Melons ringing endorsement for these drivers🙂
Member
Joined 2009
Paid Member
Thanks !
I've been adding more bracing, gluing ribs against the sides in order to increase the stiffness. It's already feeling very solid. The day job gets in the way a fair bit but I'm going to focus on the bottom of the speaker next - I want to glue on a piece of the back panel, just the first foot or so in order to provide a place to mount the speaker terminals and to provide another level of stiffness. I've added what nearly amounts to another shelf brace near the bottom but of a frame type not 'holey'.
The rest of the back panel will remain removable so that I can try it as an open-back speaker and also to allow ease of access to finish it off.
Any photo's?
I'm doing my holey braces very shortly, for my EmKens and I hope I do as good a job as yourself.
I'm doing my holey braces very shortly, for my EmKens and I hope I do as good a job as yourself.
Member
Joined 2009
Paid Member
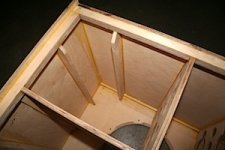
I'm placing extra ribs in parallel with the long direction of unsupported panels. These are nothing fancy, using up scrap pieces of wood left over from the build so far. They don't need to be positioned too accurately, in fact you want some variation around the box so that no two panels are the same.
Attachments
I'm placing extra ribs in parallel with the long direction of unsupported panels. These are nothing fancy, using up scrap pieces of wood left over from the build so far. They don't need to be positioned too accurately, in fact you want some variation around the box so that no two panels are the same.
Good shout on the little extra ribs, especially as the panels are so large. They work best if they are a different material (normally harder) from the panel itself, but as you have the holey braces in as well you'll be good to go.
Cant wait for the first play!!
I reckon you will be good to go on building a yacht for your next diy project. 🙂
Not so many holes tho 😀😀
Member
Joined 2009
Paid Member
I reckon you will be good to go on building a yacht for your next diy project. 🙂
way too much work ! - but funny you should mention it - I was thinking that the kind of carpet they sell for yachts would be good for fixing on the walls for damping - rubber backed carpet
Member
Joined 2009
Paid Member
Good shout on the little extra ribs, especially as the panels are so large. They work best if they are a different material (normally harder) from the panel itself, but as you have the holey braces in as well you'll be good to go.
Cant wait for the first play!!
yes, it will be something to look forward to - the driver is in my cold storage room (Canadian houses are still built with these things) playing an empty FM channel so they are breaking-in whilst construction continues.
Member
Joined 2009
Paid Member
I have chosen to use Silicone to attach the outside panels to the box. Hopefully, I'll be able to router-trim the edges of the inner box, clean it up, and attach a 2' x 2' panel to the top of the box using Silicone. It's a 100% Silicone glue, no additives. I've calculated that I need one tube for a 2' x 2' panel for a layer thickness of just less than 1mm.
Attachments
- Home
- Loudspeakers
- Full Range
- A Big'un - the Audio Nirvana Super 15


