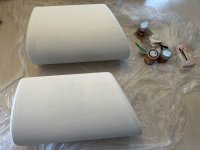
small update... during concrete cure I noticed small hair crack occured around binding post holes so I have filled those with very soft cement+water paste to prevent further spread:


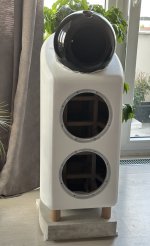
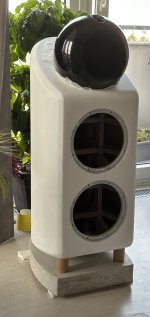
I think it was a success and after everything dried I also tried how its going to look with the posts, I think better then expected 😀 as concrete is quite thirsty I am still spraying it every day here and there with water but soon it'll be a week so I think I stop doing that soon. As its so dry, I got an idea that it would be very suitable to do some naming with water decals. After that I will paint it all with some water based varnish:

also i did a lil bit of woodwork - tried fitting teardrops into seats. To make it fit properly I had to dig in a bit into back wall. During final mount I will cure all survaces the teardrop sit on with some foam or rubber seal. Its going to be secured in place with a few "door" screws which I'll sand and polish so they look nice:


also all the walls are finished:

hopefuly over the weekend I'll trim the excess and mill all the edges
I think it was a success and after everything dried I also tried how its going to look with the posts, I think better then expected 😀 as concrete is quite thirsty I am still spraying it every day here and there with water but soon it'll be a week so I think I stop doing that soon. As its so dry, I got an idea that it would be very suitable to do some naming with water decals. After that I will paint it all with some water based varnish:
also i did a lil bit of woodwork - tried fitting teardrops into seats. To make it fit properly I had to dig in a bit into back wall. During final mount I will cure all survaces the teardrop sit on with some foam or rubber seal. Its going to be secured in place with a few "door" screws which I'll sand and polish so they look nice:
also all the walls are finished:
hopefuly over the weekend I'll trim the excess and mill all the edges
Last edited:

Looking good. 👍. The speakers are really coming alone and together now. Sounds like the hair line crack is no match for your skills. Question? How heavy are each concrete piece? Sure will help deaden the cabinet even further.😁.
I’m not sure about the screws being visible. Is there a better way? I don’t mean to judge, it’s just an observation
Jeffrey its 14kg for one stand
Jcris you mean the one on picture above? Its going to be located on a back wall, basically i wouldnt see that. But on the other hand i want to make impression that some extra piece is holding that. Ofc i could just whole glue it with silicone or so.
Jcris you mean the one on picture above? Its going to be located on a back wall, basically i wouldnt see that. But on the other hand i want to make impression that some extra piece is holding that. Ofc i could just whole glue it with silicone or so.
Last edited:
Wow 30 pounds still a good weight but, not to heavy. I think it’s the best Idea for your design. Now you don’t have to add lead shot or sand in a sealed chamber to deaden the cabinets. Great planing ahead.👍😁
Also, when I first read the title, I thought it was going to be a Bose 802 build. Only because I'm more familiar with Bose than B&W. Glad it's the latter.
Hello again,
To achieve the curvature of the walls I see you had to “ sandwich “ a few pieces of wood together. It appears this has created some voids between those pieces. I wonder if that will create unwanted resonance? I’m not sure how that curvature could be created otherwise. Kerf cutting perhaps? I wonder how this is accomplished by B&W, and other manufacturers? The internal bracing looks excellent though, so maybe that negates some potential issues. I’m certainly no expert but am enjoying your build.
To achieve the curvature of the walls I see you had to “ sandwich “ a few pieces of wood together. It appears this has created some voids between those pieces. I wonder if that will create unwanted resonance? I’m not sure how that curvature could be created otherwise. Kerf cutting perhaps? I wonder how this is accomplished by B&W, and other manufacturers? The internal bracing looks excellent though, so maybe that negates some potential issues. I’m certainly no expert but am enjoying your build.
To see how they do it just check youtube and search, there are plenty factory tours describing the process.
To my voids…Yes there are some spaces on outside extras (good catch!) as I have not applied much glue there and have not tied these outer parts with straps. Because there wouldnt be any internal bracing to hold it against and not to curve or damage the bend it goes loose free on edges. I pressed and tied straps only around bracing part.
Hopefuly it´ll be filled nicely. If not, I will inject glue in if possible. When I knock on walls sounds sturdy everywhere and no hollow spots
Last edited:
I haven't followed the whole thread so not sure if there is anything left to do with the curved sides, but... I made curved cabinets with 1/8" layers of plywood and used Gorilla Glue. You moisten the wood with water (I just used a small spray bottle) and it expands a fair amount, filling any gaps.
today I had some extra time and finally cut the excess plywood...
It wasnt ideal, because plywood wanted to chip like hell, but after some time I figured out the right way to guide the mill and it went fine. However there are a few issues visible and have to use filler again and sand again to fix a few mistakes.
I did a short clip of cutting the excess 🙂 beware of volume, its loud! one hand phone, one hand vibrating tool 😀
no video from the milling as I need two hand for that one 🙄
couple of images from the process below, cutting it flat as first step:


after that I milled all the plywood edges by 45° tool, I had rly big one and chamfer is about 30mm but still some part of plywood was flat. To have smoother transition over all edges I smoothed all by sanding with 80 grit:


When I bring them home ofc small black one had to check my work and do a sniff check 🤣

as there are a few issues next I am going to fill the mistakes with poly filler and sand everything, then I'll apply acrylic primer and semi-gloss black by foam roller, smth like "structure" surface of some sort, will see how it will come up, will do few tests on the bottom if i like it or not 😀
It wasnt ideal, because plywood wanted to chip like hell, but after some time I figured out the right way to guide the mill and it went fine. However there are a few issues visible and have to use filler again and sand again to fix a few mistakes.
I did a short clip of cutting the excess 🙂 beware of volume, its loud! one hand phone, one hand vibrating tool 😀
no video from the milling as I need two hand for that one 🙄
couple of images from the process below, cutting it flat as first step:
after that I milled all the plywood edges by 45° tool, I had rly big one and chamfer is about 30mm but still some part of plywood was flat. To have smoother transition over all edges I smoothed all by sanding with 80 grit:
When I bring them home ofc small black one had to check my work and do a sniff check 🤣
as there are a few issues next I am going to fill the mistakes with poly filler and sand everything, then I'll apply acrylic primer and semi-gloss black by foam roller, smth like "structure" surface of some sort, will see how it will come up, will do few tests on the bottom if i like it or not 😀
Last edited:
Ya for sure. I thought it was your sub woofer checking out the competition. 😂🤣.WOW, what a build project!!! So impressive. Looks like you have an odd 'woofer' in that last pic 🤣
Scott
P.S. My dogs do it by to and so does my cat. 🤷🏻♂️. Awesome Job. 👍.
a lot of sanding today... filled all dents and errors, sanding sanding and never ending sanding... after that I did first 2 layers of water based acrylic primer. Some fresh wood joints showed up, one month old ones stayed flat, so I think will keep it resting for a while...
anyway, after the first primer dries I'll sand it again and will see if that fix minor issues such as visible joints.
I must say I like it white too 😀 sooo big dilemma now, will think about it...
anyway, after the first primer dries I'll sand it again and will see if that fix minor issues such as visible joints.
I must say I like it white too 😀 sooo big dilemma now, will think about it...
Attachments

https://www.usaudiomart.com/details...gn=email-featured-ad-click&utm_term=649992127
Thought you might find this interesting
Thought you might find this interesting
- Home
- Loudspeakers
- Multi-Way
- 802 Diy speakers