
The big blue/green caps are 25V 2200uF each.
The little orange/yellow cap says: 103Z or something like that.
Can't really read on the small diods - black with a grey/silver stripe?
The little orange/yellow cap says: 103Z or something like that.
Can't really read on the small diods - black with a grey/silver stripe?
Oh, another thing. Can there be such a thing as a negative voltage? I might have left out some minus symbol on some readings.
When measuring the voltage over the 7810 I used the following spot as my Ground (black pen):
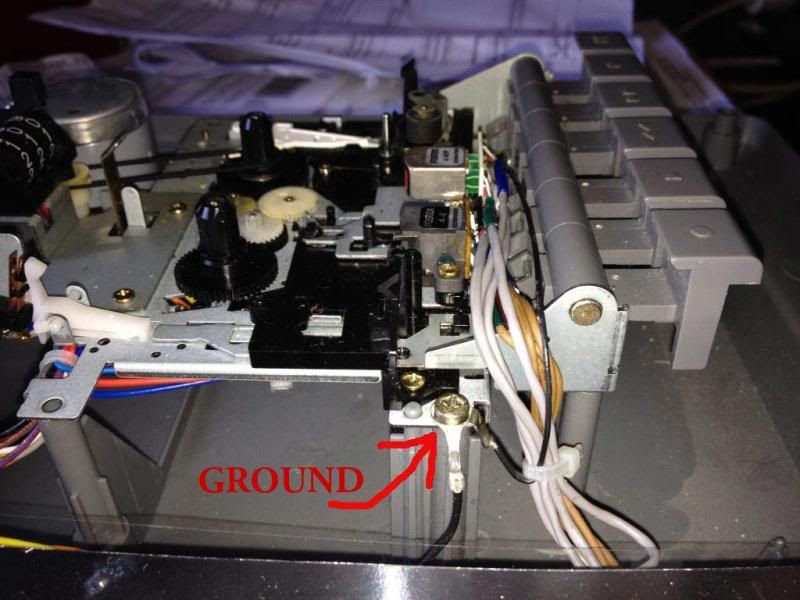
When measuring the voltage over the 7810 I used the following spot as my Ground (black pen):
The big blue/green caps are 25V 2200uF each.
The little orange/yellow cap says: 103Z or something like that.
Can't really read on the small diods - black with a grey/silver stripe?
Yes, the caps are useful in any audio equipment! Those might be useful when starting the motor 😕 and when using some flat car battery 😱
They add more levelling and act as energy reservoir tank ( or all together, i.e. when pressing play the motor asks for a current surge ...)
The diodes are for protetion against an opposite voltage - it might happen that you insert a non-proprietary wall mart with inverted plug connections...
The little 10nF cap is for filtering noise at HF.
I don't know about making it "perform better", not by replacing components anyway. The biggest gains would come from ensuring good alignment of the electronics with regard to the tapes used, thats bias, assuming it uses AC bias and also good alignment of the head (azimuth) although errors there are more applicable to ensuring good compatability with other machines.
The little PCB shows the two big caps are in parallel. The negative connection of the caps is almost certainly the "true" ground point and is the point to which all voltages would be measured. The point you have marked probably is connected to the same point but confirm it is... it may not be.
Assuming the 7810 is used in "voltage" mode i.e. as a regulator, then there has to be at least a 12 volt or so differential between pins 1 and 3.
When talking about improving performance this noob just started thinking maybe there's something else wrong and that the motor is getting too little power, and that that would be the reason that it doesn't fast forward like disired.
Measuring the voltage over the two legs of the big caps I get 14.7Volts on each.
Measuring the voltage over leg 1 and 2 of the 7810, I also get 14,7Volts.
Over leg 1 and leg 3: 4.6V.
I get the impression that the heatsink around the regulator is connected to ground. Between leg 1 of the regulator and the heatsink i get 14.7V.
Between leg 2 and the the heatsink I get 0V.
Measuring from the side marked 0 on the big caps I get 14.5V to the first leg on the regulator. 10V to the third leg and, 0V to the middle leg.
Seeing the other side of the power PCB might help us explain what is happening.
Sure!
I would suggest that if it's now working fine, make sure the heads, capstan and pinch roller are clean, put it back together and live life. There aren't any easy mods to do to this to make it much better.
I'm guessing the ffwd/rewd problem may be mechanical, possibly a bad belt or idler wheel. If you view the transport from the side with the belt that goes from the motor the flywheel, you will notice a second smaller belt. The smaller belt is what powers the rewind/fast forward functions. It could be that the smaller belt (or even the main motor belt) has lost tension and that is the reason why the ffwd/rewind functions don't work. Easy enough to test by putting a tape in it, activating ffwd or rewind and watching to see if the motor is turning fine but the belts are slipping.
Assuming the power supply is now correct, old belts would be my guess. I've seen similar in lots of machines. If it were me, I'd just order new belts for the thing and replace them while it's apart.
Nice work!
Steve
Last edited:
Measuring from the side marked 0 on the big caps I get 14.5V to the first leg on the regulator. 10V to the third leg and, 0V to the middle leg.
That sounds correct and is what I would expect. So it really does seem the reg was the culprit and the new one has fixed the issue.
I would suggest that if it's now working fine, make sure the heads, capstan and pinch roller are clean, put it back together and live life. There aren't any easy mods to do to this to make it much better.
I would tend to agree...
If the motor or its supply were at fault then it should be possible to tell just from the sound/visuals and feel of the motor that it is slowing.
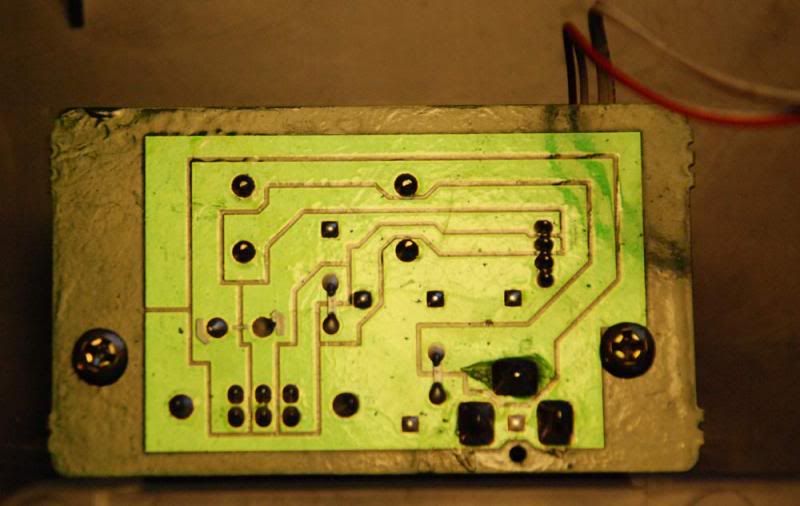
Tracing the PCB reveals no surprises. It is a DC power supply and requires a DC input. The bottom diode is across the DC input to protect against incorrect polarity and I'm assuming that the other diode is there to protect against the batteries being installed the wrong way round.
The two big caps are across the input DC and the smaller cap is across the switch.
The PCB would require a DC input of about 15-18V. DEFINITELY NOT AC, that would kill it.
The two big caps are across the input DC and the smaller cap is across the switch.
The PCB would require a DC input of about 15-18V. DEFINITELY NOT AC, that would kill it.
I would suggest that if it's now working fine, make sure the heads, capstan and pinch roller are clean, put it back together and live life. There aren't any easy mods to do to this to make it much better.
Done!
I'm guessing the ffwd/rewd problem may be mechanical, possibly a bad belt or idler wheel. If you view the transport from the side with the belt that goes from the motor the flywheel, you will notice a second smaller belt. The smaller belt is what powers the rewind/fast forward functions. It could be that the smaller belt (or even the main motor belt) has lost tension and that is the reason why the ffwd/rewind functions don't work. Easy enough to test by putting a tape in it, activating ffwd or rewind and watching to see if the motor is turning fine but the belts are slipping.
The belts look fine. I took loose the main belt from the motor and could see no indication that it was old/dry. The smaller one on the back/underside looks good too.
With no cassette inside the machine forwards and rewinds at the same speed.
With cassette inside, it rewinds although slower than desired/expected. Fast forward hardly moves at all.
The rewind wheel is sensitive to how much tape it has on its reel. It rewinds briskly when its wheel is empty, but it will give up and stop, before the whole tape has been rewinded. (I am using a C-90 cassette, and a C-60 would have caused less strain).
When pushing fast forward, the cog wheels spins like they should (but the wheel winding the reel) hardly moves or comes to a full stop.
Obviously, there's some kind of "thing" that makes the FF/RWD stop when all tape is wound up on a single reel. Could "that thing" be too sensitive, and because of that give up pulling too early?
Assuming the power supply is now correct, old belts would be my guess. I've seen similar in lots of machines. If it were me, I'd just order new belts for the thing and replace them while it's apart.
Nice work!
Steve
Thanks! New belts seems like a good idea. Just have to figure out where to buy them, and what size.
Tracing the PCB reveals no surprises. It is a DC power supply and requires a DC input. The bottom diode is across the DC input to protect against incorrect polarity and I'm assuming that the other diode is there to protect against the batteries being installed the wrong way round.
The two big caps are across the input DC and the smaller cap is across the switch.
The PCB would require a DC input of about 15-18V. DEFINITELY NOT AC, that would kill it.
Thanks for taking the time to examine it!
The powersupply measures 17.1V so that should tell us it's good enough right?
/C
Sometimes there is a friction clutch that drives the spindles and those can go bad as well.
In my past experience they cannot be fixed and have to be replaced with a new one, Good luck finding one if that is the case.
If it does have one Do Not try to clean it with any solvents or anything or else you will just render inoperable all together.
Replace the belt if you can get one and clean the surfaces of any of the other idler's, there may be one or two that are Knurled and these can slip if they have the slightest debris on them, This happens a lot in old VCR's.
Use a Q'tip or Chamios stick with Isopropanol to clean them and again make sure you don't get any in any of the clutch's I had mentioned.
Don't use rubbing alcohol, use a good denatured alcohol on tape decks, if you can help it, as it has an abrasive rubbing compound in it, or, only use pure Isopropanol if you can.
Sometimes replacing the belts require disassembly of the whole drive layer's so do be careful and keep track of what you are doing and how it is taken apart as it can get very frustrating if you should forget a part or spring and how it goes back together.
I used to repair a lot of this stuff back in the day and still do, I have had my share of headaches and sleepless nights over them!!! He,he,he 😉
I still have a Fostex X-26 laying around here that I never got to repairing.
Do Not!!! make any adjustments to the Bias or Azimuth screws unless you know the proper procedure using a properly calibrated test tape.
If you can find a test tape they are not exactly cheap as they are created with exacting standards.
There is not a whole lot you can do to up the quality of those machines other than some how finding and fitting it with a better tapehead and replacing and upgrading all of the opamp's in it once you obtain the manual.
Using the best lowest noise tape you can get your hands on is the only thing you can do.
Back in the day Sony SR was the best, then TDK MA, SA, SD and D and MAXELL XLII-S were the only tape I would use in my Tascam 103 mastering cassette deck.
Radio Shack's Supertape wasn't to bad either good luck in finding any of that stuff and if you do buy all that you can get your hands on!!
I still have my Tascam 103 after 25 years and it still runs great although it could use a new Tapehead now.
But it still works and sounds great.
I still listen to my stockpile of 400+ tapes of the formentioned brands.
Good Luck!!
jer 🙂
Last edited:
Some of those old C tapes drag a lot I still have some of those and they will barely rewind in my deck as well.
Put in a Quality tape and you will be amazed at the difference in the rewind speed.
jer 🙂
Put in a Quality tape and you will be amazed at the difference in the rewind speed.
jer 🙂
There is not a whole lot you can do to up the quality of those machines other than some how finding and fitting it with a better tapehead and replacing and upgrading all of the opamp's in it once you obtain the manual.
That's an idea ! instead of doing those - changing Opamps 🙄
A heavier, heavy-duty, sturdy build mechanic for tapes can be used !
I believe about + 30 dB in overall noise floor dynamics etc achievement😉
I once swapped out all of the Opamps in my Fostex 454 mixer and what a world of difference that was !!!
It gave my Mackie 32-8 a run for the money!!!
But that is about all that you can do other than use a quality tape as well.
New opamp's may make it sound cleaner for the most part but it won't do anything about Tape noise (hiss).
Only good tape can fix that.
jer 🙂
It gave my Mackie 32-8 a run for the money!!!
But that is about all that you can do other than use a quality tape as well.
New opamp's may make it sound cleaner for the most part but it won't do anything about Tape noise (hiss).
Only good tape can fix that.
jer 🙂
There is some Sony SR on E-bay right now!!
Don't be alarmed by the prices as I used to pay $5 to $7 a piece when it was new and still available in the local drugstores!!
jer 🙂
Don't be alarmed by the prices as I used to pay $5 to $7 a piece when it was new and still available in the local drugstores!!
jer 🙂
Sometimes there is a friction clutch that drives the spindles and those can go bad as well.
In my past experience they cannot be fixed and have to be replaced with a new one, Good luck finding one if that is the case.
If it does have one Do Not try to clean it with any solvents or anything or else you will just render inoperable all together.
Replace the belt if you can get one and clean the surfaces of any of the other idler's, there may be one or two that are Knurled and these can slip if they have the slightest debris on them, This happens a lot in old VCR's.
Use a Q'tip or Chamios stick with Isopropanol to clean them and again make sure you don't get any in any of the clutch's I had mentioned.
Don't use rubbing alcohol, use a good denatured alcohol on tape decks, if you can help it, as it has an abrasive rubbing compound in it, or, only use pure Isopropanol if you can.
Sometimes replacing the belts require disassembly of the whole drive layer's so do be careful and keep track of what you are doing and how it is taken apart as it can get very frustrating if you should forget a part or spring and how it goes back together.
I used to repair a lot of this stuff back in the day and still do, I have had my share of headaches and sleepless nights over them!!! He,he,he 😉
I still have a Fostex X-26 laying around here that I never got to repairing.
Do Not!!! make any adjustments to the Bias or Azimuth screws unless you know the proper procedure using a properly calibrated test tape.
If you can find a test tape they are not exactly cheap as they are created with exacting standards.
There is not a whole lot you can do to up the quality of those machines other than some how finding and fitting it with a better tapehead and replacing and upgrading all of the opamp's in it once you obtain the manual.
Using the best lowest noise tape you can get your hands on is the only thing you can do.
Back in the day Sony SR was the best, then TDK MA, SA, SD and D and MAXELL XLII-S were the only tape I would use in my Tascam 103 mastering cassette deck.
Radio Shack's Supertape wasn't to bad either good luck in finding any of that stuff and if you do buy all that you can get your hands on!!
I still have my Tascam 103 after 25 years and it still runs great although it could use a new Tapehead now.
But it still works and sounds great.
I still listen to my stockpile of 400+ tapes of the formentioned brands.
Good Luck!!
jer 🙂
Thanks for great tips!
I read in the manual that my Fostex XR-5 wants type II (Chrome) cassettes, 60 or 90 minutes, TDK SA - Maxell XLII or equivalent. So those Sony SR I believe won't work, right? I have quite a few old chrome cassettes lying around.
Being reasonable about it, I just think I should put it all back together. I can live with weak FF/RWD since I can always wind them on my cassette deck instead. If a transport belt should break, at least I know a lot more about how to change them and where to buy them.
Changing all opamps is not for me 🙂 - and I don't mind the tape hiss. The idea to get this old machine up and running is all about embracing the LoFi-limitations of the cassette medium, to get a little more grit and escape the sterility I sometimes experience in DAW-recording.
Time to leave the workbench and make some music!
Thanks again/C
- Status
- Not open for further replies.
- Home
- Source & Line
- Analogue Source
- 4-track cassette repair - sharp troubleshooters welcome!