So you are looking for design suggestions?
Looking at your SPL the box lacks a little volume, but I understand there has to be a limit.
Well, these drivers seem to suck on closed boxes (and so 4th orders also), but vented is way to go. So why not 2 vents?
Look at this 6th order. You could gain some SPL between 20 and 45 Hz. OK, you miss the SPL above 50 Hz, but it's a sub right?
He cannot go any bigger...his room is 10 x 9 x 8! Unless that is meters, not feet. He did say it was small.
OP: There is nothing wrong with MDF for a sub. I've had good luck gluing it up with plywood into a sandwich. You might get some positive results from them having different properties. If you end up using any product with melamine, make sure you get a really good, fine cutting blade so it doesn't chip out on you. I have had great luck with my plunging track saw cutting that type of material.
My wifes' family is from the Arecibo area, by the way. Good luck with your project.
Circular shapes are naturally more stiff than rectangular. In that case the tube ports will cost less material than straight slots, in favor for more internal volume of the box.
Bracing btw is not a difficult thing, you just need more on thin walls. You could add one at the centre of the driver and add some bracing on top and bottom.
Yeah, I've read somewhere about round ports being more efficient than supported slot ports too, so my first option was to use PVC/Schedule-40 but sold only by 20' and cost over $200 here, so opted for the cheaper cardboard form tube as seems to be already used by some in this regards.🙂
Non sure how precise but I've used this quick tube volume calculator to get an idea about the internal volume of the 8"Dia. x 38"L x ~1/4" thick and got about 0.96 cu.ft, so subtracting ~1/4" thick wall of the tube I guesstimate about 1.1 cu.ft.

Regarding on the braces yeah, I should definitely add a center brace so noted down, on the top/bottom I will add rib style bracing.
He cannot go any bigger...his room is 10 x 9 x 8! Unless that is meters, not feet. He did say it was small.
OP: There is nothing wrong with MDF for a sub. I've had good luck gluing it up with plywood into a sandwich. You might get some positive results from them having different properties. If you end up using any product with melamine, make sure you get a really good, fine cutting blade so it doesn't chip out on you. I have had great luck with my plunging track saw cutting that type of material.
My wifes' family is from the Arecibo area, by the way. Good luck with your project.
Hi homebuilder, Yes the room is about 10' x 9' x 8', pretty small room by the way.
I've used MDF on all my previous builds but they were relatively small speakers compared to this subs and they were heavy, hence I was trying to minimize the weight for this large subs, however since this subs will permanently remains in the front corners I could be fine doubling 3/4" MDF if I could not find any decent cabinet grade plywood here, and get a 4-wheel hand truck.

PS I'm from the Humacao area.🙂
Update:
I called a somewhat near lumber store here on my location where I previously bought 5/8" and 3/4" MDF from them, and they do carry cabinet grade A/B Plywood, unfortunately both the A/B Plywood and the 3/4" MDF is out of stock, however they said the order arrives in about a week or so.😎
I will give them about 2 weeks before call them again for availability, so I will head there and seek for the A/B Plywood on the first place and depending on they quality buy 6 sheets, if the quality/price ratio don't looks appealing, I will get the cheaper 6x 3/4" MDF, fingers crossed though.
Regards
Absolutely, that is one of the reason I want to avoid(if possible) the MDF, the dust and the weight, plus they don't like high humidity/wet as expected.
Since I'm in an hurricane/storm highly prone location, moving my 2way MDF speakers are easy, but moving this coffins may be a challenge alone.
Since I'm in an hurricane/storm highly prone location, moving my 2way MDF speakers are easy, but moving this coffins may be a challenge alone.
I always use a vacuum cleaner attached to the tool when I am cutting wood or any board. And if I paint something I use a protective mask etc.
Hi Machismo, the vacuum hose attachment is definitely a great idea that I've used few times, some power tools has this feature to easily attach an existing vacuum hose, also definitely a mask, *glasses* and ear protection is a must wen working power tools.😉
Regarding the MDF, last time I've cut and routed few sheets outside the house, the very tiny MDF particles impregnated the windows and some of them go inside the house through the window screens.
Regarding the MDF, last time I've cut and routed few sheets outside the house, the very tiny MDF particles impregnated the windows and some of them go inside the house through the window screens.
Last edited:
Update:
After searching for a moderately priced yet decent looking Plywood with no luck(too many side voids, inner cheap looking etc.), and after ~3 months of waiting, the MDF material finally arrived at the nearest wood shop in 3/8", 5/8" and 3/4" sheets, so I will use it regardless of the dust and weight.😉
At first I was planning on use 1.5" walls and make the boxes 48"H x 24"W x 24"D for an gross 11.5 FT^3.
However I was trying to get an even more compact enclosure(less tall) without sacrificing much volume if possible, and I was able to do so by using double 5/8" sheets to form 1.25" walls(still good with bracing), so the new box measures will be 42"H x 24"W x 26.5"D for an gross 11.8 FT^3, a slightly more that the taller box. 🙂
Here the 6x 5/8" MDF sheets:
I use 2x B&C 21SW152-8 in a LLT
Good day JRiv,
3 years ago I built a dual LLT sub using the B&C 21SW152-8 and I'm still quite happy with it's performance. The boxes are 540L each and have a bottom slot port tuned @ 11.5Hz. I would have chosen a round port if it were possible but the placement in my room didn't allow for that.
Best of luck with the build 😉
Photo's:
Last edited:
Hi Frank207b, your 21SW152's setup looks awesome and very well executed, which I had good skills/patient in sanding and painting like most, I find laminate way easier.😱
Between I've started on this project again as have some time and good weather to work with outside the backyard, to prevent the infamous MDF dust get inside the house.
Unfortunately I've had the 6 x 5/8" MDF sheets lying on the wall for quite some time and they developed a small bent as expected😱, so I just did the wall cuts(16 x 42"H x 24"W) and placed them in the floor with about 150Lbs on top to let them flatten again until my spiral router bits arrives.
Hopefully this project will turn out ok as I've never made boxes that big, nor used this kind of speakers for subs before.
Pictures of the walls cuts(16 x 42"H x 24"W):


Regards
Between I've started on this project again as have some time and good weather to work with outside the backyard, to prevent the infamous MDF dust get inside the house.
Unfortunately I've had the 6 x 5/8" MDF sheets lying on the wall for quite some time and they developed a small bent as expected😱, so I just did the wall cuts(16 x 42"H x 24"W) and placed them in the floor with about 150Lbs on top to let them flatten again until my spiral router bits arrives.
Hopefully this project will turn out ok as I've never made boxes that big, nor used this kind of speakers for subs before.
Pictures of the walls cuts(16 x 42"H x 24"W):
Regards
Last edited:
Hello JRiv,
The finish on my subs is actually not that great 🙂 I used Warnex paint that matches the couch. The top of the sub is also not very refined with pine planks glued together and finished with a grey stain. Laminate will look awesome too! Anyway these B&C drivers are nothing short of amazing and you'll certainly love their performance!
With all these weights in the picture, I'm sure you'll do fine with the enclosure. Just be sure to have enough clamps available before you start gluing. My experience is that you can never have enough of them. Also check the glue joints when you tighten the clamps. MDF/wood loves to slide under pressure and before you know it the alignment of the boxes can be off target really fast.
Hi, thank you for the tips regarding this build.
However since I don't have the long clamps atm, I have to do a time consuming dry-run assembly of the box to set pilot holes for the wood screws, then when all looks pretty aligned I set enough glue and screw-in, like on this very old build I did to play with an old subwoofer.😉
That was an old build and I definitely gone crazy with a ton of screws that time lol😱 and 1.5" walls(dual 3/4" sandwich), but now I will be easy on them on this build.
Also to cut down weight and gain some more air space I chose the 5/8" Masisa Light MDF(~64Lbs a sheet) to make 1.25" sandwich walls, though Light MDF is a little more flimsy than standard MDF but I guess braced should perform quite well for subs duty, hopefully I will not regret getting the standard 3/4" MDF.
Regards
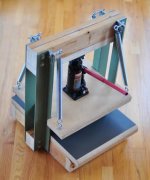
i had laminated my 18mm bb plywood, because i have limited clamps then decided to combine screws and nail gun - lots of them. the trick is to nail on the corner first and clamp it, apply as much as nail you have then hammer it. apply several screws to tighten the laminate
i have seen some of diy laminating clamps using hydraulic jack, looks fun to build if you laminate so many panels
i have seen some of diy laminating clamps using hydraulic jack, looks fun to build if you laminate so many panels
Attachments
Hi, thanks for the tips on the screws and nails combination, it is definitely another solution to clamping indeed, as long as the finished product being laminated it is no big deal, unlike serious painting finish.
The hydraulic laminate clamping tool looks pretty neat and probably very useful for bookshelves and small speakers projects indeed, though for big panels it will be more challenging.
Between pretty good electronics projects on your sig.
Regards
The hydraulic laminate clamping tool looks pretty neat and probably very useful for bookshelves and small speakers projects indeed, though for big panels it will be more challenging.
Between pretty good electronics projects on your sig.
Regards
that clamping station is just the beginning, it can be expanded into bigger one. use H beam steal as the structure then you can use 4 up to 8 hydraulics which can laminate 1 sheet of ply 😀
i almost bulid that station but then ended with more practical solution, if you have this as a business then it's a good investment but if just a hobby like me then nail and screw is enough
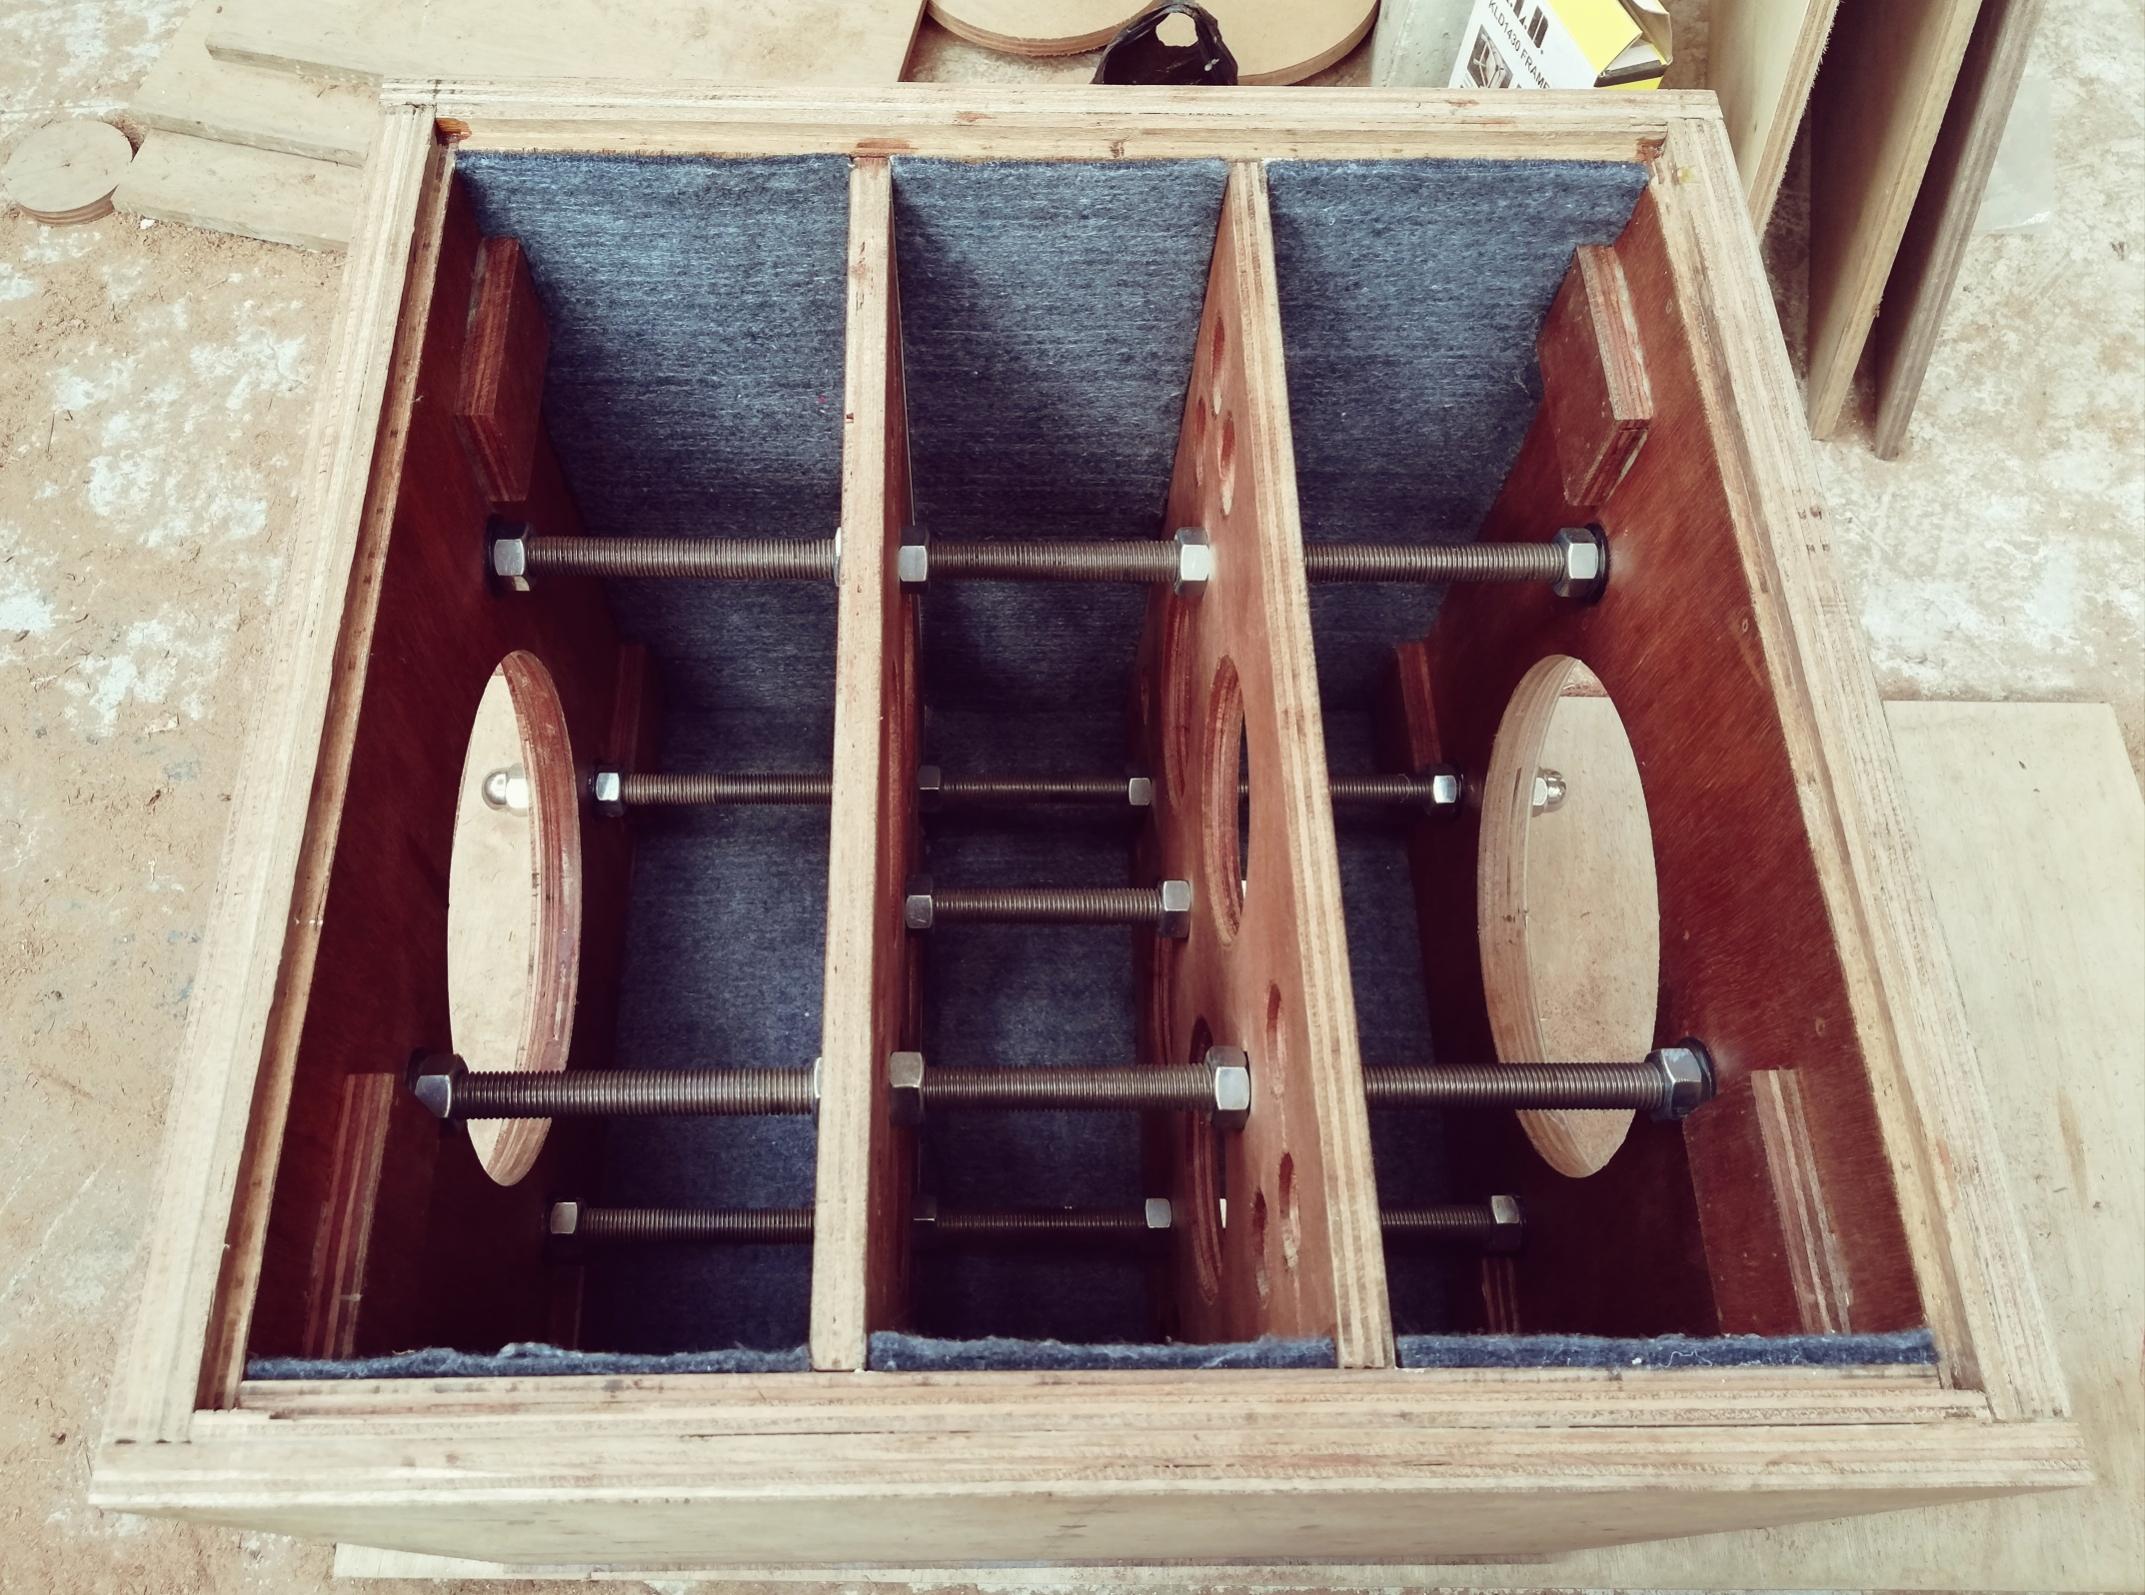
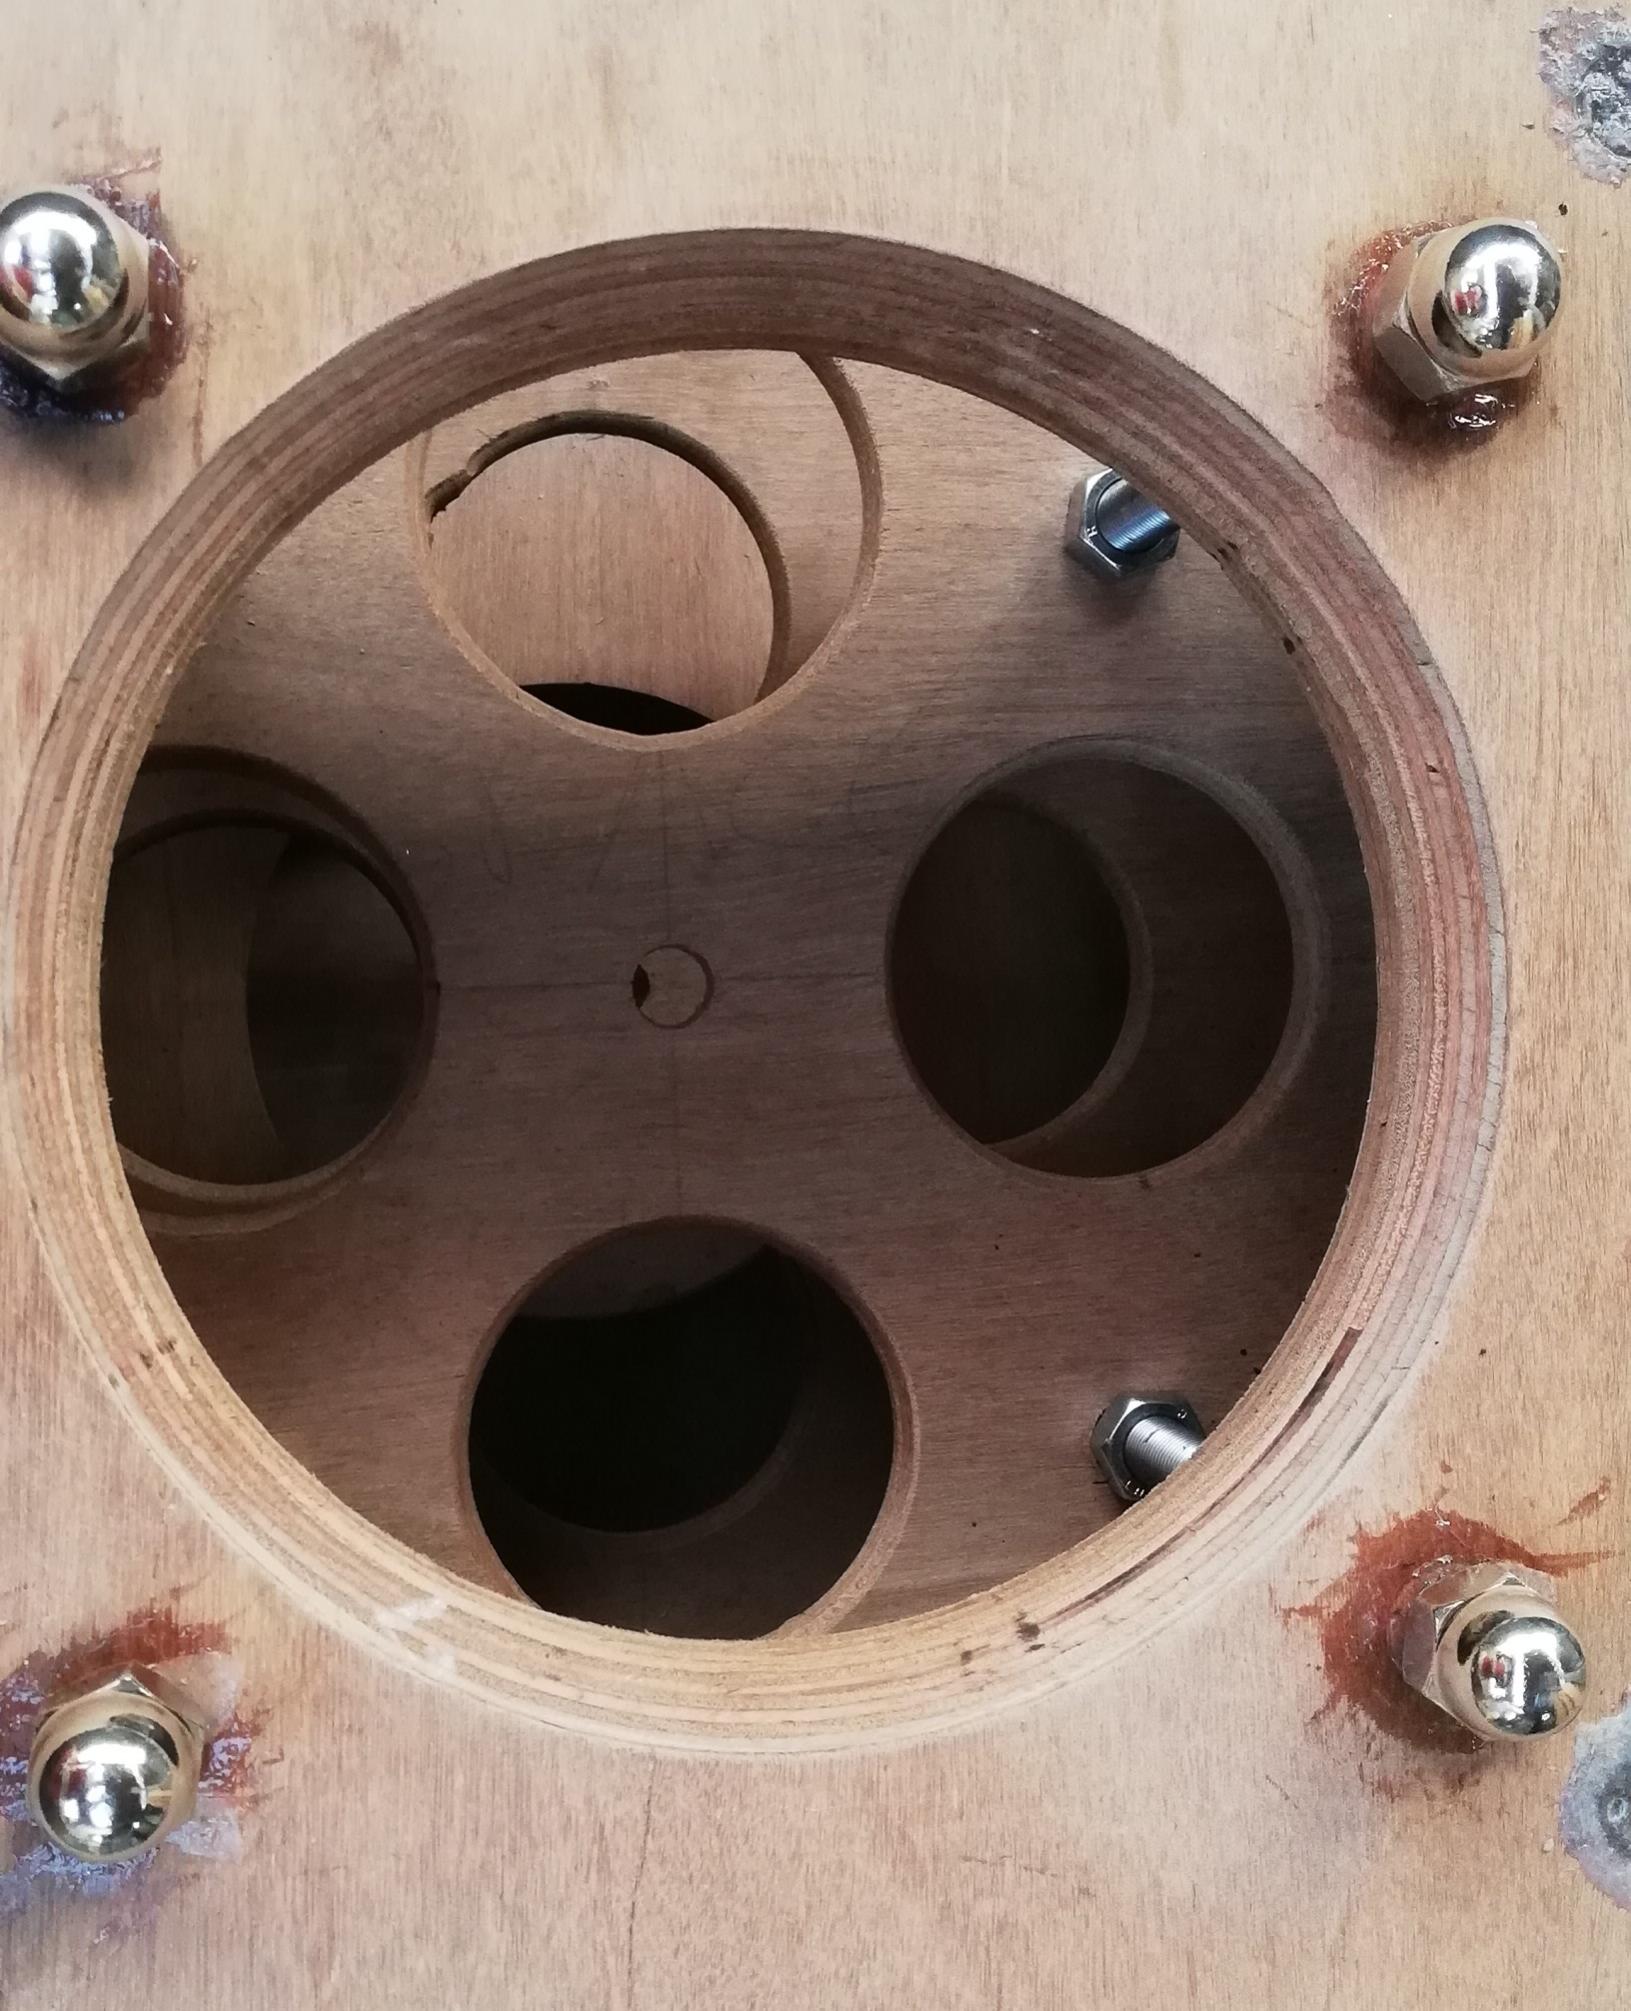
because you are building big driver, another crazy idea that i used on my 1st subwoofer build, braces are locked with 4 of 20mm threaded rods. 1st build was always idealistic but my 2nd sub is more simple
i almost bulid that station but then ended with more practical solution, if you have this as a business then it's a good investment but if just a hobby like me then nail and screw is enough
because you are building big driver, another crazy idea that i used on my 1st subwoofer build, braces are locked with 4 of 20mm threaded rods. 1st build was always idealistic but my 2nd sub is more simple
Hi, yeah the clamping station definitely can be scaled up to bigger needs, but as you've said for a hobbyist like me too, I'm fine with old fashioned screw/nail solution.🙂
But oh my!..., and I was thinking I was being overkill, but that multiple 20mm threaded rods as bracing are definitely more than enough stiffness 😱, indeed seems the first serious sub build is an kind overkill experience for most, lets see how this second ones will turn out after finished and measured.
Regards
i visited my friend who build custom speaker including subwoofer, most of them 12" driver. when he test it as loud as it can, all of them shake and move around even if it has rubber feet. maybe metal spike should avoid that but it's pricey
based on that experience i found this dual-opposed design, beside cancelling each driver movement, resonance should be reduced too. but my worries if my 18mm bb ply will bend, that's why 1st build was overkill
it was build on 2nd floor, weighted around 75kg without drivers, another 2 man helped me to to bring it to audio room in 1st floor
my 2nd build is more moderate, only driver baffle get extra ply. even the bracing is simple. but due to dual-opposed, i can't feel any box resonance at all
but anyway, because you use 21" driver, i just can't imagine how it will shake. i also use 21" subwoofer but it is on OB design which still shake it's mini baffle
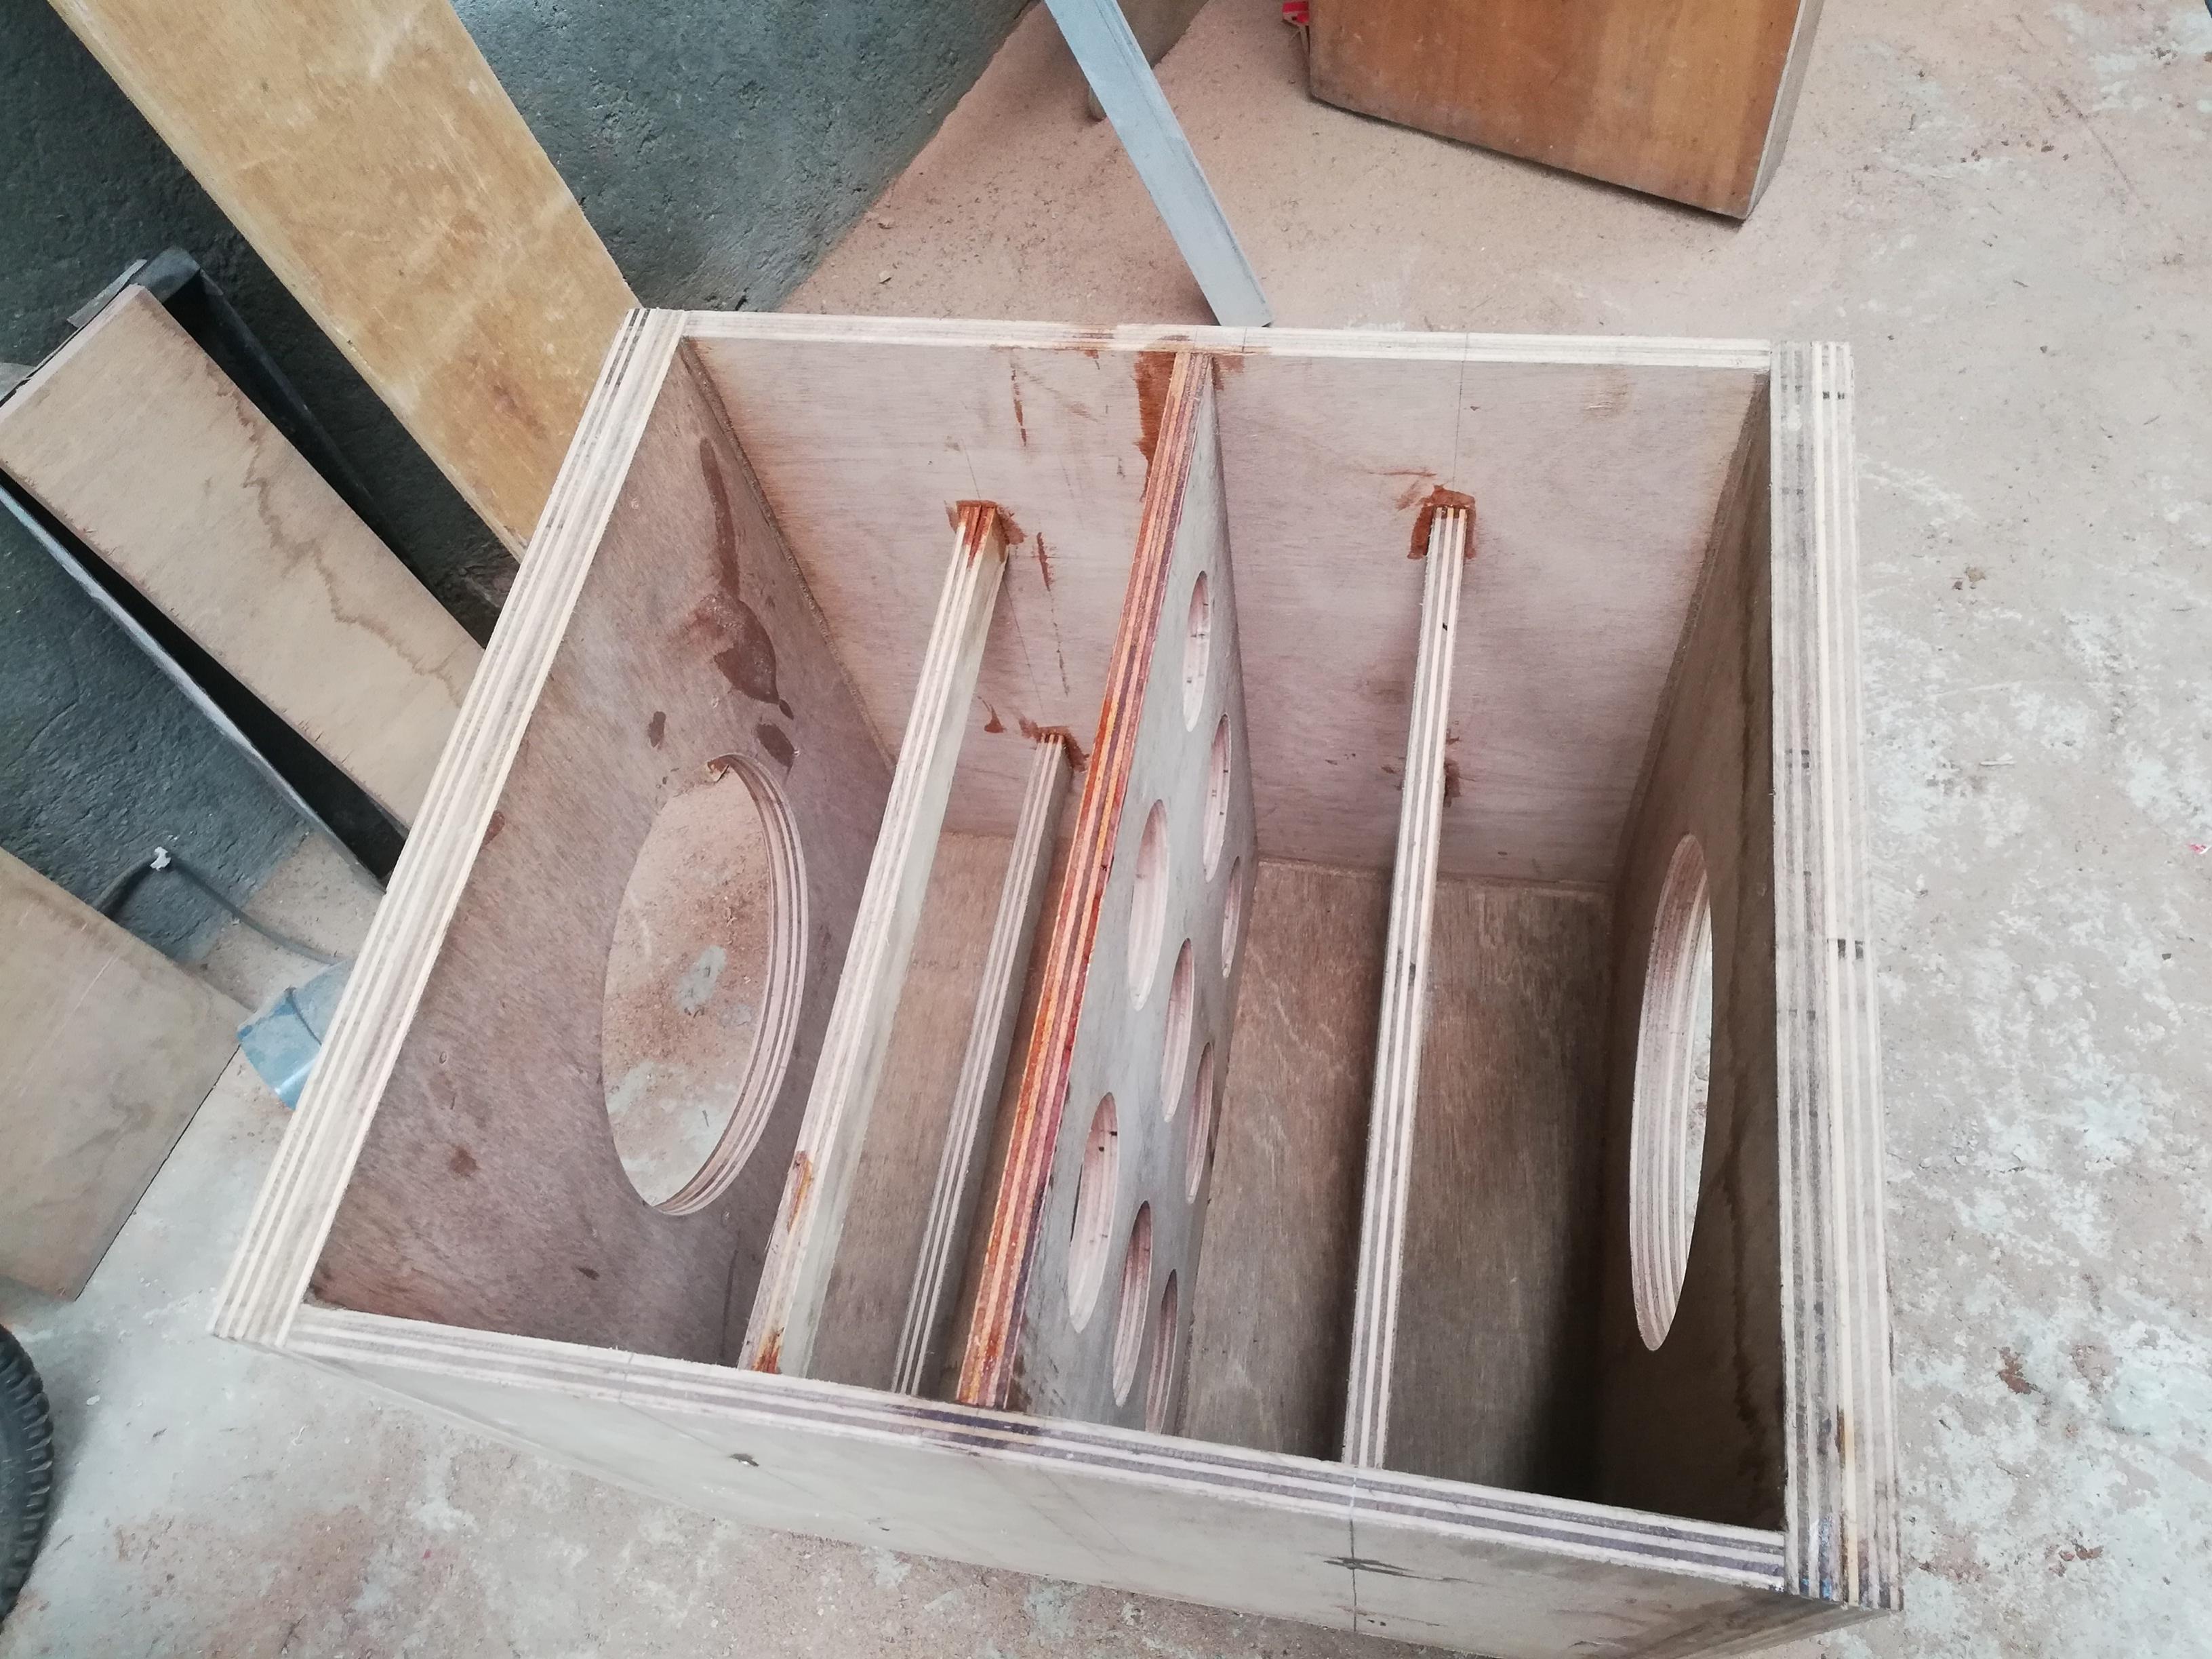
Hi, I was also reading on that dual opposed setup as well but my room space is very tight, plus the need for another pair of 21's made my decision for the two relatively compact boxes.
As for shaking, I have to completely agree, the previous subwoofer build I've posted was modified for an 18" driver the box took almost 2 sheets of standard 3/4"(19mm) and weighed about 140Lbs(64kg) with the driver, and when I was in the bass-head mood, I've made that thing dance around regardless of the rubber feet.
Between that later subwoofer enclosure you've posted have decent clean bracing and more than enough thick baffles.😎
Regards
As for shaking, I have to completely agree, the previous subwoofer build I've posted was modified for an 18" driver the box took almost 2 sheets of standard 3/4"(19mm) and weighed about 140Lbs(64kg) with the driver, and when I was in the bass-head
mood, I've made that thing dance around regardless of the rubber feet.Between that later subwoofer enclosure you've posted have decent clean bracing and more than enough thick baffles.😎
Regards
- Home
- Loudspeakers
- Subwoofers
- 21" Subwoofers design suggestion