Has anyone looked into using the SB Audience ROSSO-65CDN-T or ROSSO-75CDN-T with the SynTripPs?
I haven’t seen it mentioned in this thread, but the 65CDN-T seems like excellent value for money and has received quite a bit of praise online. It looks like the 3-inch diaphragm ROSSO-75CDN-T is a newly released model.
I would assume the 31.1 degree exit angle of the 65CDN-T would be a better fit vs 75CDN-T's 9.5 degrees, though the 75CDN-T offers slightly higher sensitivity in the lower frequencies.
They look nice. This one has more X-max: https://www.sbaudience.com/index.php/products/compression-drivers/rosso-65cd-t/
It should be capable of ~+3dB more clean output than the 2.5" (65mm) diaphragms.It looks like the 3-inch diaphragm ROSSO-75CDN-T is a newly released model.
I wouldn't make that assumption from looking at the upper frequency response of the drivers on the H280 horn.I would assume the 31.1 degree exit angle of the 65CDN-T would be a better fit vs 75CDN-T's 9.5 degrees, though the 75CDN-T offers slightly higher sensitivity in the lower frequencies.
Unless you have measured distortion of the drivers on the same horn, I wouldn't assume the 65CD-T heavier slab magnet with less flux density has more Xmax simply because it's magnetic gap is longer than the lighter, higher flux density neodymium 65CDN-T.They look nice. This one has more X-max: https://www.sbaudience.com/index.php/products/compression-drivers/rosso-65cd-t/
Considering the HF response of these three Rosso drivers, I'd guess they all have similar diaphragm to phase plug distance, Xlim no more than 0.8mm, Xmax in the 0.5mm range.

So useful ! Thanks mate, will report back once I crossing that bridge !Hey @FloKai !
Woofers wired in parallel (+ & - on discrete conductors) is convention for these I believe.
High frequency driver on a separate plug (I haven't wired that yet).
I'm using 14awg stranded copper for everything. Separate conductors for the internal wiring, and 14/4 SJOOW for the main leads, with Neutrik NL4 connections. I recommend the Wago connectors internally as they're easily disconnected/reconnected if/when one needs to take the back off and repair anything.
P.S. I ended up just going with 1" denim fiber damping, without the mass loading. It was a lot cheaper and I think it'll do the job just fine.
View attachment 1452917
Final wiring time. Before I tape the connectors and seal the boxes please let me know if anything looks amiss. It looks like the wires float nicely and aren't contacting anything when the back is closed


Normally, a cabinet's corners are rounded, screw holes sealed, sanded, and painted before loading the drivers. Not having done that looks like "a miss" to me 😉 .Before I tape the connectors and seal the boxes please let me know if anything looks amiss.
"Floating wires" and Wago connectors put stress on all the spade connectors during transport, and may rattle in use.It looks like the wires float nicely and aren't contacting anything when the back is closed
Test polarity of the drivers through each connector.
Cabinets look clean!
Thanks for the helpful response.
I've yet to sand, route corners, seal screw heads, prime, paint,.add corner guards and feet etc. I wanted to sound test before burying the screws so if I need to I can disassemble, but it turns out there's plenty of access from the back. Guess I'm just impatient.
Should the wires be secured to the cabinet then? It all feels pretty secure and the wires are well crimped and the NL4s hot glued. The speaker connections are very solid. If need be I can use longer wires and make it all beefier, or whatever's recommended. Does anyone have pics of a best practice wire up?
Thanks again, this project has been so educational and nourishing.
@octapotamus
If your working outside with these try wire tying the wires down. Any time I have had floating wires in the past they ended up buzzing. If you are using these inside hot glue is perfect.
If your working outside with these try wire tying the wires down. Any time I have had floating wires in the past they ended up buzzing. If you are using these inside hot glue is perfect.
Hello!
I have been following this thread for a long time and i have to say that i am trully inspired. As such i have decided to build my first PA system starting from 2 SyntripP horns.
@weltersys i have to say thank you for brilliant work and effort in this community.
I want to implement 2 of your designs, the SyntripPs and the Keystones. I was thinking of 2 x SyntripP horns, 4 x 18" Keystones and 2 x 15" inch kickbins (something like the Cubo 15 maybe?) for my first DIY PA system. What do you think ?
And lastly, I found some plans for the keystones acoording to the relevant thread but i can't seem to find the final SyntripP one's? Are there any finalized plans?
Thank's again
-John
That much bottom for one 3" diaphragm HF on a conical horn sounds like you are planning to make a playback, rather than PA (Public Address) system.I want to implement 2 of your designs, the SyntripPs and the Keystones. I was thinking of 2 x SyntripP horns, 4 x 18" Keystones and 2 x 15" inch kickbins (something like the Cubo 15 maybe?) for my first DIY PA system. What do you think ?
I think horns or front loaded cones sound better than TH for the "kickbin" low mid range ~80-200Hz.
I think low mids, mid and high range should all be elevated well above the audience head height.
The plans I finalized have the post numbers in the original post.And lastly, I found some plans for the keystones acoording to the relevant thread but i can't seem to find the final SyntripP one's? Are there any finalized plans?
+1...but i'm also the sort that thinks that should apply in a domestic/home listening situation to!!!I think low mids, mid and high range should all be elevated well above the audience head height.
Ok I see… what would be a good combination of speakers (subs, horns etc) and their crossover points. I plan to do outside dj events with electronic music. 200-300 people.That much bottom for one 3" diaphragm HF on a conical horn sounds like you are planning to make a playback, rather than PA (Public Address) system.
I think horns or front loaded cones sound better than TH for the "kickbin" low mid range ~80-200Hz.
At one square meter per person, that's about 17 meters by 17 meters.200-300 people.
The SynTripP acoustical crossover center is ~800 Hz, not much flexibility there without a "hole in the middle".
A pair of Keystones and SynTripP with no ports crossed ~100Hz could do ~112 dB SPL at the back of the audience with around a +10dB low frequency "haystack" response typical for DJ EDM playback.
If you want more output and a bigger haystack you could double up on the subs, add low mid cabinets and cross ~80 and 160Hz. If you want more than that, you'll need top cabinets with more HF output potential than the SynTripP was designed for.
Art
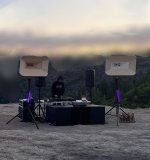
Maiden voyage with the full horn extensions, somewhere deep in the Sierra Nevada. Wanted to add to the praise about how incredible these things sound. In particular, the wide, coherent stereo soundstage these put out has to be heard to be believed. A truly engrossing experience. My goal was the best available DIY PA top that can be handled by one person, and I think this design still remains the king. Thank you for making these plans available to the public. Here is my Wall of Yap reflecting on the experience of building these:
- If you have the option at all to CNC, I would strongly recommend that route. This was all hand work for me aside from the throat adapter plate that was cut by an online service. Unless you are a professional cabinet builder, which I am not, building these by hand is a serious undertaking & requires a full wood shop and loads of time and patience. Pictured is my third start-to-finish attempt. Been said many times before but it could be said again, this is a bad "first-time" project.
- The "synergy calc" pdf available online has some valuable construction tips that I wish I had on the first go around. The key to doing these by hand is in building jigs & router templates. At a minimum, you will need a large acute angle sled & a compound miter sled as described in the synergy calc pdf. A "track saw" jig for a circular saw is very useful for the long miters needed in the secondary horn.
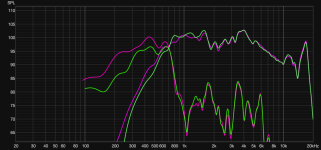
- I failed to account for the exit angle of my compression driver, so there is a constriction right at the interface of the exit chamber and the horn. I'm assuming this is the source of my 15 kHz notch. The "Hughes" transition was shaped by hand with Bondo and wood filler, and is not at all perfect. JW Sound's recent Instagram story simulating a hand-shaped vs "perfect" throat transition in AKABAK was very interesting. I'm sure the polars are a little wonky in the 10kHz+ region, but they still sound fantastic in the "air" region to me. I run a pretty aggressive HF tilt at full bore FWIW.
- I loaded a B&C DE90TN which sounds great, but it was purchased before I really appreciated the weight difference between a ferrite and neodymium compression driver. I would really recommend getting a neodymium CD to keep the weight down.
- The Alex Hall adjustable-tilt speaker pole mount was installed as far forward in the cabinet as I could get it without touching the inner horn wall. This works good with the main cabinet alone, but is very marginal with the secondary horns on. It would be unusable for me with a lighter CD. If you're going to use this mount, it will need to be stood off from the cabinet, and I would recommend waiting until you have the cabinet assembled and loaded before cutting a hole to make sure you're getting the center-of-mass right. I installed M6 threaded inserts in the bottom four corners and use eye bolts & rope+ratcheting pulley to guy the cabinet back and down.
- A downside inherent to this design is that the secondary horn acts as a huge windsail when outdoors. You will need some serious speaker stands and some kind of anchoring or weighting solution to run these safely outdoors above head height. I ended up having to run my lower to the ground than I would have liked to with my TS-110Bs, since I haven't figured out how to anchor them to bedrock yet. You will also need a way to guy the cabinets down to counteract them rotating in the wind. Pole mounts on the subs works well, but I prefer to keep subs coupled in the center and only run L/R if there's no other choice.
- Flat output down to 30 Hz was a requirement, so settled on SKRAMs. Two is a minimum amount, four would be much more comfortable and would save me from being awakened from a 4 AM power nap to micromanage the low end for DJs running things a bit too hot :^). (The eventual goal is 6, with port caps to reach flat down to 25 Hz!)
- Don't think of the secondary horn as optional, think of not running the secondary as optional, if the situation demands. These sound fantastic without the extensions on, but are in a league of their own with them on. The directivity is comical. You can stand right to the side of them, wondering if the faders got pushed accidentially because of how quiet they are anywhere they're not pointing. More valuable energy on the dancefloor.
- Output drops off pretty significantly below 200 Hz with extensions and below 300 Hz without. Attached are uncalibrated 2m on-axis raw individual driver measurements with and without extension (2m elevation quasi-free 10ms window). I think for non-EDM styles you'd be fine output-wise tuning off the 100 Hz bottleneck but I can see the appeal in giving up a bit of the point-source effect for significantly more output with a kick section for EDM. Planning on experimenting with a kick bin in the future given the style of music I am building for.
- If I were to do this again, I would try to 3D print the entire throat transition as one piece ala the JMOD MEH, since this is such a sensitive area. I plan on experimenting with a similar style cabinet built around the DCX464 and some 12" woofers, while retaining the one-person-ability of the SynTripP, at some point in the future. Need to learn some AKABAK 🙂.
All in all it was worth every bit of effort involved and a huge thanks again for sharing these plans. Overheard many comments from even non-soundsystem-heads about how good the whole rig sounded - getting a layperson to say "damn, this sounds good!" to themselves is a high compliment in my book.
- If you have the option at all to CNC, I would strongly recommend that route. This was all hand work for me aside from the throat adapter plate that was cut by an online service. Unless you are a professional cabinet builder, which I am not, building these by hand is a serious undertaking & requires a full wood shop and loads of time and patience. Pictured is my third start-to-finish attempt. Been said many times before but it could be said again, this is a bad "first-time" project.
- The "synergy calc" pdf available online has some valuable construction tips that I wish I had on the first go around. The key to doing these by hand is in building jigs & router templates. At a minimum, you will need a large acute angle sled & a compound miter sled as described in the synergy calc pdf. A "track saw" jig for a circular saw is very useful for the long miters needed in the secondary horn.
- I failed to account for the exit angle of my compression driver, so there is a constriction right at the interface of the exit chamber and the horn. I'm assuming this is the source of my 15 kHz notch. The "Hughes" transition was shaped by hand with Bondo and wood filler, and is not at all perfect. JW Sound's recent Instagram story simulating a hand-shaped vs "perfect" throat transition in AKABAK was very interesting. I'm sure the polars are a little wonky in the 10kHz+ region, but they still sound fantastic in the "air" region to me. I run a pretty aggressive HF tilt at full bore FWIW.
- I loaded a B&C DE90TN which sounds great, but it was purchased before I really appreciated the weight difference between a ferrite and neodymium compression driver. I would really recommend getting a neodymium CD to keep the weight down.
- The Alex Hall adjustable-tilt speaker pole mount was installed as far forward in the cabinet as I could get it without touching the inner horn wall. This works good with the main cabinet alone, but is very marginal with the secondary horns on. It would be unusable for me with a lighter CD. If you're going to use this mount, it will need to be stood off from the cabinet, and I would recommend waiting until you have the cabinet assembled and loaded before cutting a hole to make sure you're getting the center-of-mass right. I installed M6 threaded inserts in the bottom four corners and use eye bolts & rope+ratcheting pulley to guy the cabinet back and down.
- A downside inherent to this design is that the secondary horn acts as a huge windsail when outdoors. You will need some serious speaker stands and some kind of anchoring or weighting solution to run these safely outdoors above head height. I ended up having to run my lower to the ground than I would have liked to with my TS-110Bs, since I haven't figured out how to anchor them to bedrock yet. You will also need a way to guy the cabinets down to counteract them rotating in the wind. Pole mounts on the subs works well, but I prefer to keep subs coupled in the center and only run L/R if there's no other choice.
- Flat output down to 30 Hz was a requirement, so settled on SKRAMs. Two is a minimum amount, four would be much more comfortable and would save me from being awakened from a 4 AM power nap to micromanage the low end for DJs running things a bit too hot :^). (The eventual goal is 6, with port caps to reach flat down to 25 Hz!)
- Don't think of the secondary horn as optional, think of not running the secondary as optional, if the situation demands. These sound fantastic without the extensions on, but are in a league of their own with them on. The directivity is comical. You can stand right to the side of them, wondering if the faders got pushed accidentially because of how quiet they are anywhere they're not pointing. More valuable energy on the dancefloor.
- Output drops off pretty significantly below 200 Hz with extensions and below 300 Hz without. Attached are uncalibrated 2m on-axis raw individual driver measurements with and without extension (2m elevation quasi-free 10ms window). I think for non-EDM styles you'd be fine output-wise tuning off the 100 Hz bottleneck but I can see the appeal in giving up a bit of the point-source effect for significantly more output with a kick section for EDM. Planning on experimenting with a kick bin in the future given the style of music I am building for.
- If I were to do this again, I would try to 3D print the entire throat transition as one piece ala the JMOD MEH, since this is such a sensitive area. I plan on experimenting with a similar style cabinet built around the DCX464 and some 12" woofers, while retaining the one-person-ability of the SynTripP, at some point in the future. Need to learn some AKABAK 🙂.
All in all it was worth every bit of effort involved and a huge thanks again for sharing these plans. Overheard many comments from even non-soundsystem-heads about how good the whole rig sounded - getting a layperson to say "damn, this sounds good!" to themselves is a high compliment in my book.
Attachments
- Home
- Loudspeakers
- Multi-Way
- SynTripP: 2-way 2-part Virtual Single Point Source Horn