An L-pad or other attenuator between the AMP and the CD affects the gain staging - moves you further above the noise floor of the DAC/DSP as well as that of the amp. whether or not "getting the amp going" helps is a function of the class of amp. Not all of them are subject to crossover distortion. A large enough series resistor will also protect the CD by limiting current through it so you might not need a series cap. a shunt resistor will swamp the CD's Z so there will be less FR variation due to the series R, which you can and should equalize away in any case
I have built a variation of the dipoles with two 15OBO350 and a 5210.
I have tried several different baffle sizes and ended up with smaller wings which makes them less brutal visually but really removes a lot of the bottom.
I ended up using DIRAC with the flex eight to get a decent response. I was not clever enough with the filters to adjust them satisfactorily.
I will probably go back to bigger wings, that deep bass is addictive.
I'm struggling with noise from the amplifier, coming out of the 5210 woofer, even with no input signal. Is there any easy remedy?
Attachments

Thank you for your report and photo. Very good!
A "trick" you might employ to get the most out of a small-wing design is use as much bass boost as you want or need down to 40Hz, but roll them off below 35. You could inch it a bit lower than that, but the key is to minimize excursion because you're losing "Xmax traction" at the rate of 6dB per 1/3 octave.
Noise: If you mean amplifier noise from the 5210 compression tweeter, you can use a resistor network to pad the tweeter down 10dB and boost the signal in the Flex Eight to compensate. That will cut the noise level by 10dB and is an easy remedy. If you put 10 ohm resistor in parallel with the tweeter, and a 10 ohm resistor in series with both of those, that will get you in the ballpark and you can tweak the channel output on the Flex Eight as needed.
I can't thank you enough for putting this together 🙂 It is pretty amazing. I wish there was a DSP less version though, I am old fashioned 😀
Thank you, I will do so.
Unfortunately it is the woofer of the 5210, the compression driver is fairly silent.
Thank you, I will do so.
Unfortunately it is the woofer of the 5210, the compression driver is fairly silent.
If it’s the woofer, there is something wrong somewhere in the signal chain or a problem with the amp.
If your amp has level controls try turning them down.
Try switching amps or trading out woofer amp <> tweeter amp.
And… you’re welcome!
If your amp has level controls try turning them down.
Try switching amps or trading out woofer amp <> tweeter amp.
And… you’re welcome!
Last edited:
This post has the latest Bitches Brew files for Flex Eight.
These files have both biamp and triamp configurations. They are for the FIR version of Flex 8 not the Dirac version.
They would be a good starting point for a crossover for your system. You would need to load them into the standard Flex Eight menu, copy all the filters by hand over to the Dirac version, and then tweak a fair bit of EQ settings based on measurements. Especially for the tweeters.
The advantage of this is that it would adhere to my overall priority of low phase shift.
You might still want to run Dirac after that but it wouldn’t be essential.
- I have the file “The Bitches Brew Open Baffle Live Edge Speakers” PDF document dated 7/4/2023. Is this the latest file showing me what drivers, crossover components, etc. to buy?
- In one of your posts, (dated 12/11/2024) you attached a zip file for a Flex Eight processor to use with the BB speakers. Is this the latest file I should use?
- I plan to use the Flex Eight MiniDSP, do you still recommend that processor?
- There is some back and forth in the posts about about using a tri-amp setup that would eliminate use of the passive crossover. Do you recommend that approach...
These files have both biamp and triamp configurations. They are for the FIR version of Flex 8 not the Dirac version.
They would be a good starting point for a crossover for your system. You would need to load them into the standard Flex Eight menu, copy all the filters by hand over to the Dirac version, and then tweak a fair bit of EQ settings based on measurements. Especially for the tweeters.
The advantage of this is that it would adhere to my overall priority of low phase shift.
You might still want to run Dirac after that but it wouldn’t be essential.
All, @nfitch started a great new thread on the Bitches Brew design here:
Heard these recently, really loved them, and now plan to build them. Others embarking on the same journey, please share! Ideally this thread can concentrate the latest design notes, guides and user builds.
The speakers: https://evo2.org/wp-content/uploads/2023/07/Bitches_Brew_Open_Baffle_Live_Edge_Speakers.pdf
A note on the passive crossover: https://www.diyaudio.com/community/...over-vs-parallel-for-subs-open-baffle.404680/
Another note on the crossover...
The speakers: https://evo2.org/wp-content/uploads/2023/07/Bitches_Brew_Open_Baffle_Live_Edge_Speakers.pdf
A note on the passive crossover: https://www.diyaudio.com/community/...over-vs-parallel-for-subs-open-baffle.404680/
Another note on the crossover...
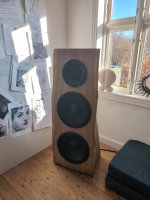
Live edge dipoles in cherry with the 10” Radian 5210 and SB Acoustics 15OBO350.

Thanks Perry - great design!
Thanks Perry - great design!
They look very neat.SB Acoustics 15OBO350.
Can you tell us about the DSP EQ for the 15OB350.
how does the bass sound?
Those are gorgeous! Great proportionality.Live edge dipoles in cherry with the 10” Radian 5210 and SB Acoustics 15OBO350.
View attachment 1450087
Thanks Perry - great design!
How do they sound? What obstacles did you encounter? Workarounds? I'd love to see more pictures, and as full of a write-up as you care to give.
Excellent work.
Last edited:
Live edge dipoles in cherry with the 10” Radian 5210 and SB Acoustics 15OBO350.
Tools
The tools I used for this project were all second hand or acquired for previous projects. I started with:
Speakers and crossover parts were sourced from TLHP.com. Back tweeters were from amazon.
I opted for the 10” Radian 5210 with aluminium tweeter and SB Acoustics 15OBO350.
I used Mundorf Classic capacitors and resistors and the Mundorf BL125 air core coil, (4.7mH ±2%, 0.84ohm) which was slightly out of spec for resistance but about half the price of the lower resistance version.
Mock up using old wardrobe doors
I made an initial mock up speaker using an old wardrobe door.

I made this in a couple of hours - freehanding the straight edges with the circular saw, building a very quick circle jig for the router (see below for more details) and then mounting the speakers with a few bolts.
They sounded great so I decided to take my time building the final versions.
Sourcing timber
I sourced the live edge slabs from Ebay. I spent some time hunting around and found these pieces at a reasonable price. It was a good decision to use the SBA woofers as it was already challenging find nice slabs wide enough for the 15” woofers.


Plywood for the wings was from B&Q (big DIY chain in UK). I got a sheet of 1830x607x18 (6’x2’) which is big enough to cut four wings.
Preparing and flattening timber
I removed the bark with a chisel and picked out any bits of loose wood or bark on the surface of the slabs.
I used a hand plane to flatten the wood. This was a lot of work as I hadn’t used a hand plane before for anything like this. I ordered a second hand reconditioned plane and used Paul Seller’s youtube videos for the techniques on setting up the plane for scrubbing, flattening and finishing, sharpening the plane iron, and working the piece of wood to get it flat.
I definitely put more attention on getting the front flat than back. The fronts needed to look good, but the backs just needed to be flat enough not to wobble on the workbench.
A wobbly plastic workbench isn’t great for this task. I didn’t want to work on the floor so I was usually resting the slabs against the walls or doors of the workshop and having to endlessly rotate the slab to get the best angle for hand planing.
I also had a lot of problems with tear-out which got a bit better as I developed my skill in setting up the plane, but eventually I got to a point where I concluded the slabs were flat enough and that I could sand out the remaining tear-out where the wood grain is particularly complex.
At this stage I tried to fill the remaining big cracks and holes with epoxy resin. I sealed up the holes with masking tape, poured in the resin and waited overnight for it to set. What happened was the epoxy drained out, stained the wood black and then set on the workshop floor. I tried this again, being very careful to seal up any cracks with tape and the exact same thing happened again.
After clearing that mess up, I did an initial sand of all surfaces with the random orbital sander at 80 grit.
Just enough epoxy had set in the cracks that I could proceed with the build. I managed later on to cut off some very big holes and cracks in the slabs.

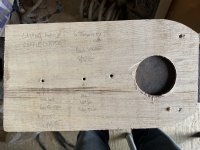
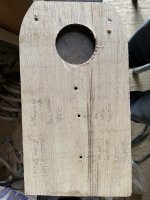
Cutting circles
I marked out the slabs in pencil, starting with a centre line and tops/bottoms at right angles to the centre line. I marked the cut-outs using a pair of compasses.
I built a very simple router jig to cut the holes. As I made this from thin plywood (all I had lying around), the screws holding the jig into the router base scratched the wood so I improvised a solution to raise the jig a bit and allow it to slide better.


I drilled a 4mm hole in the centre of each cut out and attached the jig with a 4mm bolt. I then used the router to go round each cut-out getting around 5mm deeper each time. Given the thickness of the slabs I worked from each side.
I should have used a jig for the 4mm guide holes as it turned out they weren’t perfectly straight so there was a small misalignment between the cutouts from both sides. I tidied those up a bit with the router while being careful to leave things as circular as possible.
I then cut the rebates with the router as the built in rebate tool. It would have been easier to do the rebates with the jig before I made the cutouts but it worked fine.
More cuts and holes
I cut the tops and bottoms off the slabs using the circular saw. As I don’t have a track saw I clamped a straight edge onto the slabs and used that as the reference to ensure the cuts were straight.
My circular saw allows angled cuts so I set it to ten degrees. I marked up the angles on the side of the slabs - this is important as I found it easy on the mock up speakers to cut the ten degree angle the wrong way around.
Then I drilled the mounting holes. It was very helpful to do this before the wings were attaches as I could work horizontally.
I made a guide block to ensure the holes were perfectly straight this time. I did that by planing a piece of wood square and using a pillar drill to cut a vertical hole.
Then put the speakers in place, marked the holes with a pencil, hole punch, drill to 6mm, countersink both sides. It was a good idea to use 6mm holes for 5mm bolts as it gives a bit more space for everything to line up.
At this stage I sanded up to 320 grit and put on a first coat of Osmo polyx on the front while it’s all still horizontal
Making the wings
I marked up the plywood as in the diagram from Perry.
I decided I liked the look of the Bitches Brew wings so I drew the compound curves freehand, while keeping the wings to 18” depth.
Then rough cuts with circular saw, and shaped the first wing freehand with the router. I used that piece with a pattern bit to copy the curve onto the other four wings. They looked great apart from a big dent in the top of one of the wings were the router slipped.
Then clamped pairs of wings together and finished them on the sander so each pair would be identical.
I cut the cross piece from a cheap piece of 1x6 pine on the mitre saw. Doing this I realised the wings need to be mounted right next to the speaker cut-out - on the mock up I had aligned the wings to the edge of the baffle. Then assembled the wings and the cross pieces using biscuits, glue and clamps.
Once the glue was dry I sanded to 320 grit and painted with two coats of blackboard paint for a matt black finish.
Attaching the wings
I positioned the wings on the back of the baffles, marked up and attached with glue and biscuits.
The compound curve on the wings was very helpful in clamping the wings to the baffles. I didn’t have a good clamping solution for the top of the wings so I used screws to hold them in place.
The screws looked pretty ugly and started to split the plywood, especially where the router had slipped. I used two part filler to cover the screws and mask the huge router dent in the wings. Once the glue and filler was dry, I sanded back the filler, and touched up the blackboard paint.
The seal between the wings and the baffle wasn’t perfect - the backs of the baffles weren’t perfectly flat, so I sealed any gaps with black hot glue.


Finishing construction
A little bit more sanding to make sure they sat nice and flat on the floor. Then more polyx - second coat on the front and top, single coat on the back
Then mount the speakers using t-nuts and bolts, and just screwed the back tweeter into the wings
Crossover and wiring up
Building the crossover was straightforward.
I copied the wiring from the mock up speaker, mainly using point to point wiring. I used wire lever connectors instead of terminal blocks or speaker posts as I had read somewhere they sound better (and are much much cheaper). I used hot glue to attach all the components (yes even the heavy inductor).


Then double checked the wiring and ready for a sound check.
I already had a miniDSP 2x4HD lying around that I uploaded with Perry’s Birch Dipole presets.
I used my Pass Zen v9 for woofers and a very rare and lovely pair of Leak TL12.1 for tweeters. I reduced the tweeter volume in the miniDSP by 18dB to allow for sensitivity difference between the two amplifiers.
I’m thinking it might be sensible to swap the amplifiers round as the TL12.1 has noticeable background hiss through the very sensitive Radian tweeters?
Listening impressions
I am transported to the gig or the concert. The imaging is phenomenal, it really does feel like the sound goes beyond the edge of the speakers and there is very clear and distinct sense of front-to-back depth. The bass is deep but the way the bass integrated with the rest of the sound - it is just seamlessly integrated in a way that sounds different from any single driver or FAST system I’ve built before.
I’m running these in a room that also has a grand piano. The spaciousness of the sound - the way it spreads out in the room - really captures a similar feeling.
The speakers go more than loud enough in a large domestic room (4mx6m?) with the Zen and TL12.1 which are both rated to around 12 watts.
In future I wouldn’t bother with the L-Pads - I’m running these back tweeters at full volume and it all sounds great.
Next steps
The build is definitely finished.
I know I need to do some work to optimise the crossover for these drivers but for now that is a future project and I’m going to sit back and enjoy the music 😀
Tools
The tools I used for this project were all second hand or acquired for previous projects. I started with:
- Plunge router
- Electric drill
- Belt sander
- Circular saw
- Wobbly plastic work bench
- Biscuit joiner
- Straight edge
- Chisel
- used hand planes (No. 4 Stanley and No. 5 Woden)
- random orbital sander - the old one broke
- a mitre saw - already broken but fixed the blade and belt for this project. I only used this the mitre saw for a single cut which could have been done easily with the circular saw.
- clamps as my old plastic ones broke
- hot glue gun as the old one broke
Speakers and crossover parts were sourced from TLHP.com. Back tweeters were from amazon.
I opted for the 10” Radian 5210 with aluminium tweeter and SB Acoustics 15OBO350.
I used Mundorf Classic capacitors and resistors and the Mundorf BL125 air core coil, (4.7mH ±2%, 0.84ohm) which was slightly out of spec for resistance but about half the price of the lower resistance version.
Mock up using old wardrobe doors
I made an initial mock up speaker using an old wardrobe door.
I made this in a couple of hours - freehanding the straight edges with the circular saw, building a very quick circle jig for the router (see below for more details) and then mounting the speakers with a few bolts.
They sounded great so I decided to take my time building the final versions.
Sourcing timber
I sourced the live edge slabs from Ebay. I spent some time hunting around and found these pieces at a reasonable price. It was a good decision to use the SBA woofers as it was already challenging find nice slabs wide enough for the 15” woofers.
Plywood for the wings was from B&Q (big DIY chain in UK). I got a sheet of 1830x607x18 (6’x2’) which is big enough to cut four wings.
Preparing and flattening timber
I removed the bark with a chisel and picked out any bits of loose wood or bark on the surface of the slabs.
I used a hand plane to flatten the wood. This was a lot of work as I hadn’t used a hand plane before for anything like this. I ordered a second hand reconditioned plane and used Paul Seller’s youtube videos for the techniques on setting up the plane for scrubbing, flattening and finishing, sharpening the plane iron, and working the piece of wood to get it flat.
I definitely put more attention on getting the front flat than back. The fronts needed to look good, but the backs just needed to be flat enough not to wobble on the workbench.
A wobbly plastic workbench isn’t great for this task. I didn’t want to work on the floor so I was usually resting the slabs against the walls or doors of the workshop and having to endlessly rotate the slab to get the best angle for hand planing.
I also had a lot of problems with tear-out which got a bit better as I developed my skill in setting up the plane, but eventually I got to a point where I concluded the slabs were flat enough and that I could sand out the remaining tear-out where the wood grain is particularly complex.
At this stage I tried to fill the remaining big cracks and holes with epoxy resin. I sealed up the holes with masking tape, poured in the resin and waited overnight for it to set. What happened was the epoxy drained out, stained the wood black and then set on the workshop floor. I tried this again, being very careful to seal up any cracks with tape and the exact same thing happened again.
After clearing that mess up, I did an initial sand of all surfaces with the random orbital sander at 80 grit.
Just enough epoxy had set in the cracks that I could proceed with the build. I managed later on to cut off some very big holes and cracks in the slabs.
Cutting circles
I marked out the slabs in pencil, starting with a centre line and tops/bottoms at right angles to the centre line. I marked the cut-outs using a pair of compasses.
I built a very simple router jig to cut the holes. As I made this from thin plywood (all I had lying around), the screws holding the jig into the router base scratched the wood so I improvised a solution to raise the jig a bit and allow it to slide better.
I drilled a 4mm hole in the centre of each cut out and attached the jig with a 4mm bolt. I then used the router to go round each cut-out getting around 5mm deeper each time. Given the thickness of the slabs I worked from each side.
I should have used a jig for the 4mm guide holes as it turned out they weren’t perfectly straight so there was a small misalignment between the cutouts from both sides. I tidied those up a bit with the router while being careful to leave things as circular as possible.
I then cut the rebates with the router as the built in rebate tool. It would have been easier to do the rebates with the jig before I made the cutouts but it worked fine.
More cuts and holes
I cut the tops and bottoms off the slabs using the circular saw. As I don’t have a track saw I clamped a straight edge onto the slabs and used that as the reference to ensure the cuts were straight.
My circular saw allows angled cuts so I set it to ten degrees. I marked up the angles on the side of the slabs - this is important as I found it easy on the mock up speakers to cut the ten degree angle the wrong way around.
Then I drilled the mounting holes. It was very helpful to do this before the wings were attaches as I could work horizontally.
I made a guide block to ensure the holes were perfectly straight this time. I did that by planing a piece of wood square and using a pillar drill to cut a vertical hole.
Then put the speakers in place, marked the holes with a pencil, hole punch, drill to 6mm, countersink both sides. It was a good idea to use 6mm holes for 5mm bolts as it gives a bit more space for everything to line up.
At this stage I sanded up to 320 grit and put on a first coat of Osmo polyx on the front while it’s all still horizontal
Making the wings
I marked up the plywood as in the diagram from Perry.
I decided I liked the look of the Bitches Brew wings so I drew the compound curves freehand, while keeping the wings to 18” depth.
Then rough cuts with circular saw, and shaped the first wing freehand with the router. I used that piece with a pattern bit to copy the curve onto the other four wings. They looked great apart from a big dent in the top of one of the wings were the router slipped.
Then clamped pairs of wings together and finished them on the sander so each pair would be identical.
I cut the cross piece from a cheap piece of 1x6 pine on the mitre saw. Doing this I realised the wings need to be mounted right next to the speaker cut-out - on the mock up I had aligned the wings to the edge of the baffle. Then assembled the wings and the cross pieces using biscuits, glue and clamps.
Once the glue was dry I sanded to 320 grit and painted with two coats of blackboard paint for a matt black finish.
Attaching the wings
I positioned the wings on the back of the baffles, marked up and attached with glue and biscuits.
The compound curve on the wings was very helpful in clamping the wings to the baffles. I didn’t have a good clamping solution for the top of the wings so I used screws to hold them in place.
The screws looked pretty ugly and started to split the plywood, especially where the router had slipped. I used two part filler to cover the screws and mask the huge router dent in the wings. Once the glue and filler was dry, I sanded back the filler, and touched up the blackboard paint.
The seal between the wings and the baffle wasn’t perfect - the backs of the baffles weren’t perfectly flat, so I sealed any gaps with black hot glue.
Finishing construction
A little bit more sanding to make sure they sat nice and flat on the floor. Then more polyx - second coat on the front and top, single coat on the back
Then mount the speakers using t-nuts and bolts, and just screwed the back tweeter into the wings
Crossover and wiring up
Building the crossover was straightforward.
I copied the wiring from the mock up speaker, mainly using point to point wiring. I used wire lever connectors instead of terminal blocks or speaker posts as I had read somewhere they sound better (and are much much cheaper). I used hot glue to attach all the components (yes even the heavy inductor).
Then double checked the wiring and ready for a sound check.
I already had a miniDSP 2x4HD lying around that I uploaded with Perry’s Birch Dipole presets.
I used my Pass Zen v9 for woofers and a very rare and lovely pair of Leak TL12.1 for tweeters. I reduced the tweeter volume in the miniDSP by 18dB to allow for sensitivity difference between the two amplifiers.
I’m thinking it might be sensible to swap the amplifiers round as the TL12.1 has noticeable background hiss through the very sensitive Radian tweeters?
Listening impressions
I am transported to the gig or the concert. The imaging is phenomenal, it really does feel like the sound goes beyond the edge of the speakers and there is very clear and distinct sense of front-to-back depth. The bass is deep but the way the bass integrated with the rest of the sound - it is just seamlessly integrated in a way that sounds different from any single driver or FAST system I’ve built before.
I’m running these in a room that also has a grand piano. The spaciousness of the sound - the way it spreads out in the room - really captures a similar feeling.
The speakers go more than loud enough in a large domestic room (4mx6m?) with the Zen and TL12.1 which are both rated to around 12 watts.
In future I wouldn’t bother with the L-Pads - I’m running these back tweeters at full volume and it all sounds great.
Next steps
The build is definitely finished.
I know I need to do some work to optimise the crossover for these drivers but for now that is a future project and I’m going to sit back and enjoy the music 😀
Attachments
I'll second that. That is real DIY!
@Perry - can I ask a question about your series crossover. I'm attempting one for my cardioid coax. The application is just like yours except the coax has side slots instead of being OB and the woofer CTC is only 300mm. It simulates quite nicely but I noticed the amplifier load impedance dips down to 1 ohm at the series resonance frequency of the LC. I should have expected that. Is it a problem for the amplifier? The notch is within the passband, circa 160 Hz. I'm expecting to draw about 60W from a 250W amp that is 2 ohm stable.
@Perry - can I ask a question about your series crossover. I'm attempting one for my cardioid coax. The application is just like yours except the coax has side slots instead of being OB and the woofer CTC is only 300mm. It simulates quite nicely but I noticed the amplifier load impedance dips down to 1 ohm at the series resonance frequency of the LC. I should have expected that. Is it a problem for the amplifier? The notch is within the passband, circa 160 Hz. I'm expecting to draw about 60W from a 250W amp that is 2 ohm stable.
Live edge dipoles in cherry with the 10” Radian 5210 and SB Acoustics 15OBO350.
Next steps
The build is definitely finished.
What a great build story, congrats and thanks for sharing! I particularly enjoyed hearing about the small stumbles that remind me so much of all of my own project challenges.
I'm quite curious how you find the sound as they get some hours on them. I like the combination of drivers you chose, but was concerned how I might get along with the aluminum diaphragm in the 5210 (while not having the budget for the Be).
- Home
- Loudspeakers
- Multi-Way
- Live Edge Dipoles - #1 at Parts Express 2023 Speaker Design Competition - Updated Design