Before unsoldering anything I would try to make sure control voltage applied is right.
Pinout is likely to have 12V, fan output and some control voltage that could be faulty.
Hopefully you can find the normal range for that input.
Pinout is likely to have 12V, fan output and some control voltage that could be faulty.
Hopefully you can find the normal range for that input.
Try making a circuit diagram if polishing does not work, could be a simple Wheatstone bridge arrangement, and a simple op amp.
If you need to, use the plug in contacts as adapter, and put SSR controlled from outside. Do not bother to repair the circuit.
If you need to, use the plug in contacts as adapter, and put SSR controlled from outside. Do not bother to repair the circuit.
Finished up repairing and calibrating one of my HP3478A Multimeters. I was unaware a previous owner had put a 3 volt alkaline battery in the unit instead of a lithium one... The alkaline puked and all the calibration constants went bye-bye. So I replaced the battery with a proper lithium cell and also replaced the four RIFA caps per advice from forum folk. Just finished up doing a good enough, but non-traceable calibration following the HP manual instructions. Went pretty well. I used my Keithley 2015 meter as a check for the values.
"Self Test OK" is great to see upon power up!
Now I will go after the battery and caps in my second 3478A, which is behaving great thus far. Just need to assure power to the cal constant's memory while doing the job 🙂 (I have a plan for that)
"Self Test OK" is great to see upon power up!
Now I will go after the battery and caps in my second 3478A, which is behaving great thus far. Just need to assure power to the cal constant's memory while doing the job 🙂 (I have a plan for that)
Attachments
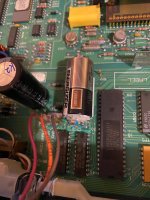


Yup. Use another Lithium battery with wire leads, 10K in one lead. Solder across the old battery (different contacts). Now you can pull the old battery and install the new one without losing anything.
Using a power supply risks dropping a lead and losing the cal constants. 100% success rate doing this, I have a cell with wire leads soldered on for this purpose.
Using a power supply risks dropping a lead and losing the cal constants. 100% success rate doing this, I have a cell with wire leads soldered on for this purpose.
Got a clothes dryer that is shutting down in the middle of a cycle, so see, that is electric and even possibly electronic. More likely the vent pipe needs cleaned, but I will take credit anyway.
A Yamaha DX7-II that ended up in my Suzuki Swift late one night. A friend had salvaged it at the city dump and thought I may be interested to dig out parts from it. However after som faultfinding I changed the back-up battery and got some life back into the machine. However I am no expert on this kinds of digital stuff and the instructions doesn't help a bit, so making it say BEEP BEEP, hasn't succeeded.
Neither do I. All "plinks" and "plongs" and a few "swooosh" went away when the battery reached a staggering 0.3V. I guess its working and I can get to the point where parameters are to be programmed, but nowhere (in hell) is it described how to do that.
My desk lamp. The switch started arcing and making the light flicker. I cut out the old moulded one and put a new two pole inline switch in. All good. A nice simple repair for less than €1.00 🙂.
Built up a model railway DCC controller for sale on ebay.
It sold so I always test them once more before sending out.
The display started scrolling randomly instead of being steady.
All soldered joints looked good.
So removed the display with hot air gun and tried another one, and that was the same !
So must be the PIC micro, programmed another one and that fixed the problem.
Not sure why original one failed as I sell hundreds of these controllers without any problems.
Will be sure to try PIC first next time before de-soldering the display.
I fixed a Vax wet and dry vacuum cleaner. Our central heating boiler is leaking water but it will be a while before it can be replaced, so every few hours of operation, I have to vacuum out water from the tray at the bottom. But this morning the vacuum made that nasty juddery noise that says its not firing on all cylinders (or more accurately, that not all its coils are being energised). Sigh. Damaged commutator/brushes and time for a new motor. So I found a video with a young Scottish lady showing how to get inside. She's right, it's a wee bit fiddly. (Actually, she might not have said "wee" but I used to work with a lot of Scots and they would cairtainly have said that.) Anyway, so I got in there, got the motor out and started looking for a replacement. As I was handling said motor to measure its dimensions, I noticed a wire that had come out of a connector. I put it back in, reassembled machine and applied power. A clean vacuum sound - no juddering. Excellent!
Yesterday - JBL K110 voice coil ribbon to tinsel repair, recone work on CTS 10" guitar speakers
Today - tested tubes, calculated output transformer impedances and primary transformer voltages
Tomorrow? REST! 🙂
Today - tested tubes, calculated output transformer impedances and primary transformer voltages
Tomorrow? REST! 🙂
Hey, I've got a pair of those!A Yamaha DX7-II that ended up in my Suzuki Swift late one night. A friend had salvaged it at the city dump and thought I may be interested to dig out parts from it. However after som faultfinding I changed the back-up battery and got some life back into the machine. However I am no expert on this kinds of digital stuff and the instructions doesn't help a bit, so making it say BEEP BEEP, hasn't succeeded.
Top: DX7 (mk1)
Bottom: DX7II-FD
Programming sounds on them is quite a challenge since it's a menu-driven hell. Someone somewhere said, "It's like painting the hallway through the mail slot." Most people probably just used presets, though making your own sounds is quite fascinating once you learn how to do it.
The mk1 was filthy when I got it. There was a lot of corrosion under the keys, and one of the keys didn't work. I completely disassembled the keybed, and I found that the faulty key had a broken contact spring due to the corrosion. Fortunately, the break was near the PCB connection, so I just bypassed it with a wire.
I also replaced the LCD with one that has a backlight. It doesn't fit perfectly (a little too tall), but it's nice to be able to read the screen in a dim room.
The DX7II-FD was nearly flawless when I got it. I just needed to fix a couple of bad solder joints one one of the output jacks.
Current project: Yamaha KX88
This thing is a beast! A DX7 is not a small or light keyboard, but the KX88 completely dwarfs it. I'm glad I finally have a full 88-key controller with weighted keys. It makes playing piano feel that much more expressive.
This KX88 isn't in the greatest condition. The membrane panel has a few holes and cracks in it. Fortunately everything works. The interior is very similar to the DX7. I think some of the parts are interchangeable.
When it arrived, the top two keys were sticking down. The right front corner had some impact damage, and this caused the cheek piece to squeeze the top two keys together. I removed the right end cap and found that the mounting tab was bent.
I fixed it with pliers, and now there is a gap between the cheek and the top key.
I also replaced the power connector with a grounded IEC socket. The original was neither grounded nor polarized. If the input cap or something else shorted, the metal top could be live!
Anyway, the KX88 is up and running again. The next step is to disassemble, clean, and lubricate the whole keybed. There are a few keys that feel a bit stickier than others.
Last edited:
It's like painting the hallway through the mail slot.
Or changing the piston rings thru the exhaust pipe. Ask my youngest ton if he would like to have DX7 as he’s making music (eurodisco), but he said NOOOO. My 5 yo grandson could have some use of it. Just have to get the voices back, and install a proper battery (a battery holder where any 2032 battery goes).
Oldest son dumbed a keyboard (PC) in my lap and wanted me to “just solder a little here and there” as the wires were broken ….
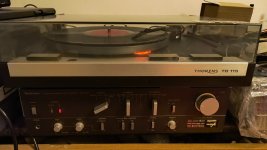
One Thorens TD-115. Actually the first Thorens on my bench. Visually kinda compatible with my Technics amp. Sad It is it is not mine.
Came to my hands with "skipping" fault. Turned out to be an overhaul, as it was needed to keep the unit alive.
- recap
- bearing cleaning and lubing
- new belts (thank you Thakker for having a set of the two)
- cueing mechanism cleaning and lubing again (finally found out that RC model differential high viscosity silicone oil does the job)
- deteriorated foam dampers in springed feet redone
- messed up autostop aligned
- basic clean
- speed adjustment pots replaced
- motor oiled
- rubber rejuvenator applied to the motor holder to regain it's flexibility
...plus some standard fuss.
I must say this TT sounds wonderful now. Hats down to Thorens engineers. But a lot of work to make the thing singing again.
Attachments
Thank you! This tt is indeed interesting. Speed regulation is very sophisticated. Tonearm assebly is clever, physically allowing for mere 1g of tracking force. Very clean sounding tt.
You want to track slightly on the heavy side. Tracking too light is more likely to damage your records. So if the range is 1 ~ 2 grams tracking, slightly over 1.5 gr would be better, and nothing wrong with 1.75 gr.
Yes, that is the low mass arm. I have a similar one on the TD-126 MKII I use.
Yes, that is the low mass arm. I have a similar one on the TD-126 MKII I use.
A CB-630 Continuous Band Sealer. A silly little package sealer with a small conveyor belt. It was a tough one... tightened up the knob on the speed control pot and changed the motor brushes. Actually, the easily accessible one was like new. The more difficult one to access was heavily worn and appears to have been badly misaligned. It hardly qualifies as a repair, but its going home with a repair bill nonetheless.
- Home
- Member Areas
- The Lounge
- What did you last repair?