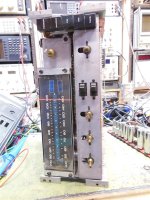
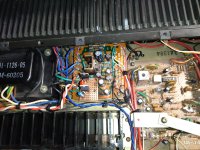
Well, great progress today. I replaced D701-D704 OA81s with OA91s even though only 1 of the diodes was faulty (read 0.5V instead of 0.33 in diode mode on my meter). As a precaution, I also took out and measured C708 and C709 500 pF silver foil - both were spot on, but very fragile, so I replaced them each with 2 x 270pF in parallel 1% NP0/COG and voila - I have stupendous undistorted stereo FM. I also replaced Q903 with a MJE15032 about 2 years ago when I first started out on this journey that I forgot to mention. The stereo indicator light is not working so I will have to address that. Luckily, it looks like I can do that with an LED. I still have to check out the phono section and then do an overall distortion etc measurement - that will have to wait until after the camping trip though.
Some of the tone control pots and switches are quite scratchy, so I'm going to have to intervene with the switch cleaner. However, I am nervous because these are very old components, and I don't know if they have plastic bits that will succumb to a modern switch cleaner—ditto the pots. Anyone with experience in this regard?
Interestingly, despite the rated power of 40W per channel (the transformer is quite hefty!), the main reservoir caps are only 2 x 1000uF 100V - so total 2000uF as this is a single rail 'singleton' amplifier. I might consider replacing the rectifiers with something more substantial and perhaps going for 2 x 2200 uF each - but then I reckon I'm not being true to the original.
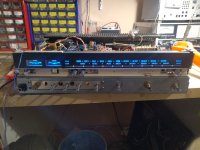
Anyway, I am very pleased the FM tuner is working on what is a close to 60-year-old classic receiver! I'll hook this thing up to the Dali's a little later on and disturb the wife's TV watching 😉
Some of the tone control pots and switches are quite scratchy, so I'm going to have to intervene with the switch cleaner. However, I am nervous because these are very old components, and I don't know if they have plastic bits that will succumb to a modern switch cleaner—ditto the pots. Anyone with experience in this regard?
Interestingly, despite the rated power of 40W per channel (the transformer is quite hefty!), the main reservoir caps are only 2 x 1000uF 100V - so total 2000uF as this is a single rail 'singleton' amplifier. I might consider replacing the rectifiers with something more substantial and perhaps going for 2 x 2200 uF each - but then I reckon I'm not being true to the original.
Anyway, I am very pleased the FM tuner is working on what is a close to 60-year-old classic receiver! I'll hook this thing up to the Dali's a little later on and disturb the wife's TV watching 😉
Use LEDs for FM Stereo beacons. If it uses a chip, they are rated for 40 mA approx. I'm tired of replacing these ICs because someone installed a higher current lamp.
Try LPS Micro-X if you can get it, or something similar. I haven't had any problems using it.
The signal diodes for the MPX are germanium (should be) and should measure 0.2 ~ 0.3 VDC drop on your meter. I'm not that familiar with Pro-Electron part numbers, it's just a standard germanium signal diode, nothing special.

Steam iron: Wouldn't steam.
Cleaning procedure helped a little: Oust descaling solution did the trick.
Instructions stated warm (hand hot) iron, unplug, allow fluid to drip out: Nothing comes out unless iron is hot and steaming.
Warning - I suspect the steam coming out is mildly acidic: Next time I will perform the descaling procedure outside.
I used to add a little vinegar in my steam iron...and flush it after cooling, so little scale.
It depends on the hardness of the water...
Then the thermostat got erratic, repair shop said it will leak after new thermostat, so I bought a new regular iron, and a pump type plant sprayer...
I suspect a high temperature sealant was used, and the repair shop did not know about it, or would have to break something during repair.
It is old, from 2008, I paid $4 new at a store closure sale...and I expect the repair may have cost me $2 to replace a 30 cent thermostat.
It still steams, I use it sometimes when I feel like, but the new iron was like $5, and it works okay.
Finished refreshing my Luxman K-112 cassette deck today. Did normal inside/outside cleaning, new belt, and some minor circuit adjustments. Decent deck. Much easier to work on than the Pioneer CT-F500 I finished up for a neighbor last week, but not as cool looking as that vintage deck.
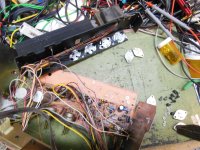
Still rebuilding a piece of history. A 1960's (I think) Sylvania console type radio (CS8, Chassis 17-3). Germanium outputs (PNP), the previous person made quite a mess in there. Replaced all kinds of way out of tolerance carbon composition transistors. Pulling the heat sink and outputs (all) was a chore, grease everywhere, dried. Too much was used in most places. Some capacitors were next to open (no surprise). I found some nice General Electric CXL179 output transistors for it. Overkill.
I'll try to power the output stage up tomorrow using my bench supply. Single supply, +47 VDC, many silicon signal transistors were only rated for 25 VDC.
I worked on this kind of stuff when I started servicing in the late 1970's. Some of our older members may remember (and have nightmares) about these types of sets. lol!
I took it on as a project since my client couldn't find anyone to service it.
Attachments
Steam iron: Wouldn't steam.
Cleaning procedure helped a little: Oust descaling solution did the trick.
Instructions stated warm (hand hot) iron, unplug, allow fluid to drip out: Nothing comes out unless iron is hot and steaming.
Warning - I suspect the steam coming out is mildly acidic: Next time I will perform the descaling procedure outside.
What they probably mean is to place the warmed iron face down so the descaler-infused water drips onto the inside of the baseplate, and then eventually out the holes. Obviously it usually turns the water into steam, but as the iron's not hot the water will eventually come out the steam holes. The irons I've pulled apart have shallow channels on the inside of the baseplate to discourage the water from coming out the holes except as steam, so it might need to build up a bit when switched off before it'd come out the holes.
I'd suggest very slightly tilting the iron in all directions to spread the water around inside.
Please note I'm just commenting because I've opened a couple of steam irons up in the past.
Anatech (and others I'm sure) you would probably enjoy this, which is a link to a website of a local tech from here in Perth who has a Hall of Shame showing poor work done previously on audio equipment. There are a few repeat offenders that have started to hate him...
Have a read if you have time. I find it really interesting.
Have a read if you have time. I find it really interesting.
I wrote some software for a model railway decoder.
It saved its state to flash program memory.
In my wisdom I tried to "improve" it.
But it kept not saving it.
I found I needed to set the position in memory of array for the data using __AT command.
I then tried to make it simple by setting memory pointer address in read and write memory routines.
But I messed up by using &address.
&address was giving address of local address on stack and not the original address sent for storage pointer.
But got there in the end and learned a bit about pointers and & function.
The pcb below controls 3 sets of model railway points.
The pcb needs an accessory address which needs to be stored in flash memory.
It has 2 modes, program address mode and run mode. In run mode it controls the points from commands sent from dcc controller.
Hey Stuey!
Many thanks for that!
I love this guy, we (a few other good techs and myself) are so sick of trying to save equipment from various hacks out there. I'll share the link with them. We do not have time to document all the bad work seen. We lose money every time trying to save the equipment and not charge too much. I have documented and presented evidence to clients occasionally who have gone to court and won.
What should be easier is to have the responsible hack be 100% financially responsible for correcting their work no matter how much it costs. Not limited to the replacement cost. One guy recently closed his business as a result of the evidence I collected.
One thing is very common. The individual believes they are wonderful technicians or engineers, the do not have the required equipment to do the work, and they don't stock proper parts. Big clues. Like getting your car fixed by people who only own vice grips and hammers.
I had a Braun Receiver with distorted sounding FM and an Albrecht CB-Transmitter wth no reception at all.
In both cases the demodulating Ge-Diode was cracked.
Seems to be a typical failure of these glass cases.
In both cases the demodulating Ge-Diode was cracked.
Seems to be a typical failure of these glass cases.
 Please discuss personal disputes off forum. Posts deleted.
You don't know how valuable a swivel chair is at your desk until it breaks. The back came loose and it was due to a welded part failure. I knew that this would be an all day job or simple. I can't believe that it is now correctly repaired in maybe less than an hours time. Still, it might time to shop around. This is the second time something has gone amiss with this old chair.
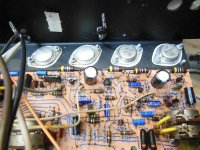
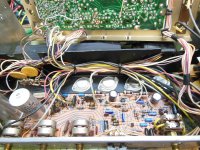
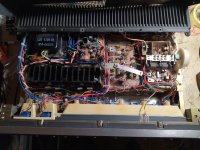
Repair and recap of Kenwood KR-4600. It needed good cleaning, trimpots were rotten so changed them, signal path recapped with proper Nichicon types (FG and ES), outputs transistors got new paste, I think I even changed some bias resistors to metallic types to reduce noise. All switches were pulled, disassembled and cleaned thoroughly, then conserved and put back - as I always do. Resistor dividers in power supply were upgraded to regulators and raised above the caps as the former heated them too much and the voltage was quite off, etc....changed lamps with LEDs. Different colour of light changed final appearance from green to blue, but I left it that way. The plastic reflector yellowed and began to fall apart of heat, I decided not to chase those specific lamps to sustain original looks. And to prevent future repairs. This one was major pain because there are virtually no connectors, but mostly hard wires. The construction is crazy and you literally need to completely disassemble. Still the wiring is impossible to route neatly and in the end it's just mess - like it was from the factory. None of the photos is final.. 🙂
Attachments
Last edited:
Perhaps the most mundane repair in the entire thread, but one that is near and dear to my heart (or, some place in close proximity to my heart). I'd been planning to strip my grandmother's old Wagner #10 cast iron skillet, which we've had since the early 90's and re-season it from scratch. That was the plan until I discovered, not one but two deep scratches cut into the cooking surface. Now, I don't want to point fingers, but if I were playing a game of Clue, I'd shout out, It was my wife... in the kitchen, with a knife (probably a very sharp serrated knife).
That moved the planned refurbishment to the top of the list.
I tried the heavy-duty oven cleaner method and while it took 3 repeat applications over several days, it did the trick. I had a raw cast iron skillet with two glaring cuts. The heavy sanding was done with my RO sander and I progressed to hand sanding with wet/dry paper and avocado oil for the final surface. I think sanding to 400 grit was probably overkill and likely prolonged the seasoning process but I'm pretty stoked with the results. It's still a work in progress to achieve the perfect black surface we all desire in cast iron ware but we'll get there before long. I hope one of my kids will cherish this lump of iron as much as I do when I'm gone. Meanwhile I'm doing what must be done... hopefully the heart attack brought on by too much fried food is a ways off.
These skillets must be the nightmare of manufacturers in the 21st century. They last forever. I own 5 of them in various forms and sizes. Except for dropping on a concrete floor they are indestructible. No other abuse is irreversible. My son once left one of the fire at night and fell asleep until the next morning. De-rusted it and re-seasoned it and it was like new again.I'd been planning to strip my grandmother's old Wagner #10 cast iron skillet, which we've had since the early 90's and re-season it from scratch
Manufacturers prefer teflon or ceramic coatings so a pan becomes worthless after 3 or 4 years. People as well because throwing away and buying new is easier than some maintenance now and then.
Fun fact: in the TV-series "Little house on the Prairie (1974-1982) this skillets were often clearly visible hanging on the wall in Olson's General Store. The series period was 1895 or so. I would not be surprised if actual skillets of those time are still around.
Well done this repair. And well worth it.
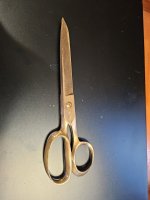
@jlinkels Thank you sir. I really enjoy bringing old, well made tools back into service. Your moniker reminds me of the old shears I dug up (literally, out of the ground) and lightly refurbished. Manufactured by Henkel in Freemont Ohio, I believe, between 1910-1915. Not to be confused with J.A. Henckels products...
- Home
- Member Areas
- The Lounge
- What did you last repair?