What are the two holes in the case and bar? Aren't they for screws to oppose the heatsink bar to the chassis, by design?
Looks like this design clamps the bar to the chassis from the outside. Without using nylon screws and silicone thermal pad, the bar is going to connect the chip thermal pad analog ground to the chassis ground.
On blocks for my amp, I use screws from the PCB to clamp the block to the chip (with thermal paste in the small pad mesa). The block itself is clamped to the chassis floor with PCB stand-off screws and there is a silicone thermal pad between the block and the chassis. Here is the block closeup.

On blocks for my amp, I use screws from the PCB to clamp the block to the chip (with thermal paste in the small pad mesa). The block itself is clamped to the chassis floor with PCB stand-off screws and there is a silicone thermal pad between the block and the chassis. Here is the block closeup.

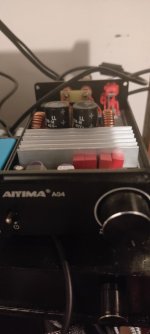
lokonsky....which Fosi amp is this? V3 or something else?Got this amp for under 40 buck including shipment! must be my lucky day.... the previous owner got troubled with occasionally shutdown after a minutes play music, so my suspect is that the amp is over heat and enter the protect mode. Try with 36 v and everything run smooth....i dont realy understand why fosi ship a 48v adaptor for this really small amp...
Try open the case later for re pasting the thermal compound and see anything i can upgrade. From the internet's picture i think to swap the main capacitor from 2200uf nichicon pw to 1000uf panasonic FM+ 1uf ceramic capacitor for lower esr, changed ne5532p opamp to 5532ap (better distortion), and maybe swap the elco capacitor in near opamp to 105c rate, but for now im really happy what this amp sound...
Thanks
Pete
X...you care more about your product than Fosi obviously does, no?Looks like this design clamps the bar to the chassis from the outside. Without using nylon screws and silicone thermal pad, the bar is going to connect the chip thermal pad analog ground to the chassis ground.
On blocks for my amp, I use screws from the PCB to clamp the block to the chip (with thermal paste in the small pad mesa). The block itself is clamped to the chassis floor with PCB stand-off screws and there is a silicone thermal pad between the block and the chassis. Here is the block closeup.
View attachment 1389211
Hard to care much for an amp that sells for $40. 🙂
But good design only needs to be done once and they did everything just not with care to the finer points: no thermal paste, no silicone pads, screws grounding the block, not enough thermal dissipation in the case. Etc.
The Topping PA-5 amp (TPA3244 I think?) that was so highly regarded for its ultimate low distortion better than the Benchmark reference amp had thermal issues that caused early demise as well. It’s not cheap ($399 if I recall) but still has issues. Mostly from stuffing it into too small of a package and not accounting for thermal issues. Not too many people like those amps now because they died in a few months (or a year in my case). I bought one to evaluate and it’s now dead on the left channel about 2000 hrs in. I think the solution is the secret sauce opamp block needs to be replaced by the aftermarket reverse engineered one offered by a member here on DIYA.
Users on ASR report about a 50% failure rate. Ouch that is high.
Member Plott built a wonderful TPA3255 amp - look how much space and room he leaves inside the box. No thermal issues here.

Compared to Topping PA-5 interior. Cramped and prone to overheating.

But good design only needs to be done once and they did everything just not with care to the finer points: no thermal paste, no silicone pads, screws grounding the block, not enough thermal dissipation in the case. Etc.
The Topping PA-5 amp (TPA3244 I think?) that was so highly regarded for its ultimate low distortion better than the Benchmark reference amp had thermal issues that caused early demise as well. It’s not cheap ($399 if I recall) but still has issues. Mostly from stuffing it into too small of a package and not accounting for thermal issues. Not too many people like those amps now because they died in a few months (or a year in my case). I bought one to evaluate and it’s now dead on the left channel about 2000 hrs in. I think the solution is the secret sauce opamp block needs to be replaced by the aftermarket reverse engineered one offered by a member here on DIYA.
Users on ASR report about a 50% failure rate. Ouch that is high.
Member Plott built a wonderful TPA3255 amp - look how much space and room he leaves inside the box. No thermal issues here.
Compared to Topping PA-5 interior. Cramped and prone to overheating.
Last edited:
Some user put this amp vertical and report drop of the temp about 5C. Well, i think its not just about the chip it shelf, if you put the electronic stuff with no ventilation, the other part will quickly die.... they promote this amp use 'audiograde' cap (Elna) and we know that 'audigrade' cap is a cap with only 85c rate.... so im sure in 1-2 year the amp will begin to failure. My best bet is re paste the amp, play with 36v adaptor, and someday re cap with 105 rating cap and move the amp to big case with lots of modsOne would have thought, because heat rises, they would have designed the circuit board to mount inside the case with the metal bar at the top of the unit instead of the bottom. As suggested, put thermal paste in between and maybe even run the amp turned upside down so the heat is at the top of the unit?
It sell with $110 price tag (exclude shipment) for 1 mono amp without adapter, and i got it under $40 (include shipment) ...for TPA 3255 with PFFB and good review, who can resist that temptation? And i'm agree with your opinion, why on earth they race to make miniature amplifier, cage in small enclosure and pushed to their limit? i got 3 amp TPA32XX series and all of them are naked.....they sound clean without any interference and surely damn loud in 36v for my HTHard to care much for an amp that sells for $40. 🙂
But good design only needs to be done once and they did everything just not with care to the finer points: no thermal paste, no silicone pads, screws grounding the block, not enough thermal dissipation in the case. Etc.
The Topping PA-5 amp (TPA3244 I think?) that was so highly regarded for its ultimate low distortion better than the Benchmark reference amp had thermal issues that caused early demise as well. It’s not cheap ($399 if I recall) but still has issues. Mostly from stuffing it into too small of a package and not accounting for thermal issues. Not too many people like those amps now because they died in a few months (or a year in my case). I bought one to evaluate and it’s now dead on the left channel about 2000 hrs in. I think the solution is the secret sauce opamp block needs to be replaced by the aftermarket reverse engineered one offered by a member here on DIYA.
Users on ASR report about a 50% failure rate. Ouch that is high.
Member Plott built a wonderful TPA3255 amp - look how much space and room he leaves inside the box. No thermal issues here.
View attachment 1389221
Compared to Topping PA-5 interior. Cramped and prone to overheating.
View attachment 1389222
Attachments
X... I had a bunch of those toppings replacement boards made of you want one..Hard to care much for an amp that sells for $40. 🙂
But good design only needs to be done once and they did everything just not with care to the finer points: no thermal paste, no silicone pads, screws grounding the block, not enough thermal dissipation in the case. Etc.
The Topping PA-5 amp (TPA3244 I think?) that was so highly regarded for its ultimate low distortion better than the Benchmark reference amp had thermal issues that caused early demise as well. It’s not cheap ($399 if I recall) but still has issues. Mostly from stuffing it into too small of a package and not accounting for thermal issues. Not too many people like those amps now because they died in a few months (or a year in my case). I bought one to evaluate and it’s now dead on the left channel about 2000 hrs in. I think the solution is the secret sauce opamp block needs to be replaced by the aftermarket reverse engineered one offered by a member here on DIYA.
Users on ASR report about a 50% failure rate. Ouch that is high.
Member Plott built a wonderful TPA3255 amp - look how much space and room he leaves inside the box. No thermal issues here.
View attachment 1389221
Compared to Topping PA-5 interior. Cramped and prone to overheating.
View attachment 1389222
Pete
Found the D-01 reverse engineered board by member gamerpaddy. Will attempt to fix it now. I guess I need to use a hot air gun to desolder the existing D-01 brick.

 I use mine in nearly every build.
You were not kidding about having a hard time deaoldering that unit! It took 20 minutes of hot 390C air from my hot air pencil to finally dislodge that old unit. It was smoking hot. I hate having to heat anything up that hot - and I used a soldering iron to add local heat as well. Cleaning out the old solder holes was a pain too. The new one is installed. Fingers crossed that it works.

@xrk971 Great video of the heat block install. What thickness of silicone pad do you recommend between heat plate and chassis?
Also, which DC socket do you recommend when keeping the power supply out of the enclosure? I need to install one by tapping the thick alloy casing and screwing in the DC socket housing. However I am not sure if it is OK to install the metal DC socket housing VS the plastic DC socket housing version, as the DC negative signal from power supply will obviously be in contact with enclosure.
Thanks for any input.
Those sockets aren’t good for the kind of current the TPA3255 needs if you want full power capability. Don’t let the PSU GND touch the chassis. So the metal one is no good in any event.
The connectors used for RC drone battery charging are great for DC power and high current.
XT60 panel mount works well. Good for 90A!
https://a.aliexpress.com/_m0tMTiJ
You can get the mating plugs with pigtails or bare. They look like this.
https://a.aliexpress.com/_mMebAkX
This is what I used on my Vera-link BT amp speaker out.

Alternatively, Mil-Spec round connectors work as well as Neutrik power connectors.
The connectors used for RC drone battery charging are great for DC power and high current.
XT60 panel mount works well. Good for 90A!
https://a.aliexpress.com/_m0tMTiJ
You can get the mating plugs with pigtails or bare. They look like this.
https://a.aliexpress.com/_mMebAkX
This is what I used on my Vera-link BT amp speaker out.
Alternatively, Mil-Spec round connectors work as well as Neutrik power connectors.
The repair of the PA5 amp works like a champ. Without these DIY fixes I would have a $400 door stop. Similar thing happened on my SMSL Su-9n DAC. The clock chip went bad from thermal burnout. Someone reverse engineered the part (it was ground off on the chip) and I swapped out a $6 part to save a $400 DAC. Still working like a champ. The original clock was a bad low quality part that overheated.
That was a general pic, but thank you. I have a couple 10A rated 5.5 x 2.5 female DC sockets to try.
Yeah, we thank gamerpaddy for his efforts with this.The repair of the PA5 amp works like a champ. Without these DIY fixes I would have a $400 door stop.
Wow..... those tiny beastYou were not kidding about having a hard time deaoldering that unit! It took 20 minutes of hot 390C air from my hot air pencil to finally dislodge that old unit. It was smoking hot. I hate having to heat anything up that hot - and I used a soldering iron to add local heat as well. Cleaning out the old solder holes was a pain too. The new one is installed. Fingers crossed that it works.
View attachment 1389353
Precisely for this reason TI says that the thermal pad needs to have a good connection to PCB ground. (Datasheet page 32 note T3)Thermal paste would work well but you don’t want the thermal pad of the TPA3255 chip touching the chassis ground. That would make it susceptible to noise and hum. The thermal pad should be electrically isolated but thermally conductive with the chassis. I use a silicone heat sink pad between the thermal block and chassis and paste between the TPA3255 and the thermal block. Without the paste it is very bad because the heat flux is huge. Up to 10W or so over a tiny 5mm x 12mm area.
I have a video showing how I connect the thermal block on my amp to the chassis using both paste and silicone thermal pad. This part starts at about 2min in if you want to skip the preliminary setup stuff specific to my TPA3255 amp design.
- Home
- Amplifiers
- Class D
- TPA3255 - all about DIY, Discussion, Design etc