Hi OS,
Just a quick Sprint layout tip.
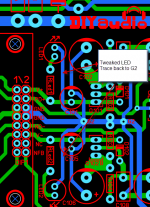
Not sure if you are using this one this may help you out. Lets say you want run a trace between two pads. First select trace then click on this starting pad. Then move your mouse in the direction of second pad. Don't click your left mouse button or anything just press the space bar. This will change the way trace is run. There is quite a few options to cycle through.
This can be very handy to ensure that the trace meets the other pad directly in the center. Another thing to try for long runs is start from one end then start tracking to the other end. You might observe that the trace it not going to meet nicely with the destination pad. So what I do it finish the tace somewhere close to the end pad then. Start the run trace command again but this time your starting point is the destination pad. Now work back toward your half-finished trace. Use the space bar again to get the trace orientation correct now select a part on that trace. It doesn't necessarily need to be the endpoint. Once you have the full trace in place you can use the split trace command to get rid of any overlap traces and then use the join trace to connect it all into one single trace.
I also like to only run my traces from pad to pad then start a new trace this makes making changes later on easier.
Just a quick Sprint layout tip.
Not sure if you are using this one this may help you out. Lets say you want run a trace between two pads. First select trace then click on this starting pad. Then move your mouse in the direction of second pad. Don't click your left mouse button or anything just press the space bar. This will change the way trace is run. There is quite a few options to cycle through.
This can be very handy to ensure that the trace meets the other pad directly in the center. Another thing to try for long runs is start from one end then start tracking to the other end. You might observe that the trace it not going to meet nicely with the destination pad. So what I do it finish the tace somewhere close to the end pad then. Start the run trace command again but this time your starting point is the destination pad. Now work back toward your half-finished trace. Use the space bar again to get the trace orientation correct now select a part on that trace. It doesn't necessarily need to be the endpoint. Once you have the full trace in place you can use the split trace command to get rid of any overlap traces and then use the join trace to connect it all into one single trace.
I also like to only run my traces from pad to pad then start a new trace this makes making changes later on easier.
Hi OS,
Another small tip.
Moving things around precisely in sprint can be a bit of a pain so what I do is. Lets say that you have two pads or macros that don't quite line up in the horizontal plane and you want to align them. What I do is measure the distance between the two macros or pads. Take note of the delta Y distance. Then create a custom grid spacing and set it temporarily to that delta Y distance. Now move the pad or macro up or down one grid spacing. I just click on the macro or pad and press the arrow key once. This will move the macro or pad exactly one grid distance. One they are aligned you can change your grid back to what it was and continue.
Thank you ,my friend.
I see ..... your tips. I have a sprint headache now. "Spooky" gave me one.
The "headache" put out a good Spooky. Worthy of the DIYA motherboard.
Glad I have the circuit in my head.
PS- the "spirits" guided me.
OS
I see ..... your tips. I have a sprint headache now. "Spooky" gave me one.
The "headache" put out a good Spooky. Worthy of the DIYA motherboard.
Glad I have the circuit in my head.
PS- the "spirits" guided me.
OS
Attachments
Last edited:
I'm assuming you are talking about the spooky. Maybe we should make which pcb we are talking about clear.D2 should be reverse.
Sajti
Headache gone ...
Spooky with hopefully no errors (fixed caps and diodes reversed).
Border and no DRC issues.
Schema updated to reflect the IPS.
Made a Macro of the spook , fit the wolverine MB perfect.
This is the one I want !! I like the LED's (spirits). 😀
OS
Spooky with hopefully no errors (fixed caps and diodes reversed).
Border and no DRC issues.
Schema updated to reflect the IPS.
Made a Macro of the spook , fit the wolverine MB perfect.
This is the one I want !! I like the LED's (spirits). 😀
OS
Attachments


This is the one I want !! I like the LED's (spirits). 😀
OS
Very excited for this project! I can't thank you enough for sharing this with us 🙂 . I'm even building a new pair of floorstanders just for this 🙂
I like the LED's (spirits). 😀
OS
I like them too. Theese are the location where the low impedance LEDs are mandatory. I did lot of research to find the TLRH4400 series from Vishay.
Sajti

Try these mods back at post #404. And change C7 Option LC to 2pf.
Distortion will go down to 0.001331%
Distortion will go down to 0.001331%
What you will really get .....
Wolverine DIYA amp is equivalant to a HK680.
Harman Kardon HK 680
I own this , a "wardog" after I re-capped it. Same EF3 , a much simpler LIN
topology. Not a PPM amp , like the Wolverine.
I've A/B'ed the 680 against my wolverine Slewmaster - Identical !!
Spooky (diyaAmp) is closest to a HK990.
Harman Kardon HK 990 integrated amplifier | Stereophile.com
.005% is realistic expectation for this topology.
I liked the way fast bass played with the Spook/slew. The reviews seem
to reflect this , as well.
So , either a 800$ or 2400$ amp ... as a more refined DIY kit.
OS
So , either a 800$ or 2400$ amp ... as a more refined DIY kit.
OS
800$ AND 2400$ amp 🙂 . I'll make both!
First , I need to get the primary project and maybe the first IPS (Spook) going.
Then , ....
Hellraiser - (greenamp/kypton) CFA-team red.
Symasui - 2 stage LTP/LTP-VAS.
Symetri - mix of spook/symasui. Bimo thought of it.
Eyesee - mirrored cascode op-amp IPS.
That should be enough to make for happiness. I have real world testing
(Slewmaster thread) to integrate with the V2.0 creations.
OS
IPS Full Checked & Tweaked
Hi OS,
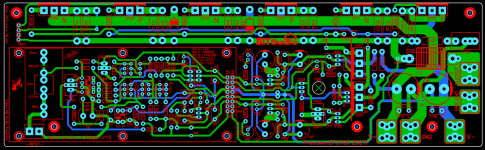
It was really nice to go over this Awesome and well planned layout.
I have given it a really thorougher check.
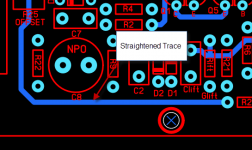
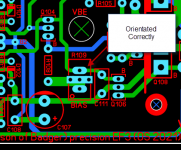
I have ensured all traces start and stop on the center of a pad and tried to optimise
the trace placement and tracking a little more.
I hope you like what I have done.
I will now move on to the VAS.
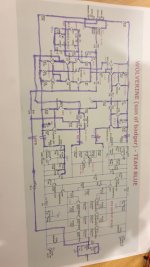
I thought that adding some branding to the board where the spooky IPS had it was a good Idea.
If you don't like it I can just remove it.
Also as I'm not 100% up to speedes with your past wolverine, spooky projects and others in the slew mater series
Could you briefly explain to me.
Is the wolverine just describing the IPS configuration or did the spooky and wolverine share the same VAS and OPS etc.
Maybe we should Brand the entire board SlewMaster Series II and then mark each individual IPS as
Wolverine
Spooky etc...
What do you think?
Hi OS,
It was really nice to go over this Awesome and well planned layout.
I have given it a really thorougher check.
I have ensured all traces start and stop on the center of a pad and tried to optimise
the trace placement and tracking a little more.
I hope you like what I have done.
I will now move on to the VAS.
I thought that adding some branding to the board where the spooky IPS had it was a good Idea.
If you don't like it I can just remove it.
Also as I'm not 100% up to speedes with your past wolverine, spooky projects and others in the slew mater series
Could you briefly explain to me.
Is the wolverine just describing the IPS configuration or did the spooky and wolverine share the same VAS and OPS etc.
Maybe we should Brand the entire board SlewMaster Series II and then mark each individual IPS as
Wolverine
Spooky etc...
What do you think?
Attachments
Last edited:
Looks great , man.
A little heavy on the branding....
Consider if one uses a Spooky.
keep the branding on the IPS section.
"Slewmaster" arose from a heated thread discussing whether a CFA was
better than a VFA (Current vs. Voltage FB).
I turned the "blabbing" into reality. 5-6 CFA designs , over a dozen VFA ...
including the Wolverine.
Modular construction really took off.
I left the forum for a few years , came back to see "Slewmaster" as
a 2M view massive thread !!!
So , I thought the forum store might benefit ... here we are.
OS
OS
Lack of documentation ....
As important as the core design is the -
-BOM - overview and build guide.
This shortcoming was discussed about the Badger. I feel bad that I left
so many "loose ends" for the poor Badger.
If anyone wants to automate the BOM , feel free.
I'll also write the build guide. It should be easy.
A lot will be informative , the design had ease of construction in mind.
PS - i'll submit both main Wolverine and Spook BOM's - almost finished.
OS
Looks great , man.
A little heavy on the branding....
OS
That's what I thought but didn't want to delete it until I checked with you.
Thanks for your other feedback it clears it up now.
Thank you for starting the BOM I know every forum member will be very appreciative of all your hard work getting this project to this point.
In continuing with the VAS check.
Boy you really have to concentrate in the CAP multiplier area.
I can see why you had a headache. Really impressed with your placement.
Attachments
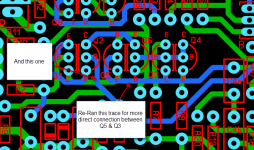
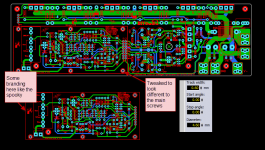
I'm looking BACK now on the Wolverine.
It's easy now , after the spook.
(below) I pushed your inner IPS routing further.
- R15 short ground route
- R6,7,8 pushed down ... your (top) blue trace lined up with all the others.
-R21 pushed up , lines up with 6,7,8.
Main ground and VAS drive have lots of room now.
If you get to the Spook , you will see why this one is cake now.
I was changing sides all night on the spook traces.
PS - R17 and R15 can run the same trace. NO return currents to really worry about.
Nothing will get modulated on that trace.
OS
Attachments
Last edited:
- Home
- Amplifiers
- Solid State
- DIYA store "Wolverine" (Son of Badger) .... suggestions ??