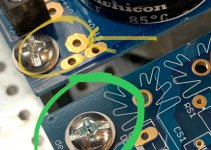
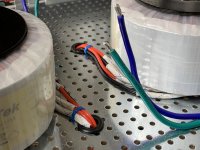
Oh my! I see what you circled. I didn’t notice that. Appreciate the catch! That could have gotten ugly.This is bad!
Last edited:
For future builds check out Monster Bolts on ebay for metric hardware in quantity at a decent price. Every now and again I load up on various sizes of M3 and M4 hardware. I usually have what I need on hand.
M3 x 12mm - Qty 50 - DIN 912 SOCKET HEAD Cap Screws - Stainless Steel A2 / 18-8 | eBay
M3 x 12mm - Qty 50 - DIN 912 SOCKET HEAD Cap Screws - Stainless Steel A2 / 18-8 | eBay
I guess many are buying the 300 deep chassis because of the availability
of UMS heatsinks...so the natural question is why not make a 4U/400 deluxe
chassis available?
I've been testing a few different Papa-amps on 3U 400mm heatsinks and they all stay below 50C easily. The 400mm case depth is great if you don't want to mount your transformer vertically on a support, which I think is a must if you use a 300mm deep case.
With the optional bottom plate and a 400W Antek, it's an amp you want to bend your knees and use your legs to lift unless you're still young and free of back pain. I think for some hot head amps like Aleph J and SissySIT you are probably better off with 4U/400.
Drilling your own (Modushop) heatsinks isn't so bad - print out the UMS pdf and tape it to your heatsink and punch the holes. The key is to make sure the holes are between heatsink fins. Tapping the holes is super easy and fast but make sure you grease/oil/wax the tap in between. Personally I just spin the tap (with hand-held variable speed drill) against an IKEA candle rather than use oil. They are soft enough to stick. 10 seconds to tap.
Laziness next level up (which I recently achieved) is to just drill holes bigger than needed for the board mounting holes and use male/female standoffs and screws from the outside. Only need to tap the holes for output devices. I even got so lazy as to only drill the 2 device spots I plan to use so I am only tapping 2 holes per side now.
but if you think this is 'the last amp you'll ever build' then spend as much time as you want on it.
......
but if you think this is 'the last amp you'll ever build' ........
Attachments


speaking of mounting transformers vertically ,
Is there a source for pre-made brackets or is everyone making their own ?
Is there a source for pre-made brackets or is everyone making their own ?
Indeed it is 🙂 I've read through it several times.
Great information on the brackets , thanks !
Does mounting the transformer vertically cause any issues with the magnetic field produced ?
Does mounting the transformer vertically cause any issues with the magnetic field produced ?
Yes, it keeps it more contained to that end of the chassis, particularly if you aim the wires away from the rest of the amp. It’s completely beneficial.
Yes, it keeps it more contained to that end of the chassis, particularly if you aim the wires away from the rest of the amp. It’s completely beneficial.
With that thought in mind, is it more beneficial when the transformers are horizontal to have the wires exiting from the bottom than the top? Or does it matter. Magnetism is magical stuff. 🙂
I don't know whether top or bottom makes a difference but definitely wires exiting towards front and back is better than side to side in my experience. The best thing to do is to rotate the transformer to find the best (quietest) orientation.
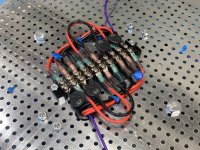
Got started on the second PSU tonight. The lessons learned from the previous one is making this one move along a bit faster. 🙂
I’ve learned on the YUGE voltage and ground planes you need more heat. Lots more heat. I found that 690°F will heat things up nicely for the jumpers and high-watt resistors. Tread lightly though. In and out. It’s a lot of watts
I’ve learned on the YUGE voltage and ground planes you need more heat. Lots more heat. I found that 690°F will heat things up nicely for the jumpers and high-watt resistors. Tread lightly though. In and out. It’s a lot of watts
Attachments
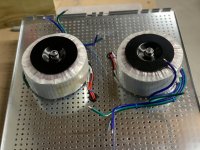
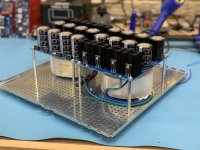
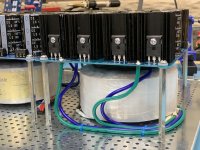
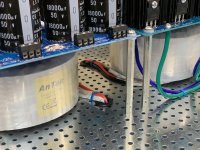
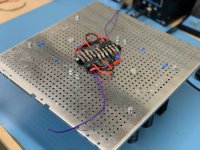
Well, ladies and gentlemen, I present one big mega huge dual mono power supply. Needless to say, it’s heavy. I fixed the potential shorting problems identified a couple days ago. Thanks for the catch! After (over)analyzing several of your comments and suggestions about elevating the platform, I took it a little to the extreme. Turns out since this is a 5U case, I can elevate the baseplate not only 10mm, but nearly 40mm (1.5”) and still have almost 50mm (2”) to the top plate. Score! That means the screws/bolts/studs for the front and back plates no longer interfere with the baseplate. The skinny standoffs that you see in the photo aren't supportive enough, so I'll probably have to fab some sort of bracketry to accommodate. But having that space is wonderful.
I haven’t got the mains plugged in yet, obviously. All of that is under the baseplate out of sight. While there will be well over an inch of airspace beneath there, I’ll be sure to put a protective cover over the HV parts for safety. On the barrier strip in the photo, the bottom two terminals are for the mains power. And of course there are still earth grounds to tend to.
All in all I’m very excited! Test run coming soon. Any advice before I flip the switch? Light bulb tester is recommended, I suspect. Although I do have a variac as well.
Attachments
-
 E275F364-3636-417A-AD89-E8943F897E3E.jpg647.7 KB · Views: 226
 -
 D5DE16DC-19DE-41DC-8758-1033CF853250.jpg970.6 KB · Views: 229
 -
 45DF01B5-6B3B-4EF7-A42C-FB718575C8B2.jpg680.3 KB · Views: 225
 -
 1741974A-E48E-429B-BDA5-01BE384731C6.jpg772.1 KB · Views: 269
 -
 EFE158FE-B47F-40B5-82D1-AB0A7CEC2EBD.jpg997.2 KB · Views: 209
 -
 00C392AC-8D62-4FE5-9342-4279C67F2C6E.jpg724.4 KB · Views: 152
 -
 6FD85C13-42BE-487F-9A12-D6E0E41C26E4.jpg993.1 KB · Views: 163
 -
 2621365F-B5FC-497D-BC9D-A991C53BB4AE.jpg1 MB · Views: 185
 -
 F911F5CE-B3A4-4CDD-8572-2DA72384E629.jpg785.3 KB · Views: 175
Last edited:

😀
Edited after accidental submit to add - I'm a chicken. I use a Variac and a dim bulb tester.
One more edit much later...
1) I think traced out your terminal block properly. Back to my chickenish nature. I like testing one PSU at a time. If it's not a PITA, I'd remove and reattach as appropriate what I think will be jumpers to carry the mains from the center set of terminals to each of the transformers' primaries to test one at a time.
2) I wish I could find my exact reference, but I can't. I took someone's kind advice to fuse each hot leg of my transformer primaries. Someone else please chime in re: whether that's appropriate here. If I find the exact reference, I'll post it later.
Last edited:
- Home
- Amplifiers
- Pass Labs
- New Aleph J builder from Wisconsin, USA