Thank you, I'll try bigger cap values then. It's kind of a 1st order filter, phase is still not recovering to normal that quickly, despite fc being at 20Hz now.
Power is enough for the moment I think. 95dB sensitivity, I really like it, a good healthy amount.
Depending on source signal level I play at around 50-70% setting in software, except older recordings e.g. Creedance Clearwater Revival.. but luckily in Linux we can "overdrive" output voltage even for line-outs simply by pulling total system loudness over 100% and then they're fine as well. But I'll keep that parallel trick in mind 😉
Hey kodabmx --
Wouldn't a true White cathode follower work better into 32 ohm headphones?
Vortex --
fc is "-3dB down at", so if you're -3dB down at 20Hz, that means you very likely can hear the loss of bass amplitude at 30Hz or 40Hz. If you crave the ultimate 'slam' from kick drum, etc. , and since you're using low impedance headphones, you'll probably want to aim for an fc of more like 5Hz or lower. You could try 1000uF, which would be two 470uF in parallel, if you happen to have those.
Massdrop/Sennheiser HD-6XX (= HD-650) has a 300 ohm impedance, which should sound noticeably better with that 6N6P amp. I'd be interested to hear how that sounds to you.
The reason I made my headamp with an OPT was so that I could use different headphones. My three favorites are a Massdrop/Sennheiser HD-6XX, a Fostex T50RP, and an Audio Technica ATH-M30 (no 'X'). They all sound 'good' from the amp, all from the same secondary (nominal 50 ohms -- primary is nominal 8k ohms). The HD-6XX sounds best, but they all have their charms.
--
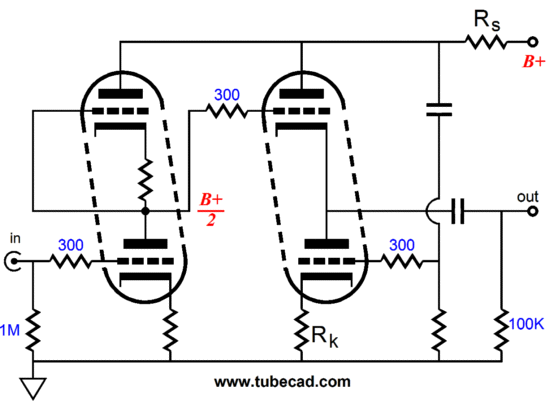
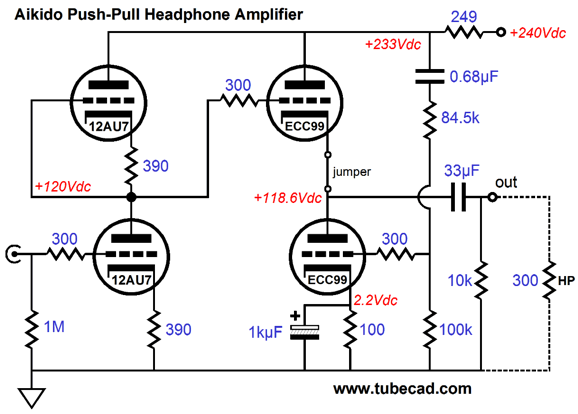
It might, or you could to do the Aikido Push Pull treatment by adding 2 resistors and a cap. Either way you go push pull... If you want the "charm" of single ended, adding another 6N6P is the easiest way.
My version is the same without the "Aikido" or push pull action.
Step one: Rk = rp(mu -2) / (mu² + 3mu + 2)
Step two: R = rp + (mu + 1)Rk
Step three:

You can cheat and use Broskie's calculated values. 6N6P is close enough to ECC99 for it to drop in.
Otherwise, use the 6DJ8 directly coupled to a 6AS7 HP amp that's easy to find on the net. I think it was headwize. It'll swing 100mA. Not as linear though but it'll make decent power into 32R.
My version is the same without the "Aikido" or push pull action.
Step one: Rk = rp(mu -2) / (mu² + 3mu + 2)
Step two: R = rp + (mu + 1)Rk
Step three:
You can cheat and use Broskie's calculated values. 6N6P is close enough to ECC99 for it to drop in.
Otherwise, use the 6DJ8 directly coupled to a 6AS7 HP amp that's easy to find on the net. I think it was headwize. It'll swing 100mA. Not as linear though but it'll make decent power into 32R.
Last edited:
Hey rongon, thanks for the tips, I'll definitely try something different later, but not now. I'm really pleased with the MH751, maybe I'm going to mod it to pure balanced operation and make a balanced 'Aikido' based on this design just for fun.
But for a while I'm good now with this amp design.
26 Ohms yepp, but 97dB sensitivity (nominal - I was wrong with 95).. max rated power is 40mW anyway so this amp at maximum, with a strong input signal is way too loud already. I don't have the feeling I should aim at 600mW 🙂 or so. They just work together beautifully.
I'm really considering to use this circuit as a pre-amp maybe, if possible. Yesterday I watched Star Wars III Revenge of the Sith (my fav.) , just for fun, with the little amp and headphones, VLC player, stereo mode. Needless to say I was blown away by the details, nuances.. like a high-end cinema except some real 3D effects due to the fact it's stereo via normal headphones. A whole different experience lol. I really liked it.
1000uF. I got the ooomph back for the bass region. Amazing sound now.
Chassis has arrived, GLS still needs to catch me due to some minor travels during my holiday now.
On Tuesday the whole thing will move into the chassis and will look like a real audio device, finally.
Chassis has arrived, GLS still needs to catch me due to some minor travels during my holiday now.
On Tuesday the whole thing will move into the chassis and will look like a real audio device, finally.
Well.... yeah. I can just scrap at least half of my FLACs. But first I'm going to try a great DAC. Premium Realtek ALC1200 is already weak now. And going to source some quality resistors, caps from partsconnexion. I'm quickly over $500 with this project.. (amp only) if I'm not careful.
I'm using this as a DAC...
224bit/192KHz DAC DIY KIT ,FULL ASSEMBLED KIT- Lampucera1.0, CS8416 + CS4397 | eBay
224bit/192KHz DAC DIY KIT ,FULL ASSEMBLED KIT- Lampucera1.0, CS8416 + CS4397 | eBay
...ck ! 224 bits ! I want one 😀
Thanks guys for all the good sharing, give the envy to drop in tubes worlds !
What do you think of micro tubes that Lampizator uses in some of his kits please ?
Thanks guys for all the good sharing, give the envy to drop in tubes worlds !
What do you think of micro tubes that Lampizator uses in some of his kits please ?
...ck ! 224 bits ! I want one 😀
Thanks guys for all the good sharing, give the envy to drop in tubes worlds !
What do you think of micro tubes that Lampizator uses in some of his kits please ?
They're easy to use, and cheap. Easily mountable in a DIP/DIL or ZIP socket.
Many are capable of poor or good performance, as with any other valve
Amp has finally arrived in its final chassis, took me 3 days nonstop soldering/thinking and hunting of additional small things like M6 screw for fixing the toroid, extra rubber feet beneath the toroid (it's heavy like hell) ...
Yeah, I'm not a professional with speed, sorry.. especially not at 300 Volts. Rule #1 an electrician told me with tube amps: no hurry !!! Calm down, deep breath, slow motions, fresh brain. 😀
Well, first launch went OK but with some hum (of course). I use star earth grounding at one of the 470uF PSU caps' negative to avoid ground loops - and of course all earth comes here. Playing around with earth, grounds, even for the 4 tubes (where sockets have a middle hole, capable of building ground there too..) things improved a tiny little but I then gave up and told myself it can't be ground loop, it must come from the AC heating.
Straight wires of course, as used to be in case of beginners. 😀
Then I googled a bit and came to a great blog post/article of The Valve Wizard and went through all the main steps, twisted AC wires neatly, routed properly to the sockets, avoided signal wires and built the virtual center tap, attached to the star ground.
And woo-hoo, 99% dead silent 😀 (Almost because I use 2 resistors instead of the precision trimpot and small resistor variance might leave some residuals there I assume). But it's soooo enjoyable now, omg what a sound
Now I still have to implement the heater elevation combined with the trimpot trick and AC is handled. (As I've read about it on the references, these ideas come from 1944, holy ****, good old tube tricks) Anyway, I'll stick to AC heating although DC could be beared by my secondary yet, but don't want to overcomplicate things now. It was a great lessons learned how to handle AC heating properly, thanks for the Valve Wizard guys whoever writes that blog.
Now I have to close the upper panel of the box somehow.. god.. with point-to-point wiring it's not that easy as I've thought at first glance. Maybe I have to cut and shorten some parts, omg.
Btw I combined the amp with a small PSU control circuitry, it bought a small PCB transformer and made stabilised 5V DC for the microcontroller after it, which pulls and keeps a 230V/5A mechanical relay to ON (closed) state when I press a button, and releases the relay when I press the button again. Kind of a full standby implementation like with factory amplifiers. The relay's output pins are in series with the primary - simple. The button has a LED ring around it, it's fading slowly when the amp is in standby mode and lights constantly when the amp is in ON state. This small complementary circuitry is always powered when the main switch at the back is ON. The code required me 2 more days, to pack LED effect and counters and everything into one cycle while handling button noise too (so that if the button has some noise or too frequent presses, the relay won't switch like crazy).
What else can I say ? The amp looks a bit retro or industrial, I'm planning to drill some extra holes for breathing onto the panels and then I'm trying to lacquer some piece of wood panels and put around it to get a decent look. The ALPS pot is a must btw, great precise thing. I might try a 256-step relay based "pot" later but for now this is pretty much hi-fi for me too.
Thank you for all the great tips, this little toy brings a lot of listening pleasure for me now. A keeper. I signed the chassis' top panel inside with a date so when I'm an old fart I'll still know who made this and when.
Oh, one more thing: I tried the 6N6P-I-s in place of the normal 6N6Ps. Fantastic sound with existing AC heating, a tad more bright and "aggressive" on the bottom end which I pretty much like indeed. But they run this way on 6.3V heaters so I'll implement a switch and drop AC heater voltage for them to be equivalent with 6N6Ps. But definitely worth trying, they're very musical too.
Cheers and keep on DIY-ing, when done well this leads to magic !!!
(Moving on to my 6C33C/KT88 projects).
Loreena McKennitt - Courtyard Lullaby - YouTube
Yeah, I'm not a professional with speed, sorry.. especially not at 300 Volts. Rule #1 an electrician told me with tube amps: no hurry !!! Calm down, deep breath, slow motions, fresh brain. 😀
Well, first launch went OK but with some hum (of course).
I use star earth grounding at one of the 470uF PSU caps' negative to avoid ground loops - and of course all earth comes here. Playing around with earth, grounds, even for the 4 tubes (where sockets have a middle hole, capable of building ground there too..) things improved a tiny little but I then gave up and told myself it can't be ground loop, it must come from the AC heating.Straight wires of course, as used to be in case of beginners. 😀
Then I googled a bit and came to a great blog post/article of The Valve Wizard and went through all the main steps, twisted AC wires neatly, routed properly to the sockets, avoided signal wires and built the virtual center tap, attached to the star ground.
And woo-hoo, 99% dead silent 😀 (Almost because I use 2 resistors instead of the precision trimpot and small resistor variance might leave some residuals there I assume). But it's soooo enjoyable now, omg what a sound
Now I still have to implement the heater elevation combined with the trimpot trick and AC is handled. (As I've read about it on the references, these ideas come from 1944, holy ****, good old tube tricks)
Anyway, I'll stick to AC heating although DC could be beared by my secondary yet, but don't want to overcomplicate things now. It was a great lessons learned how to handle AC heating properly, thanks for the Valve Wizard guys whoever writes that blog. Now I have to close the upper panel of the box somehow.. god.. with point-to-point wiring it's not that easy as I've thought at first glance. Maybe I have to cut and shorten some parts, omg.
Btw I combined the amp with a small PSU control circuitry, it bought a small PCB transformer and made stabilised 5V DC for the microcontroller after it, which pulls and keeps a 230V/5A mechanical relay to ON (closed) state when I press a button, and releases the relay when I press the button again. Kind of a full standby implementation like with factory amplifiers. The relay's output pins are in series with the primary - simple. The button has a LED ring around it, it's fading slowly when the amp is in standby mode and lights constantly when the amp is in ON state. This small complementary circuitry is always powered when the main switch at the back is ON. The code required me 2 more days, to pack LED effect and counters and everything into one cycle while handling button noise too (so that if the button has some noise or too frequent presses, the relay won't switch like crazy).
What else can I say ? The amp looks a bit retro or industrial, I'm planning to drill some extra holes for breathing onto the panels and then I'm trying to lacquer some piece of wood panels and put around it to get a decent look. The ALPS pot is a must btw, great precise thing. I might try a 256-step relay based "pot" later but for now this is pretty much hi-fi for me too.
Thank you for all the great tips, this little toy brings a lot of listening pleasure for me now. A keeper. I signed the chassis' top panel inside with a date so when I'm an old fart I'll still know who made this and when.
Oh, one more thing: I tried the 6N6P-I-s in place of the normal 6N6Ps. Fantastic sound with existing AC heating, a tad more bright and "aggressive" on the bottom end which I pretty much like indeed. But they run this way on 6.3V heaters so I'll implement a switch and drop AC heater voltage for them to be equivalent with 6N6Ps. But definitely worth trying, they're very musical too.
Cheers and keep on DIY-ing, when done well this leads to magic !!!
(Moving on to my 6C33C/KT88 projects).
Loreena McKennitt - Courtyard Lullaby - YouTube
Last edited:


Thanks. You mean for audio purpose or in general ? When meant for audio, it's a HP amp only.
As a plus there's an Arduino in it, with a small PCB transformer, own bridge rectification and 5V stabilizer, alongside the left wall.
2/3 of the place is taken by the heavy toroidal transformer in the middle (cast-resin, shielded), with 1 primary and 3 secondaries (1x 6.3V and 2x 200V).
As a plus there's an Arduino in it, with a small PCB transformer, own bridge rectification and 5V stabilizer, alongside the left wall.
2/3 of the place is taken by the heavy toroidal transformer in the middle (cast-resin, shielded), with 1 primary and 3 secondaries (1x 6.3V and 2x 200V).
Audio and generally speaking... It's quite a nice photo.
I just got an arduino kit. I'm gonna start playing with it later.
I just got an arduino kit. I'm gonna start playing with it later.
Great stuff. For a lot of things even the smallest ones can be used, e.g. for one digital port you can use a bunch of digital sensors simultaneously. You see how small mine is, built into this project. I'll use the same I think for my next project, or an ESP+WiFi based one. Then we're able to control any kind of amplifier or whatever device through TCP/IP (e.g. HTTP, etc), including sending commands and reading out whatever we want. A really great ecosystem. Good luck to that, I'm still learning it too.
- Home
- Amplifiers
- Tubes / Valves
- Any very good sounding tube headphone amp ideas?