It’s only on those batteries. The 3 clicks follows the batteries not the amp.
Glad you solved it.
One note: the recent ultra low JFET bias current version of the circuit with only 110uA current through the JFET doesn’t suffer from this large in rush problem at all. It must be from fact that lower current to JFET means that it takes a finite time for the MOSFET to get its gate to open and this slowly ramps the current demand through the MOSFETs/resistors.
Last edited:
It’s only on those batteries. The 3 clicks follows the batteries not the amp.
It was just odd that all 6 others with the same set of batteries only took one or two clicks. Had I just done...one... more... click... All would have been good. Well, at least I learned a bit more about the circuit.
Glad you solved it.
Thanks to you!
One note: the recent ultra low JFET bias current version of the circuit with only 110uA current through the JFET doesn’t suffer from this large in rush problem at all. It must be from fact that lower current to JFET means that it takes a finite time for the MOSFET to get its gate to open and this slowly ramps the current demand through the MOSFETs/resistors.
Can't wait to hear more about the Hakuin. Also, I appreciate the explanation of the "why" again. As I learn more and more, things start to come into focus.
Glad you are taking a keen interest in learning how and building lots of them. I had my fill after making over 70 finished amps. They are just too labor intensive to make for any profit. The new Hakuin is going to be all robot pick and place and hopefully, I can get that made for a reasonable cost. It’s got way too many parts in the PSU section to do more than a prototype by hand.
I've had some issues with the Hitech 9V Lithium-Polymer batteries that I originally bought.
So, I've just ordered a set of six of the EBL batteries that you use in the PCAA.
Two will go in the Amp, and the other four get transported in a protective case.
My chargers are designed for Li-Ion & Li-Polymer - so they should work with the EBL batteries.
One charger is at home, and one is at work.
I do like the sound of the NHB PCAA, but I do wish it wasn't necessary to mess about with swapping / recharging pairs of 9V batteries. 🙂
Looking forward to the convenience of the new design.
The EBL batteries arrived yesterday.
I installed a set in my PCA Amp, connected my Earbuds Anonymous (Facebook group) earbuds (from Penon Audio), and listened for nearly 5 hours, before the amp went off.
NOTE: I shouldn't have had the earbuds plugged in before turning the amp on (it came on the first time the switch was rotated), since there's quite a thump!
During the evening, I topped up the charge on the other two sets of batteries, so they're ready for long-term use.
The third set was charged over-night, and is back in the amp for today.
Thanks for the update Dbaldock, nearly 5hrs is pretty good battery life for this amp. On the new Hakuin, there will be a solid state relay (SSR) that disconnects the headphones on delay to prevent the turn on thump.
Just got word from DHL that the Hakuin prototype PCB should be here in a few days. I guess I better put in the order for the BOM.
With the need to hone my SMT soldering technique and a curiosity with the HPA world I decided to build a PCA. This project should cover both bases nicely.
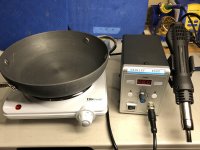
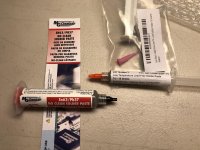
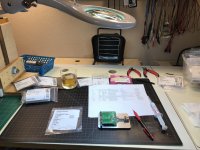
After discussing with X what tools would be necessary for SMT work I went with a hot plate and hot air station.
Application of the solder paste was a learning curve, too much at first. The pads need a very small amount, about the size of the tip of a .7 lead pencil. Magnification headgear is highly recommend 😀
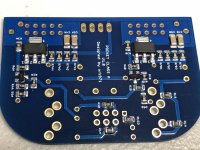
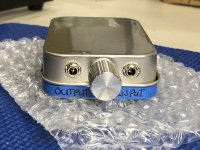
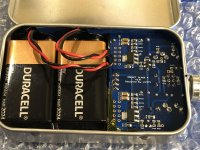
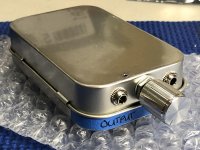
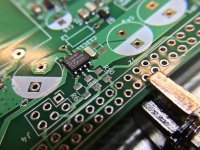
SMT soldering done this way was easier then I expected and came out much neater than when I used a fine tipped iron. The PCA was a pleasure to build, I found the trickiest step was getting the alignment for the three holes punched in the tin correctly. Being a noob that doesn’t own any “cans”, I purchased an entry level pair of CB-1 HP’s to listen with the PCA.
I’ll give this combo a test drive and report back soon... 😉
After discussing with X what tools would be necessary for SMT work I went with a hot plate and hot air station.
Application of the solder paste was a learning curve, too much at first. The pads need a very small amount, about the size of the tip of a .7 lead pencil. Magnification headgear is highly recommend 😀
SMT soldering done this way was easier then I expected and came out much neater than when I used a fine tipped iron. The PCA was a pleasure to build, I found the trickiest step was getting the alignment for the three holes punched in the tin correctly. Being a noob that doesn’t own any “cans”, I purchased an entry level pair of CB-1 HP’s to listen with the PCA.
I’ll give this combo a test drive and report back soon... 😉
Attachments
-
 C512438A-F953-4AAC-8047-6E0B2617B53E.jpg939.4 KB · Views: 279
 -
 DE11DF65-24BD-4433-BAD5-E47042B71C3C.jpg807 KB · Views: 313
 -
 FE3BD1DA-6C9C-4CC5-AF1E-3BCB9143EAB6.jpg695.7 KB · Views: 765
 -
 76BD3E0A-F439-4F32-9BF6-B493FBD95F3F.jpg733.7 KB · Views: 268
 -
 7D0339C1-2BF4-4E2D-9E4E-13D1B069D0CA.jpg974.1 KB · Views: 307
 -
 2DF5379C-F01B-4B7F-B021-23F734D48254.jpg742.2 KB · Views: 186
 -
 B6CB0F6E-1121-4C47-AD29-8318590A57F2.jpg858.3 KB · Views: 233
 -
 CA6397DF-0550-4990-B333-BF7FFB3CF3C5.jpg702.6 KB · Views: 165
Nice work, Vunce!
This solder joints look perfect. Is that no-Pb solder paste or with-Pb? Great fit and finish on the tin case holes for the connectors and pot. Adding a piece of Kapton tape to the inside of the lid will help cool the heat radiated off the PCB better.
This solder joints look perfect. Is that no-Pb solder paste or with-Pb? Great fit and finish on the tin case holes for the connectors and pot. Adding a piece of Kapton tape to the inside of the lid will help cool the heat radiated off the PCB better.
Hi Vunce,
Hope you had time to listen and form an impression. Btw, what is your bias current across the 470ohm resistors? Test with fresh set of batteries.
Hope you had time to listen and form an impression. Btw, what is your bias current across the 470ohm resistors? Test with fresh set of batteries.
Hi X,
With a fresh set of the EBL Li-ion batteries I’m getting:
48.5mA channel A
50.5mA channel B
The temperature of 470R quad is 52°C
The EBL’s need the power knob cycled 3-4 times quickly to work properly.
With a fresh set of the EBL Li-ion batteries I’m getting:
48.5mA channel A
50.5mA channel B
The temperature of 470R quad is 52°C
The EBL’s need the power knob cycled 3-4 times quickly to work properly.
That’s about perfect bias current and temps are good too. Just like a regular Class A amp with temperatures.
The trick with power cycling the knob is standard practice with the rechargeable batteries to slowly bring the rail caps up to prevent auto shut down from the smart battery controller inside the 9v Li-ion cell.
The trick with power cycling the knob is standard practice with the rechargeable batteries to slowly bring the rail caps up to prevent auto shut down from the smart battery controller inside the 9v Li-ion cell.
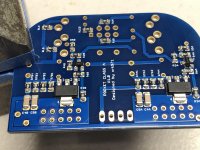
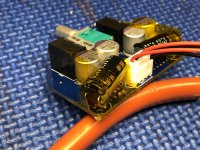
Possible solder bridge on R10
https://www.diyaudio.com/forums/att...p-gb-de11df65-24bd-4433-bad5-e47042b71c3c-jpg
https://www.diyaudio.com/forums/att...p-gb-de11df65-24bd-4433-bad5-e47042b71c3c-jpg
It's solder paste. Once it's heated and flows, it should migrate to each pad. Good eyes though - wow! 😀
Sorry - Hit Enter too soon and X added the note also -
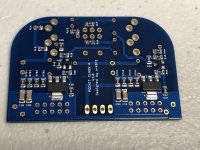
Here's the solder after flowing - looks great!
https://www.diyaudio.com/forums/att...p-gb-fe3bd1da-6c9c-4cc5-af1e-3bcb9143eab6-jpg
Sorry - Hit Enter too soon and X added the note also -
Here's the solder after flowing - looks great!
https://www.diyaudio.com/forums/att...p-gb-fe3bd1da-6c9c-4cc5-af1e-3bcb9143eab6-jpg
Last edited:
@Vunce - he beat me to it - LOL! Did you use the tip that came with it, or did you swap out to another / smaller size. I can't get nearly the nice small amounts from mine that you were able to achieve. Gorgeous work!
I've always used the solder paste and hot-air station for SMT components. For multi pin IC's, I usually tack it in place on opposite corners, then come back with fine solder and a chisel tip on my iron. I've tried the hot plate method, I can see how it would be convenient though. Place solder paste, and all the components, then heat it up and watch the board solder itself.
A good setup, patience, and diligence and you can get great results.
This is the rework station I bought a few years ago, and have had good success with:
F2C 853d SMD DC Power Supply Hot Air Iron Gun Rework Soldering Station (mode #8) - - Amazon.com
A good setup, patience, and diligence and you can get great results.
This is the rework station I bought a few years ago, and have had good success with:
F2C 853d SMD DC Power Supply Hot Air Iron Gun Rework Soldering Station (mode #8) - - Amazon.com
Attachments
@Vunce - he beat me to it - LOL! Did you use the tip that came with it, or did you swap out to another / smaller size. I can't get nearly the nice small amounts from mine that you were able to achieve. Gorgeous work!
I agree that Vunce nailed it. Looks perfect for a first timer’s attempt.

I find the blue plastic taper Luerlock tips work much better than a hypo needle. You can push down and pinch off the paste bead.
X - Something like this?
USA Shipper 100 pcs Blue Luer Lock dispensing syringe tip cap Hydroponics vape | eBay
EDIT - I think this...
Tapered Dispensing Tip Needle, 22 Gauge, Blue, Luer Lock Hub, Polypropylene
USA Shipper 100 pcs Blue Luer Lock dispensing syringe tip cap Hydroponics vape | eBay
EDIT - I think this...
Tapered Dispensing Tip Needle, 22 Gauge, Blue, Luer Lock Hub, Polypropylene
Last edited:
That came out really nice V. 🙂
Yes, it is R1B looks like 10 on the board.
I used the smallest tip it came with, but it was still too large. I'm pretty good with an iron, so for the few I needed with the AN, it wasn't an issue. Maybe next winter, when the new build season gets under way I will sit down and figure it out.
This season is winding down for me, once the water isn't hard anymore, the amp building will give way to fishing, and other outdoor activities.
Last edited:
- Home
- Group Buys
- xrk971 Pocket Class A Headamp GB