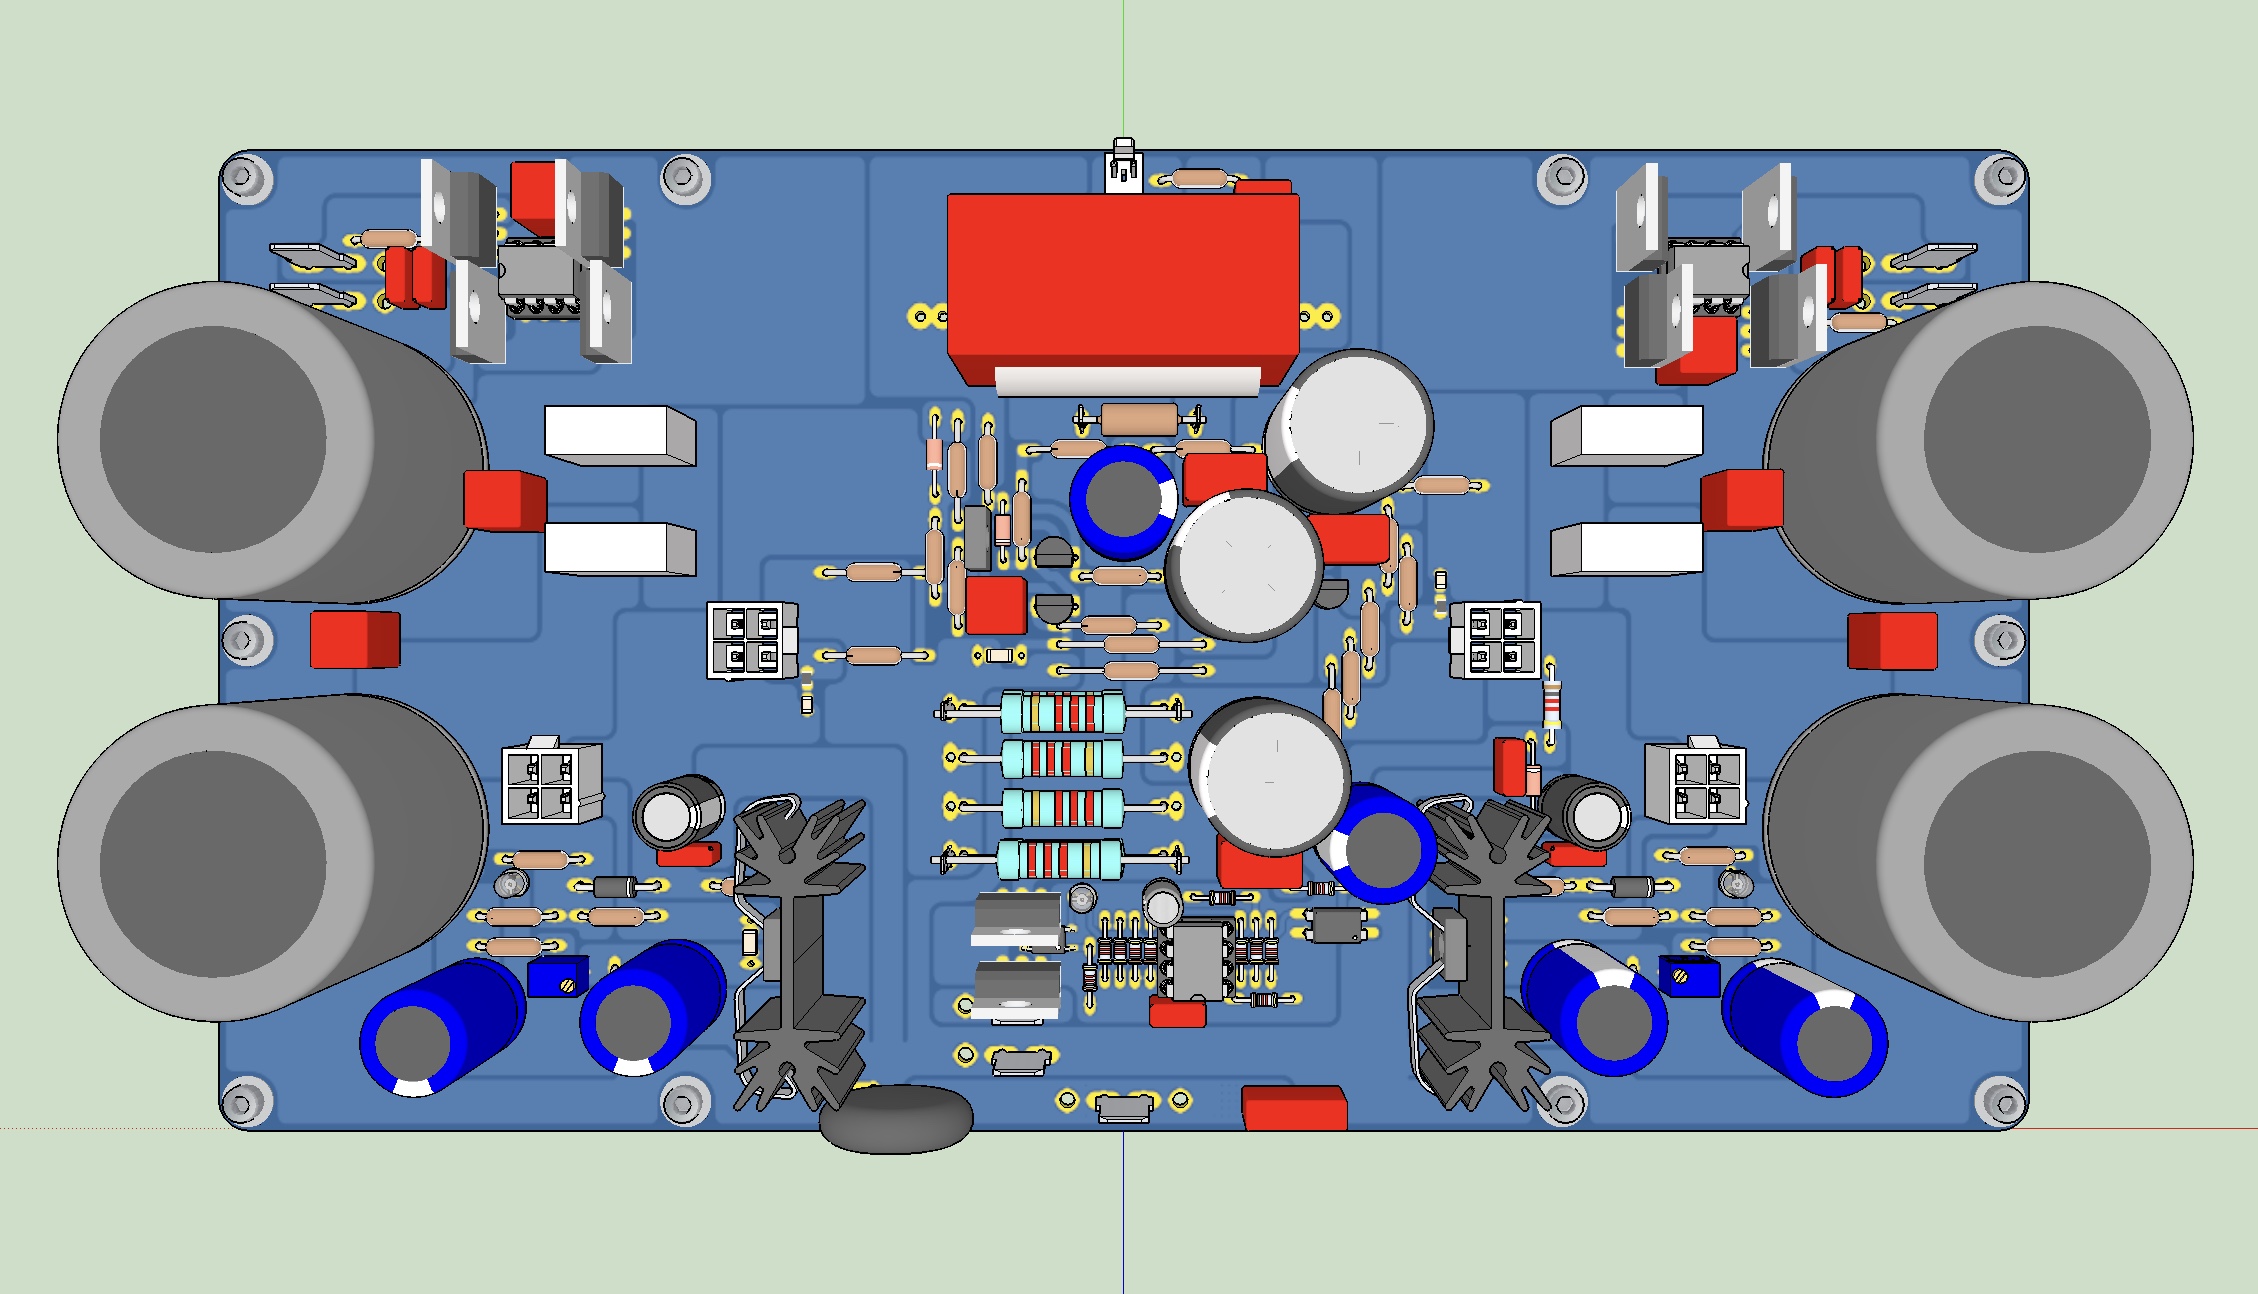
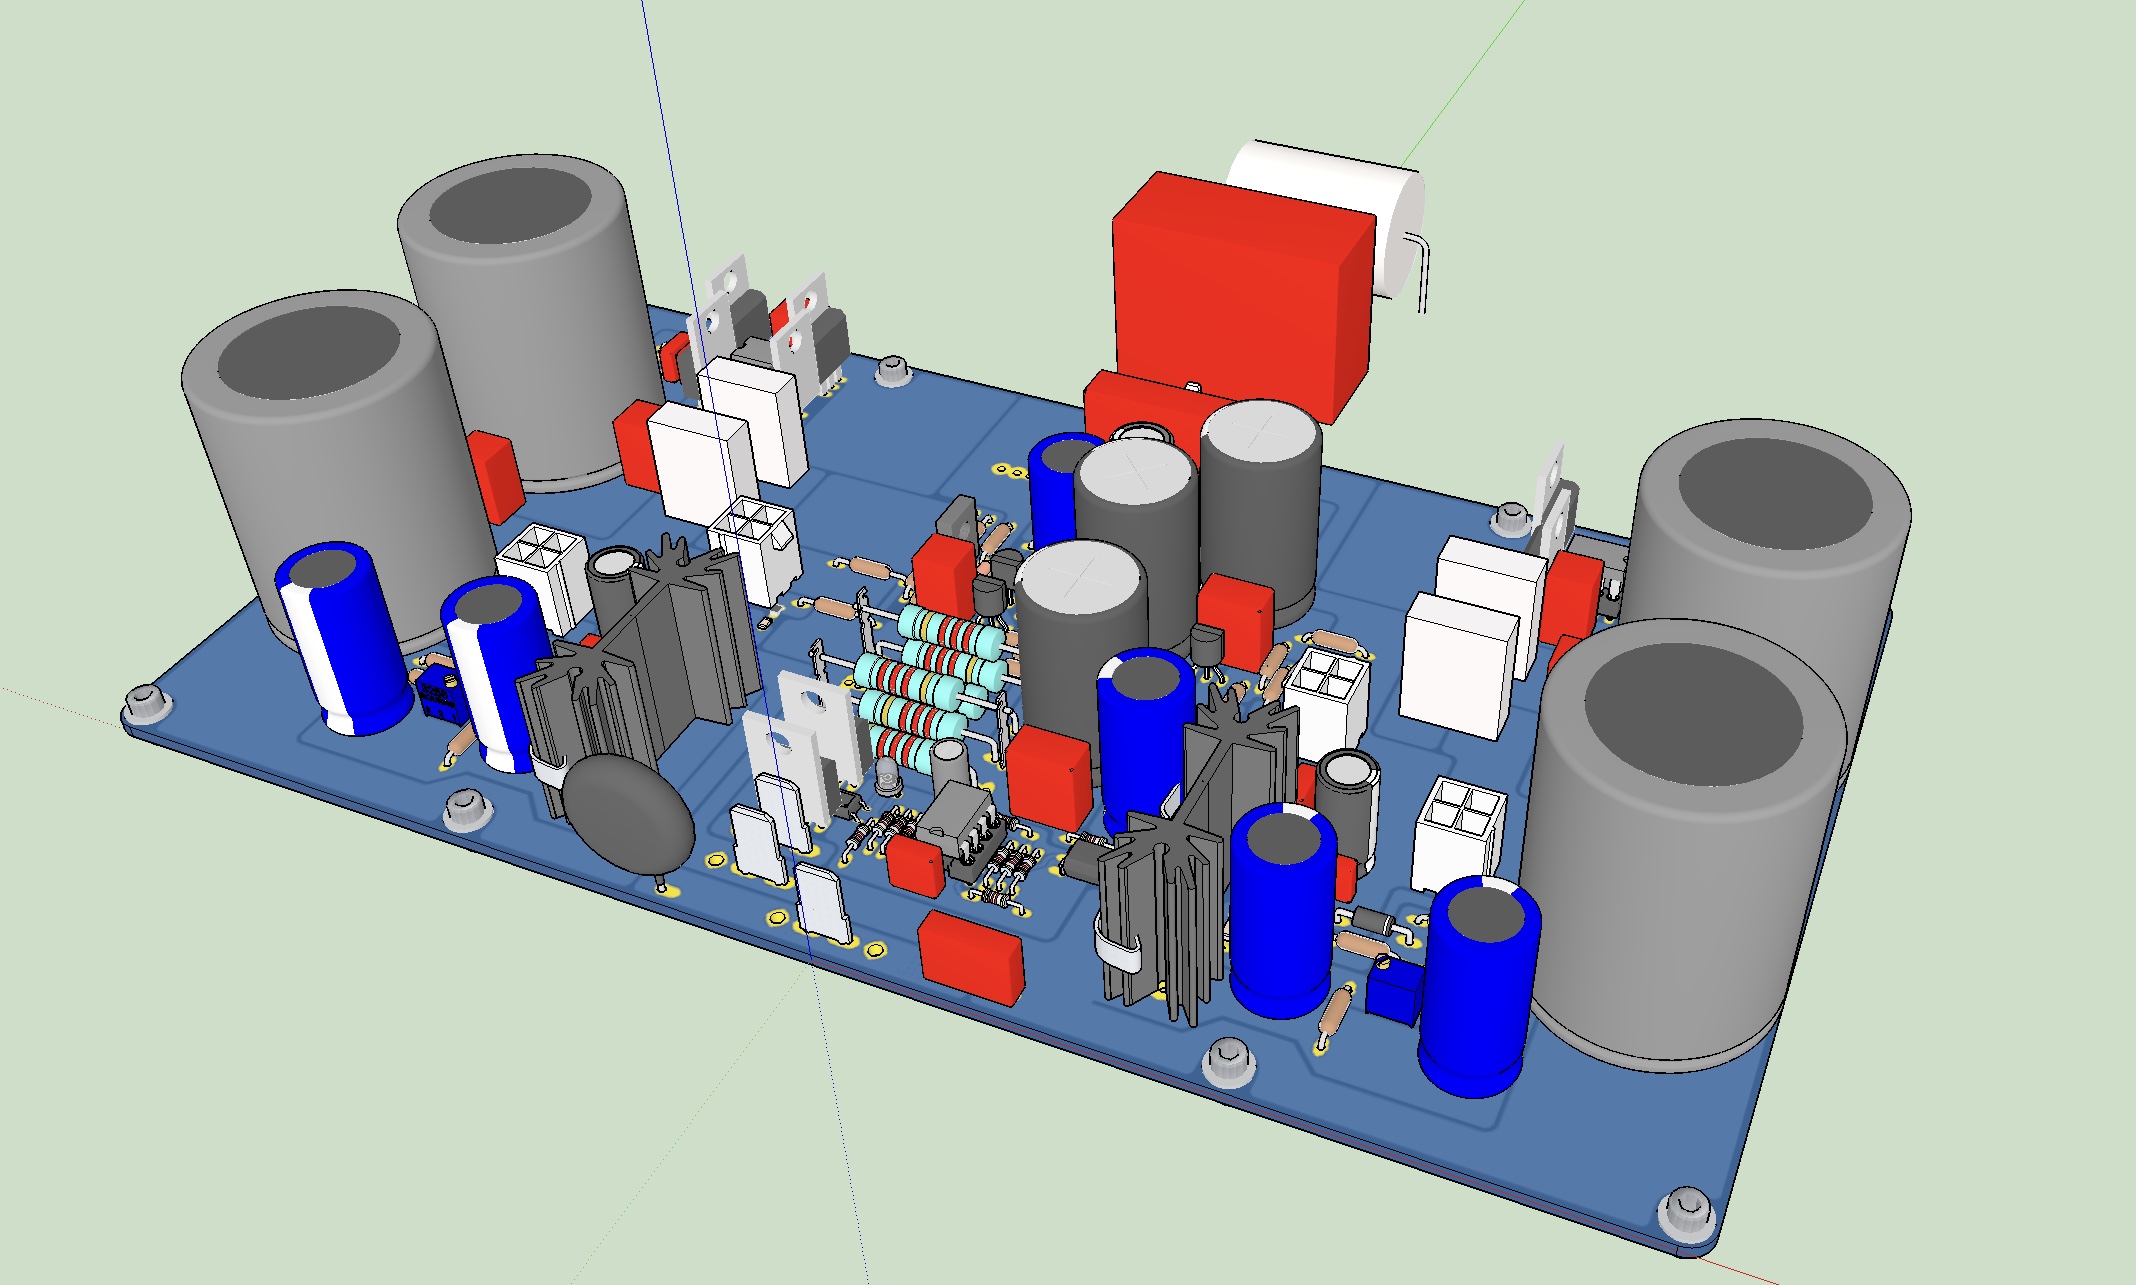
This amp is the evolution of the Alpha BB amp bit combined with the popular Smooth Like Buttah (SLB) active bridge cap multiplier power supply all integrated on board. The amp uses the wonderful Aksa Lender front end with the superb hybrid P channel Aleph output stage. In combining the Alpha BB with the SLB we have essentially simplified one of the most time consuming and difficult aspects of building a Class A amp: making the power supply and connecting it. We have also decided to include a custom solid state relay (SSR) speaker protection and delayed start circuit designed by jhofland. The SSR protection is really new - so testing it on veroboard remains to be done. In the mean time, JPS64 has not wasted any time and has come up with the following layout.

Notable features of the ABBB amplifier:
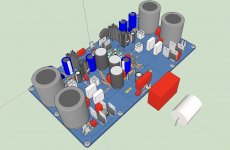
This is about as close as we can come to a single-board Class A power amp. All that is required is to connect the transformer secondaries (4 spade FASTONs), connect speaker +ve and +ve (2 spade FASTONs), audio input (2pin JST), and chassis GND (1 spade FASTON).
Of course, the 2 TO-264 BJTs for the cap multiplier need to be connected to a heatsink capable of removing about 10W to 15W each. The two TO-264 IXYS MOSFETs need to be connected to suitable heatsink or CPU cooler capable of removing about 100W. Note that many CPU coolers have a large enough pad to accommodate both BJT as. MOSFET size by side. We recommend Noctua PWM fans for silent operation.
The nice thing about mounting the actives to the heatsinks is that they are on flying leads with 4pin polarized Molex connector. So the amp board installation and actives heatsink installation are separate operations. And you can pull the amp board out of the chassis without removing the transistors from their heatsinks! How convenient is that?! We tested this on the SLB ans another one of Hugh’s amps and found that it works superbly. Very convenient.
The addition of an on-board DC protection circuit and power on time delay will help to prevtndameg to the speaker and eliminate turn on thump. It is a small and unobtrusive circuit near the output FASTON terminal.
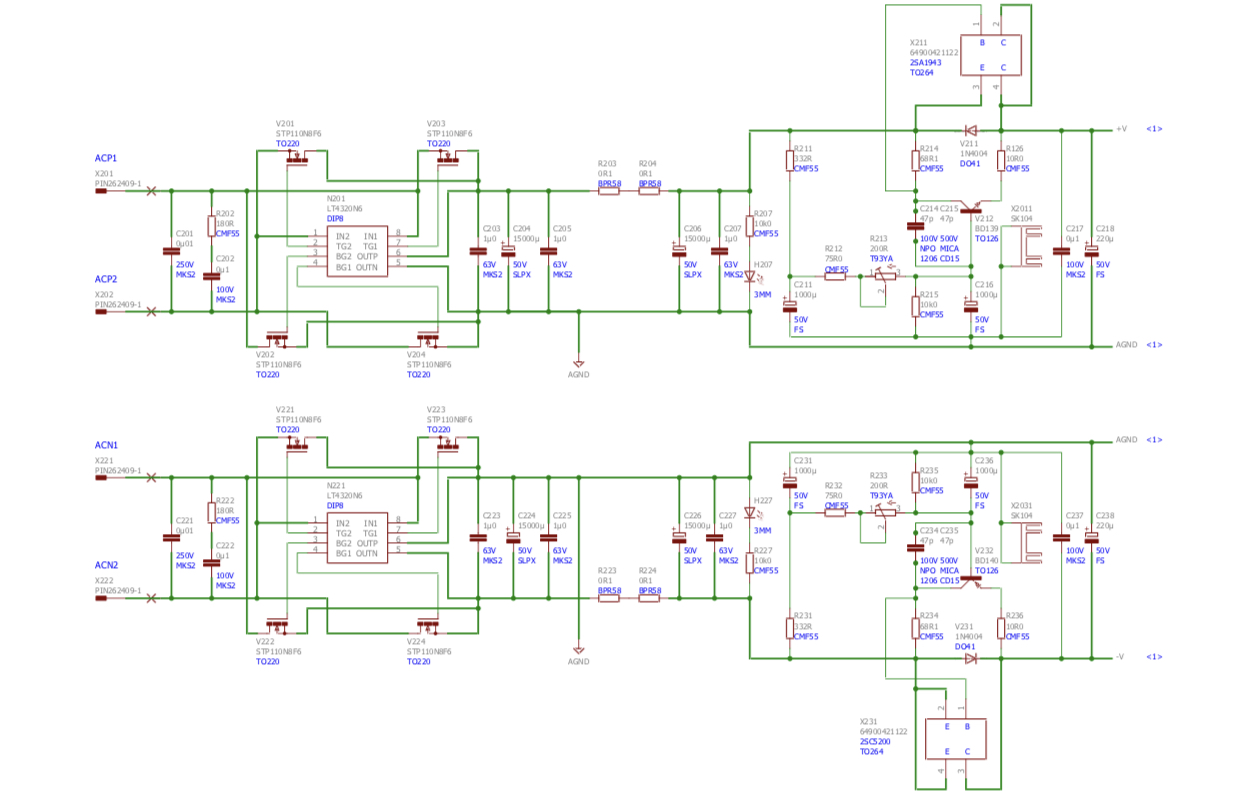
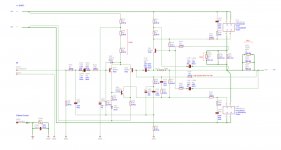
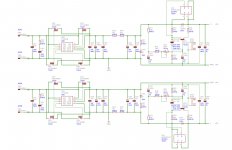
Here are the preliminary schematics:
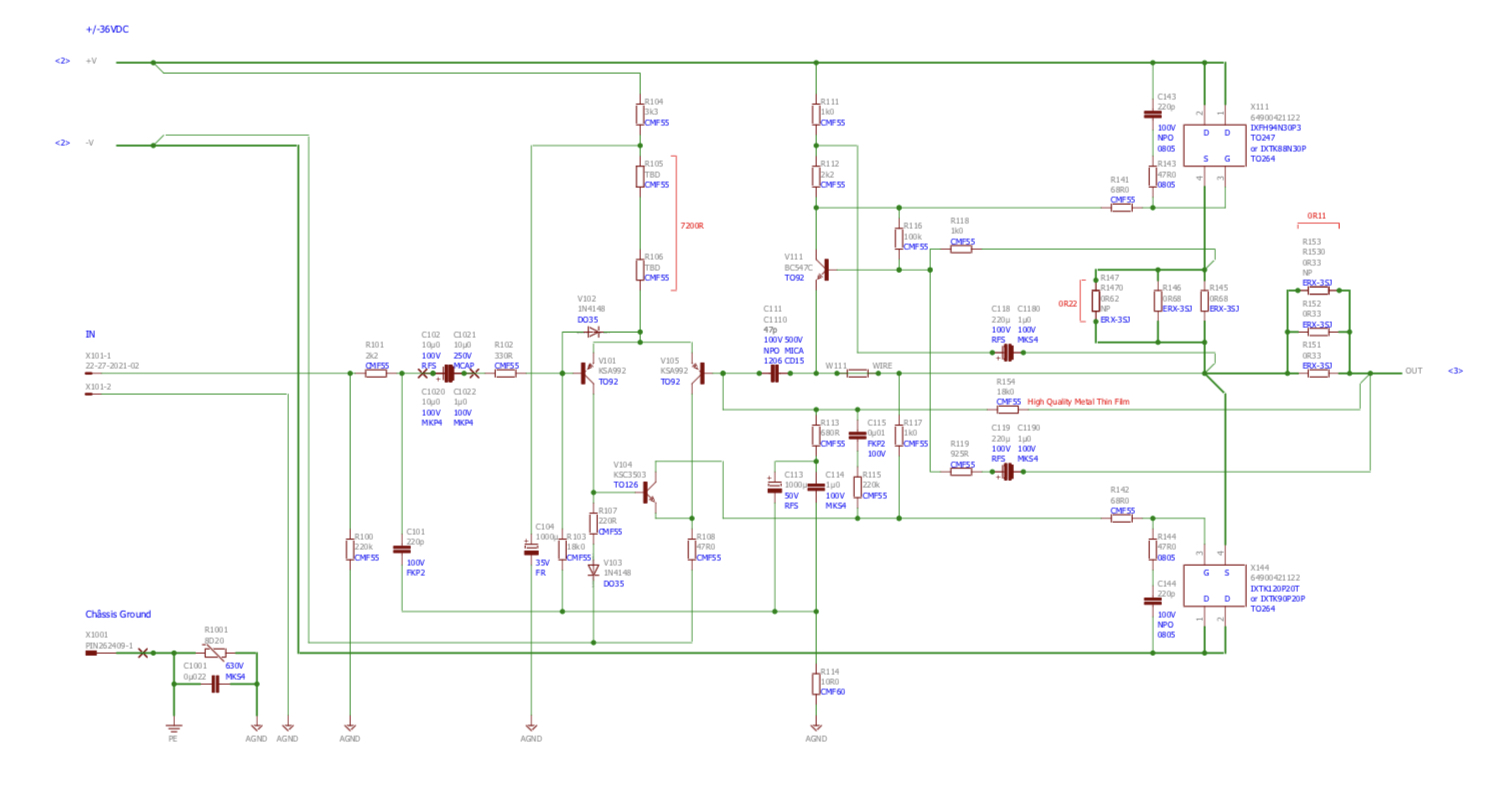
We still need to test the DC speaker protection circuit - so I will post that schematic once it has been verified to work.
I want to acknowledge the circuit designs by Aksa and Jhofland used in this amp and JPS64’s superb layouts. Without their help - this amp would not be possible.
For now, if anyone is interested, please put your name and number of boards you would like in a list below. Once we have enough critical mass, I will open up a new GB preorder listing on my Etsy shop to collect funds. The Etsy interface should help me with the logistics for efficient GB order fulfillment.
EditJune 22, 2019: Pre-Orders for the ABBB GB can be placed here: ABBB Amplifier PCB | Etsy
Edit Aug 27, 2019: Mouser Shopping Cart here (please save as your own project before modifying)
Mouser Electronics
Edit Sept 3, 2019: Joshua43214 put together a compressive BOM and corrections in this post here. Thank you Joshua!
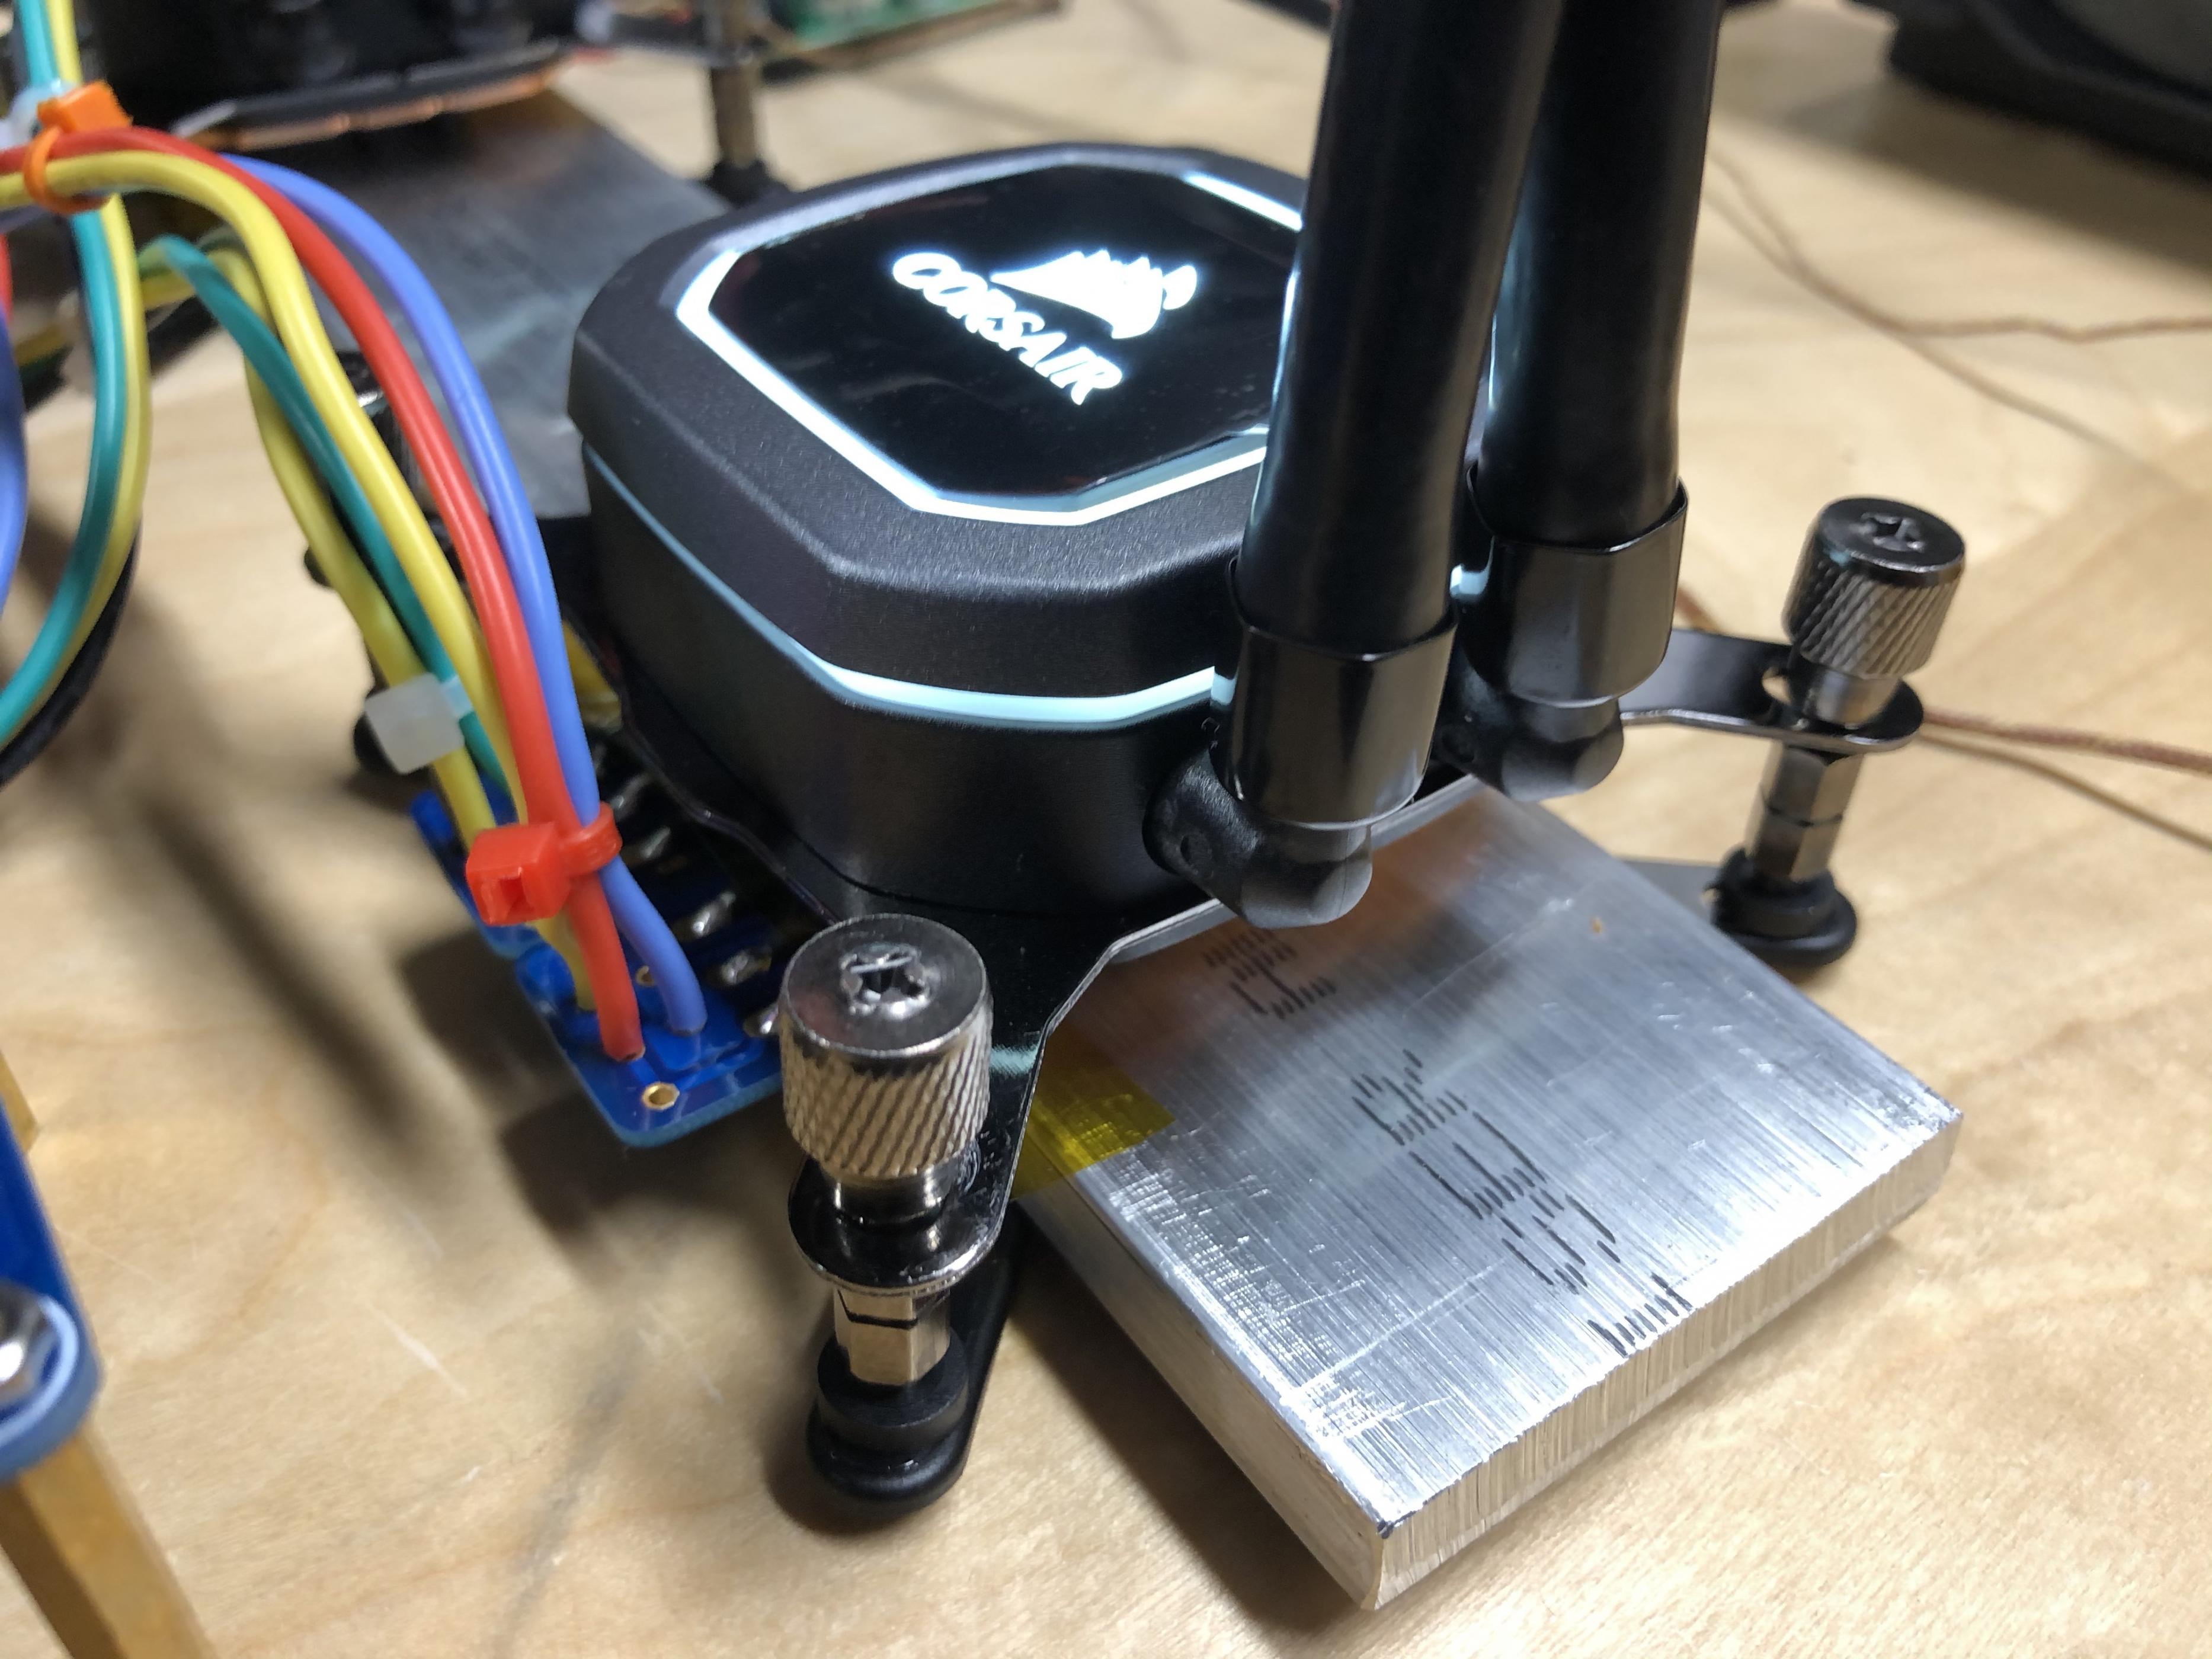
Edit Dec 11, 2019: Gtose finished one channel of his ABBB and he did it with water cooling! It measures superbly and makes 60w!!!
The Alpha Big Boy with Buttah (ABBB) 52w Class A Amp GB
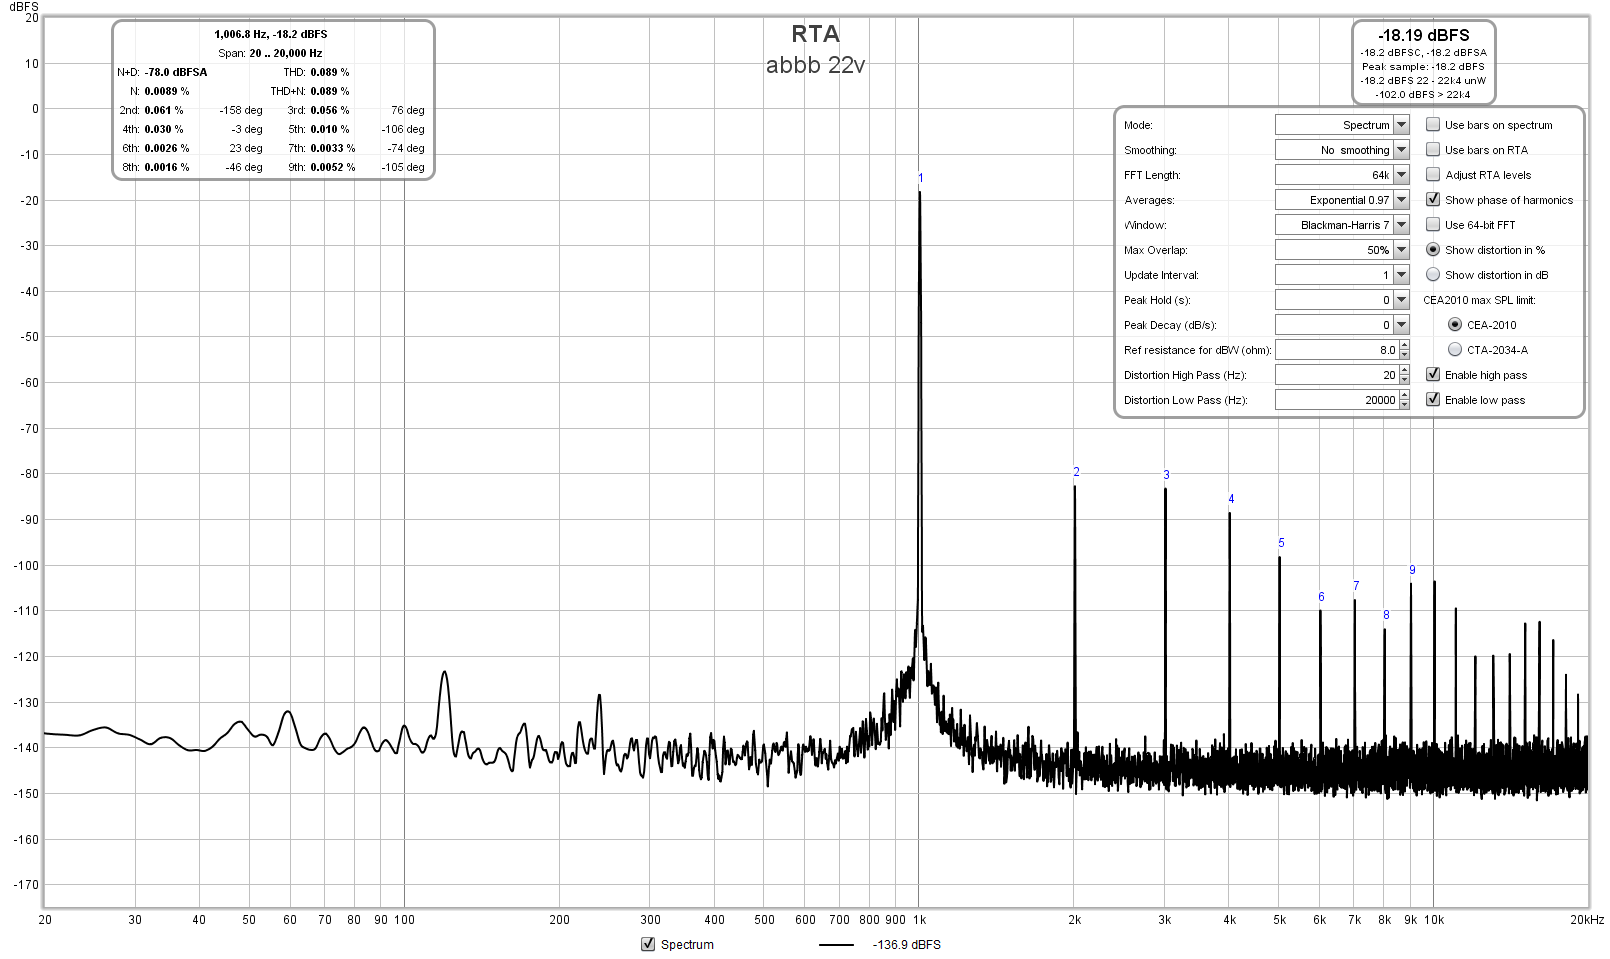
FFT showing 0.089%THD at 60Wrms into 8ohms. Note that this amp's topology is pure Class A - it has no choice but to run in Class A.
Edit Mar 31, 2020: nice black and white pdf of the schematic of the production board converted by Feret for us:
https://www.diyaudio.com/forums/att...ah-abbb-52w-class-amp-gb-abbb_sch_v002-gr-pdf
Original color pdf schematics and BOM here:
The Alpha Big Boy with Buttah (ABBB) 52w Class A Amp GB
Notable features of the ABBB amplifier:
- 52w into 8ohms
- Remotely mounted power transistors with Molex quick disconnects
- 400VA to 500VA 32v power transformer (per channel) with dual secondaries is recommend to achiev about +/-37v rails
- Designed to be used with cost effective CPU coolers
- Built in ground loop breaker using NTC and 22nF cap
- Bias current is circa 3 amps
This is about as close as we can come to a single-board Class A power amp. All that is required is to connect the transformer secondaries (4 spade FASTONs), connect speaker +ve and +ve (2 spade FASTONs), audio input (2pin JST), and chassis GND (1 spade FASTON).
Of course, the 2 TO-264 BJTs for the cap multiplier need to be connected to a heatsink capable of removing about 10W to 15W each. The two TO-264 IXYS MOSFETs need to be connected to suitable heatsink or CPU cooler capable of removing about 100W. Note that many CPU coolers have a large enough pad to accommodate both BJT as. MOSFET size by side. We recommend Noctua PWM fans for silent operation.
The nice thing about mounting the actives to the heatsinks is that they are on flying leads with 4pin polarized Molex connector. So the amp board installation and actives heatsink installation are separate operations. And you can pull the amp board out of the chassis without removing the transistors from their heatsinks! How convenient is that?! We tested this on the SLB ans another one of Hugh’s amps and found that it works superbly. Very convenient.
The addition of an on-board DC protection circuit and power on time delay will help to prevtndameg to the speaker and eliminate turn on thump. It is a small and unobtrusive circuit near the output FASTON terminal.
Here are the preliminary schematics:
We still need to test the DC speaker protection circuit - so I will post that schematic once it has been verified to work.
I want to acknowledge the circuit designs by Aksa and Jhofland used in this amp and JPS64’s superb layouts. Without their help - this amp would not be possible.
For now, if anyone is interested, please put your name and number of boards you would like in a list below. Once we have enough critical mass, I will open up a new GB preorder listing on my Etsy shop to collect funds. The Etsy interface should help me with the logistics for efficient GB order fulfillment.
EditJune 22, 2019: Pre-Orders for the ABBB GB can be placed here: ABBB Amplifier PCB | Etsy
Edit Aug 27, 2019: Mouser Shopping Cart here (please save as your own project before modifying)
Mouser Electronics
Edit Sept 3, 2019: Joshua43214 put together a compressive BOM and corrections in this post here. Thank you Joshua!
Edit Dec 11, 2019: Gtose finished one channel of his ABBB and he did it with water cooling! It measures superbly and makes 60w!!!
The Alpha Big Boy with Buttah (ABBB) 52w Class A Amp GB
FFT showing 0.089%THD at 60Wrms into 8ohms. Note that this amp's topology is pure Class A - it has no choice but to run in Class A.
Edit Mar 31, 2020: nice black and white pdf of the schematic of the production board converted by Feret for us:
https://www.diyaudio.com/forums/att...ah-abbb-52w-class-amp-gb-abbb_sch_v002-gr-pdf
Original color pdf schematics and BOM here:
The Alpha Big Boy with Buttah (ABBB) 52w Class A Amp GB
Attachments
-
 E6A3168D-8987-4480-9213-CCFC12FB17AC.jpeg552.8 KB · Views: 5,670
 -
 1C6DE951-D8E9-4BF3-BE2E-BDA1B97DBB95.jpeg461.3 KB · Views: 5,240
 -
 CE95170B-5028-4B0F-AC54-A2113518B8AD.jpeg438.9 KB · Views: 5,217
 -
 73B40049-0C62-4B5B-94EE-DD2BD0276026.jpeg317.3 KB · Views: 6,019
 -
 B5EE36C1-0021-477A-BDC9-EC54845A253B.jpeg357.6 KB · Views: 5,287
Last edited:
What is the 3rd DIP-8 on the lower middle of the board? I don't see it in the schematic anywhere??? Also, can the KSC3503 be a D for Hfe or do we need to find E's by some miracle?
Jwjarch,
That DIP is a dual comparator which is used to control switch on and DC sense for the speaker. It's not included in the circuit yet.
A 'D' version is not needed. High beta does not define high open loop; you can use any cooking pot KSC3503 here. What is important is Cob and ft, and that transistor is very good.
Magnificent coordination, layout and design to XRK, JPS64 and Jan - this is really stunning work. But to builders, remember that each output, two for each channel, will need forced air cooling using a CPU cooling tower. This will dissipate a lot of heat.........
Hugh
Last edited:
Thanks for the info Hugh. That's a pretty slick DC protect system. Very hi-tech! Well done you guys!
Good to know there’s no unobtanium parts once again. 🙂
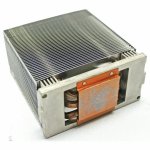
I have 8 of these guys to put to use. I've posted this info on the Alpha thread before, but if anyone needs a cheap cooler here you go. They were made to dissipate at least 130W on Xeon servers and have large copper pads on the bottom. Should be able to handle one mosfet per cooler I would think. Need 4 for an ABBB. I used these to test out my Alpha 20 build and they worked really well.
HP ProLiant CPU Heatsink DL580 DL980 G7 LGA1567 570259-001 591207-001 | eBay
Good to know there’s no unobtanium parts once again. 🙂
I have 8 of these guys to put to use. I've posted this info on the Alpha thread before, but if anyone needs a cheap cooler here you go. They were made to dissipate at least 130W on Xeon servers and have large copper pads on the bottom. Should be able to handle one mosfet per cooler I would think. Need 4 for an ABBB. I used these to test out my Alpha 20 build and they worked really well.
HP ProLiant CPU Heatsink DL580 DL980 G7 LGA1567 570259-001 591207-001 | eBay
Attachments
Last edited:
Thanks for the tip on the heatsink - the copper pad looks big enough for both cap Mx and MOSFETs. I just ordered a pair from different seller for $10ea shipping included. Last 2 though.
But this part number looks like a good heatsink for our purposes.
LGA1567 570259-001 591207-001
But this part number looks like a good heatsink for our purposes.
LGA1567 570259-001 591207-001

Thanks for the info Hugh.
I have 8 of these guys to put to use. I've posted this info on the Alpha thread before, but if anyone needs a cheap cooler here you go. They were made to dissipate at least 130W on Xeon servers and have large copper pads on the bottom.
Are these heatsinks suppose to work with a fan?
Thanks
Asuslover, yes, these are NOT passive heatsinks. They need a constant flow of air. A 92x92mm computer case fan would fit well. Noctua and Arctic have silent fan models and an additional resistor can be added to slow the fan down and make it even quieter. Just be careful not to add too much resistance and stall the fan out.
What’s the price and where in the USA do we buy all the parts or is this GB come complete with all parts but the case and rca’s and stuff. Just what’s needed for the broads
Depending on level of interest, the pricing will be circa $60/pair, as boards will be 2mm thick, 2oz copper, and ENIG finish. Projects from Aksa/JPS64/jhofland/xrk971 are typically just well documented and tested/verified PCBs with a detailed BOM. Oftentimes, Vunce or Zman01 will be kind enough to work up a completed Mouser/Digikey/Arrow shopping cart so ordering parts is easy. It's not a "kit", as you have to do some homework. However, the ABBB is a complete amp minus the chassis, CPU coolers, and power transformer. All you need to do is hook up the trafo, the speakers, the RCA input, and chassis ground. You also need to mount the power transistors onto suitable heatsinks or CPU coolers. Look in the original Alpha 20/BB thread to get ideas on active cooling with CPU coolers and PWM fans. It is a compact, low-cost way to remove up to 160w per active safely and easily. One other important point is that the ABBB amp section is adjustment free. The cap Mx portion has an adjustment pot to set the level of voltage dropout (and hence level of ripple control vs voltage dropout). We recommend about a 3v drop and for most purposes, that might be something we can set in stone with a fixed resistor vs using a trimmer pot to make the ABBB truly "adjustment free". I bring this up because many Class A amps have 2, sometimes 3 trimmers that have to be adjusted simulatneously and over a long period to allow thermal equilibrium, and there is a procedure. No such thing with the Alpha amps.
Last edited:
Thanks for the update X, any move to get rid of trimmer pots and make it all adjustment free is good. Even the best multi turn trimmer pots are not the most reliable of components in the long term.
I totally agree with eliminating all trimmers on ABBB - Aksa, Jhofland, JPS64, Vunce, and myself will discuss merits - also, option to put in a second set of pads for a fixed resistor vs a trimmer.
gary s - 2 boards
jwjarch - 2 boards
Vunce - 2 boards
meanie - 2 boards
shattered_dream - 2 boards
jwjarch - 2 boards
Vunce - 2 boards
meanie - 2 boards
shattered_dream - 2 boards
What size chassis do you recommend for a stereo build? Chassis to contain 2 boards and trafos.
thanks! 🙂
thanks! 🙂
Group buy list
gary s - 2 boards
jwjarch - 2 boards
Vunce - 2 boards
meanie - 2 boards
shattered_dream - 2 boards
yoaudio - 2 boards
gary s - 2 boards
jwjarch - 2 boards
Vunce - 2 boards
meanie - 2 boards
shattered_dream - 2 boards
yoaudio - 2 boards
Thanks for the info Hugh. That's a pretty slick DC protect system. Very hi-tech! Well done you guys!
Good to know there’s no unobtanium parts once again. 🙂
I have 8 of these guys to put to use. I've posted this info on the Alpha thread before, but if anyone needs a cheap cooler here you go. They were made to dissipate at least 130W on Xeon servers and have large copper pads on the bottom. Should be able to handle one mosfet per cooler I would think. Need 4 for an ABBB. I used these to test out my Alpha 20 build and they worked really well.
HP ProLiant CPU Heatsink DL580 DL980 G7 LGA1567 570259-001 591207-001 | eBay
Can you provide some rough dimensions of the copper pad on the bottom of these? Also, can that be drilled? I assume only a blind hole would work and a thru hole would compromise the heat pipes?
If they cannot be drilled, how to you secure the device to the sink?
What size chassis do you recommend for a stereo build? Chassis to contain 2 boards and trafos.
thanks! 🙂
As the board contains the bridge rectifier, CRC, Cap Mx, amp proper, SSR protection circuit, it saves a lot of real estate. All you need room for is the trafo. Assuming you are using a 500VA toroid from Antek AN-5428, they are about 6in dia and 3in high. I don't have exact size of the amp board, but about 7in to 8in wide x about 5in deep. Add 1 in clearance on all sides, so 10in wide x 14in deep x 6in high per channel. This does not include the CPU heatsinks, which will sit on top in the open and depending on model are 6in wide x 4in deep x 6in to 8in tall ea. You could put them front to back like Vunce did here to give you an idea (this was for Alpha 20):
So, for stereo, make twice as wide or 22in wide x 14in deep x 6in high. This is too wide and I think you may want to play with placing PCB above trafo or mounting trafo standing on edge. Personally, I think two monoblocks is a better way to go size wise and it won't be so heavy.
AN-5428 - 500VA 28V Transformer - AnTek Products Corp
- Home
- Group Buys
- The Alpha Big Boy with Buttah (ABBB) 52w Class A Amp GB