Beautiful job. I too enjoy the small format possible for a basic Shiga.
Of course once you start adding neutron star clocks, multiple Reflektor-Ds and each serviced by its own trafo, etc, etc. >> Shiga needs to look a lot bigger on the outside!
Of course once you start adding neutron star clocks, multiple Reflektor-Ds and each serviced by its own trafo, etc, etc. >> Shiga needs to look a lot bigger on the outside!
After two years I've finally completed my build. While I've had it playing for nearly a year now, it's great to have the enclosure finished too. Thanks for your help in the beginning stages, Tibi.
Remote control is by an Apple remote with the IR signals decoded by an Arduino Nano. The Arduino outputs are linked to the button PCB through optocouplers.
View attachment 695404
Like very much your idea to decode trough arduino ! Gorgeous implementation !
Regards,
Tibi
I can find you are using another clock placed under the CD turnable
Very Nice Work, The small chassis is what the reason I love 47labs product too
Thanks for your Sharing indeed
That "other clock" is an arduino nano used to "translate" Apple remote.
Quite similar to Bluthor we have developed for Shiga MKII bluetooth low energy remote.
vicol audio : BluThor - remote everything
Regards,
Tibi
Like very much your idea to decode trough arduino ! Gorgeous implementation !
Regards,
Tibi
One for your "rogues' gallery" Tibi!?
One for your "rogues' gallery" Tibi!?
Yep, that page is getting harder and harder to load. 🙂
Regards,
Tibi
Yep, that page is getting harder and harder to load. 🙂
Regards,
Tibi
I just had another look. I hadn't before noticed the Shiga MKII by Robert P. Brilliant!!
Quite similar to Bluthor we have developed for Shiga MKII bluetooth low energy remote.
I certainly was influenced by your Bluthor. I had already implemented an Apple remote for my DAC using a similar arduino setup, so this was a natural extension of that. Now I have the one remote that controls the volume and muting on my DAC, then track skipping, play/pause and stop on the Shiga.
And thanks for sharing on your Twitter, Tibi. Now I'm thinking that I should have put a bit more effort into those photos
Indeed, very nice work !
I'm glad to share others work on my social media and is great publicity for my products. 😉
Thank you for sharing this with us !
Regards,
Tibi
Just home to Jakarta after a month at home in the U.K. where I was able to pick up all my deliveries, including from Vicol-Audio - thanks!! Lots of things to play with.
Just trying the brass puck this evening, swapping back and forth between it and the Alu one. Definitely bigger sound, more full - very noticeable.
However, I find that I have to give the puck a bit of a spin like a top else the motor is not strong enough to spin up from a cold start. Has this been others’ experience? Can I give that motor more juice? With the alu puck it is a bit hesitant to get moving but it does get there after a couple of revolutions
Tibi, this brass puck is like a magic trick!
The difference between the two pucks (alu & brass) in my system is night and day. Was already very happy with SQ and am astounded that this heavier metal makes such a stark difference.
Today my Shiga is spinning up ok. I wonder if the fact that it had been out of use for a number of weeks was a factor? Maybe I was just being impatient.
If you are buying one of Tibi’s kits for the first time, don’t even look at the alu puck, go straight to brass. If you already enjoy your Shiga Black and are wondering about the benefit of lovely “gold” puck as an upgrade, I would say definitely put it on your Christmas wish list - it’s not just bling.
Hi all,
My mods for the standard Black MKII :
C12 470 µF Elna Silmic II
C43 220 µF Elna Silmic II
V1 and V2 LM1086 - 5 volt + 100µF output pins ( elna ) remove L2 and L4 (not L3 )
( ebay Littlediode )
output : series 0,33 µF Black Gate NX and a good quality resistor ( 2 watt ) for R48
because input of DAC is a coil ( audio note )
This little modifications give a ( very ) big difference.
( little problem with the alu puck: must have more weight )
This CD transport sounds incredible good !!!! Stunning ! !!
T-pad?
I have implemented all the tweaks mentioned in this thread except for the T-pad and I would very much like to try this also.
Though, I am not an electrical engineer but more of a monkey with a soldering iron so I need some help here.😱
I have understood that it should be doable with little effort but I need a guide! Anyone here who can describe the actions to take and requirements needed (is BNC cable mandatory for example)??
Dimkastas PSU
Building Dimkastas recommended PSU with LM117 or LM317 and I have a question.
I use this PSU instead of the original from Tibi and when I built it from the original schematic it was no problem getting it right on 8.15 Volt.
Dimkasta also tried the same approach feeding V1 and V2 which I want to copy. Instead of 3 green LED and a diode he surgested two green LED only for 5 Volt.
I come in at 5.266 Volt which is just a tad too high and I want to lower the voltage by at least 0.15 Volt. How to do this? I have green and red leds at home so if I get it right I should go for one green and one red LED instead if I have understood the schematics correctly, can anyone verify my thought?
Yesterday I switched to separate V1 and V2, using two LM117 tracking pre-reg + reg combos, like in the schematic I posted a while back. Just using only two red leds for the 5V reference, instead of 3 leds and 2 diodes for the 8V reference.
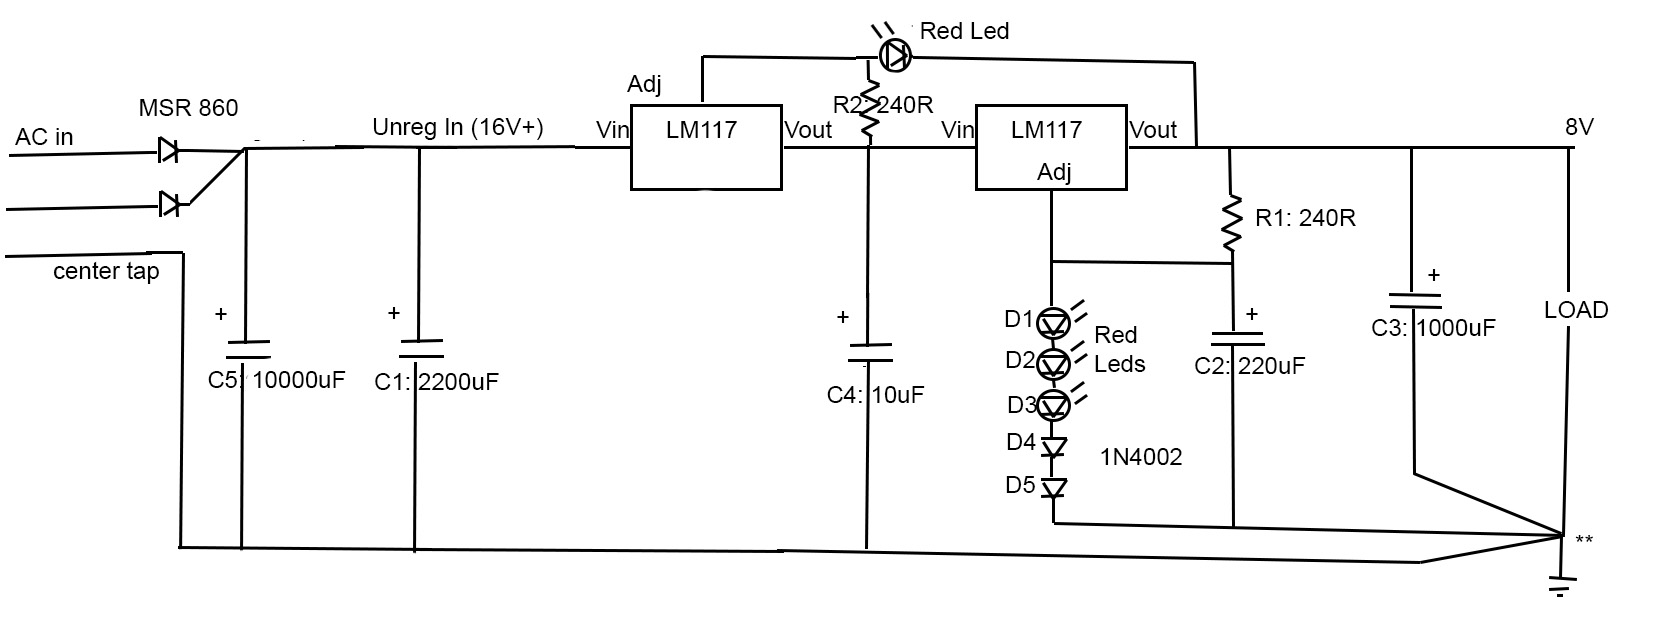
Nominal results are about 100dB of line rejection mostly coming from the tracking pre-reg, and separate load rejection from the second chip.
Cost including a heatsink that acts mostly as a chassis is around 10euros
Excellent results with big improvement in dynamics and microdetails.
This is the Schematics used!
This is the Schematics used!
And for the sharp eyed persons; you now notice that I am suffering slight disability to differentiate green and red so when I say green in most cases, this included, I mean red!😉😉
I come in at 5.266 Volt which is just a tad too high and I want to lower the voltage by at least 0.15 Volt. How to do this? I have green and red leds at home so if I get it right I should go for one green and one red LED instead if I have understood the schematics correctly, can anyone verify my thought?
To answer my own question, I have now one red and one green LED and now I have 5.07 Volt which is more close to the target. Happy again!😀
Now it is just the question about T-pad that I would like some help with. Anyone here who would like to explain how to implement the T-pad or is it not possible to do?
A better power supply for Shiga MKII and not only.
Finally, an affordable CD Transport: the Shigaclone story
Interested ? Please let me know.
Regards,
Tibi
Finally, an affordable CD Transport: the Shigaclone story
Interested ? Please let me know.
Regards,
Tibi
I'm done!....... Maybe!?
Installed the Tent labs clock friday/saturday and what can I say.....
Holy moses!
Never thought that the clock was responsible for so much details but I am overwhelmed. I was sitting with goosebumps for two hours constantly after installation.
I am now running the Shiga Black with separate PSU for V1 and V2, miniregulators on V3 and V4, installed a Mundorf Aluminium on C8 and well, all other tweaks to laser head and so on is done so I never thought that the change of clock should be that dramatic as it turned out to be.
I had a friend over the other day and we sat listening for a good hour when he said that he had been visiting the Linn show room in Stockholm some week before. He had been listening to the "Big" Linn package costing about €50 k but he concluded that my system was, if not better then at least on par.😎
As soon as I can afford I will change the C8 to a Mundorf Silver/Gold in oil, I will also invest in a real CD puck and then I think it is ready for a nice enclosure.
Yes there is more you can do to the Shiga but then we talk about Duelund cap and external clock and that I feel is way to heavy for my wallet, the sound the Shiga is presenting right now is already breathtaking so unless I win the lottery, I am done (except for the Zeno PSU that Tibi presented today which I will defenitely try).
If I have not said it before I say it again, thank you Tibi and all others who have been part of developing this project.
Because of you I have a very, very, very potent CD transport in my house.😀😀
- Home
- Source & Line
- Digital Source
- Shigaclone MKII Black - The builders Thread