No air whatsoever! 🙁 And already cut the legs. 🙁 🙁 🙁 Should I beconcerned?
I don't think you should be concerned. I did the same on my ACA build, and while those resistors do get very warm, I've had no problems since I built it 9 months ago. But next time I will definitely lift high power resistors a bit from the board.
It's something you learn from experience. And to be honest, the first time I see it mentioned here on diyAudio (but I don't read that many threads).
.
I’m jealous! I’m also in the neighborhood of 5300 but not living in the US... does this make a difference?
Question btw. being a noob at electronics. I bought two kits. Is it possible to place a switch for balanced mono or bridged SE? What will happen when my passive HATTOR preamp feeds a SE signal thrue the XLR cable when a SE source is attached like my phono preamp?
Thanks for your help!
Hi guys! What a great builds. A pleasure to see!
Regarding my question above... does anybody have a clue?
I don’t want to burn my amps when the passive pre only passes true a positive signal and ground to the ACA. What will happen?
And can I make a switch between bridged SE and XLR?
It is good to have the power resistors lifted a bit from the PCB as they do get a little hot! …...difficult to see if you have some "air" below the resistors.
Any suggestions as to the minimum air gap and how to make it happen?
Maybe a spacer underneath the component during soldering that's easily removed or is it a case of bending the legs in a specific way? If the latter, feel free to offer up any tricks of the DIY trade.
Thanks .. 😉
I bend the legs of the resistor with my fingers. this gives a natural "spring tension" when I insert the resistors so it can hold itself. But you can also bend the legs a bit after the resistor is inserted and then have a PCB holder so it does not lay direct on the table. Then the gravity will do the job. A bit difficult to explain by words........ 🙂
Maybe a spacer underneath the component during soldering that's easily removed.
Exactly that. And they will all line up neatly, too!🙄
Thanks everyone for the 3,300uF cap diameter size info.
With the resistor, I bend its legs, insert both ends into PCB eyelets, hold the resistor body with my fingers while soldering only one leg. Then I inspect the "height" - how far from the PCB it is...
If I'm not happy with the distance, only one leg needs to be heated-up to readjust the height... once happy, I solder the other leg.
This works as long as you don't hold the resistor legs with your fingers... 🙂 Of course, this will also allow you to solder one resistor at the time, but there will be no need for any readjustments latter.... and the resistors will be perfectly parallel to the PCB plane, for that visual perfection/satisfaction.
Last edited:
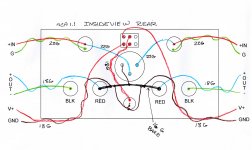
Here are some ACA 1.6 wiring photos -
Resistor placment
Stuffed PCB
Back panel. Note there's only 2 terminals on the new connector, the center is (V+) and the tab is (ground).

Note that the biggest difference is wiring the PSU to accommodate the front panel power switch. Only the V+ is switched, the pin of the barrel connector is attached via the doubled up wire and goes to the power switch, and the other pin of the power switch connects to each of the amp PCB.
The tab of the barrel connector connects to the ground pad of the amp PCB.
Resistor placment
Stuffed PCB
Back panel. Note there's only 2 terminals on the new connector, the center is (V+) and the tab is (ground).
Note that the biggest difference is wiring the PSU to accommodate the front panel power switch. Only the V+ is switched, the pin of the barrel connector is attached via the doubled up wire and goes to the power switch, and the other pin of the power switch connects to each of the amp PCB.
The tab of the barrel connector connects to the ground pad of the amp PCB.
Here are some ACA 1.6 wiring photos -
Resistor placment
Stuffed PCB
Back panel. Note there's only 2 terminals on the new connector, the center is (V+) and the tab is (ground).
Note that the biggest difference is wiring the PSU to accommodate the front panel power switch. Only the V+ is switched, the pin of the barrel connector is attached via the doubled up wire and goes to the power switch, and the other pin of the power switch connects to each of the amp PCB.
The tab of the barrel connector connects to the ground pad of the amp PCB.
Jim, thanks for showing how to wire the rear switch for stereo/mono internally! Your build looks great as usual.
Looks great! So that is what the extra switch and resistors are for... Assuming those photos are for the v1.6 build guide.
I followed the v1.5 guide and biased at 10v. I read earlier in the thread we (v1.6) should be biasing for 12v. Right?
I followed the v1.5 guide and biased at 10v. I read earlier in the thread we (v1.6) should be biasing for 12v. Right?
Looks great! So that is what the extra switch and resistors are for... Assuming those photos are for the v1.6 build guide.
I followed the v1.5 guide and biased at 10v. I read earlier in the thread we (v1.6) should be biasing for 12v. Right?
It doesn't matter which version of PCB you have. All are the same schematics.
The bias setting is dependent on the voltage of the PSU: 10V for 19V PSU and 12V for 24V PSU
Guys, please delete the pics when you quote a post that contains images.
6L6 posted 9 pictures. There is no reason to have them all displayed again in the thread.
.
6L6 posted 9 pictures. There is no reason to have them all displayed again in the thread.
.
Guys, please delete the pics when you quote a post that contains images.
6L6 posted 9 pictures. There is no reason to have them all displayed again in the thread.
.
SORRY! My bad!
Thanks for the pics, 6L6 - I hope to knock out the first (of two) amps today, but I'm going to go slowly to minimize mistakes.
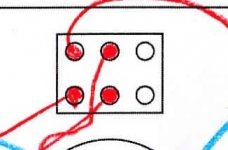
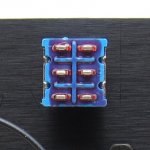
Six Pin Power Switch
Question regarding the 6 Pin Power Switch or whatever it's called.
Since I'm not using the front panel on / off switch, I'm wiring it like this first photo I've attached.
The six pins look like this second picture when attached to the chassis.
Being that I know nothing about how a power switch works, I have what is potentially a dumb question.
The red wires from the PSU plug go to the middle 2 pins, but which 2 pins will the other two red wires go? The top 2 pins or the bottom two pins? And how do i know which it right side up or down on the switch?
I'm making a guess that it doesn't matter, that the only difference between using the top two or bottom two is which position is ON for the switch.
Thanks for the help everyone!
Attachments
Mrshazbot -
First rule; The only stupid question is the one you don't ask. 🙂 🙂 🙂
Connect the power (from the center pin of the barrel connector) to the middle pins of the switch. Connect the amp PCBs to the bottom pins. This will make the amp ON with the switch in the UP position.
The middle pins are common. The inside of the switch's toggle points at the terminals that connect to the middle. It's a touch backwards, but you'll get the idea.
I was under the impression that these will work in both Balanced-XLR and SE without modifying anything? Meaning, whichever i plug in will be how it operates. Is this not the case?
I was under the impression that these will work in both Balanced-XLR and SE without modifying anything?
Yes. You only need to choose the appropriate input & output connections.
dave
Correct.
Stereo single ended, use RCA connectors on both RCA jacks and attach L and R speaker to the respective speaker posts.
Monoblock XLR, use the XLR jack and take speaker output from the two black posts.
Monoblock RCA, use the Left RCA for input, leave the right empty, flip the switch up, and take speaker output from the two black posts.
- Home
- Amplifiers
- Pass Labs
- Amp Camp Amp - ACA