Oops, sorry, didn't want to confuse people. The GB portion funding the printing is done, so feel free to keep orders coming in !
amp
I will take one of each.............Not sure what I'm doing but don't want to miss out...
Thanks
I will take one of each.............Not sure what I'm doing but don't want to miss out...
Thanks
Don't worry, lots of documentation and support.
Feel free to PM now, as I don't need the "list" since the initial phase is over. Instead of reverting the pricing back to normal I'm going to run the discount until 40 are sold.
Feel free to PM now, as I don't need the "list" since the initial phase is over. Instead of reverting the pricing back to normal I'm going to run the discount until 40 are sold.
19v SMPS
Hi Jeremy,
Beginner's question: Can I use a 19V SMPS to feed the Antipole in stead of a transformer, or would you advise against that?
I have a bunch of old 19V laptop chargers laying around and I wondered if I could possibly put them to use in this project.
Thanks in advance,
Laurens
Hi Jeremy,
Beginner's question: Can I use a 19V SMPS to feed the Antipole in stead of a transformer, or would you advise against that?
I have a bunch of old 19V laptop chargers laying around and I wondered if I could possibly put them to use in this project.
Thanks in advance,
Laurens
19v would be too low to make the KMR section act like an infinite capacitor. You'd get very diminished power output.
You can use a 19v SMPS followed by DC step up and adjust to about 21v. The nice thing about SMPS is they are devoid of 60Hz mains hum.
http://m.ebay.com/itm/150W-DC-DC-Bo...A-Step-Up-Voltage-Charger-Power-/321768206088
I now do this on my big Class A amps even.
http://m.ebay.com/itm/150W-DC-DC-Bo...A-Step-Up-Voltage-Charger-Power-/321768206088
I now do this on my big Class A amps even.
Thanks for your replies, Jeremy and XRK.
@ Jeremy: Understood, you don't recommend it
@ XRK: Interesting recommendation, but considering my skill level I am trying to make the build simper. Your suggestion would add more items to the equation. for that reason I prefer not to go that route.
So, I will stick to the "stock" configuration for the first build. Maybe for the second one I will be more brazen...
Cheers,
Laurens
@ XRK: Interesting recommendation, but considering my skill level I am trying to make the build simper. Your suggestion would add more items to the equation. for that reason I prefer not to go that route.
Honestly - this is as simple as you can get - connect a few wires, no soldering. Maybe one item more, but probably a lot cheaper too.
Is it too late to get involved with this?
$22 Amp board ($24 normally) (high grade BC337 transistor included, NOS)
$19 Antipole board ($21 normally)
Gladly pay the normal price and I understand shipping to Canada may cost a little more.
Thank you,
Paul Hirst
$22 Amp board ($24 normally) (high grade BC337 transistor included, NOS)
$19 Antipole board ($21 normally)
Gladly pay the normal price and I understand shipping to Canada may cost a little more.
Thank you,
Paul Hirst
Honestly - this is as simple as you can get - connect a few wires, no soldering. Maybe one item more, but probably a lot cheaper too.
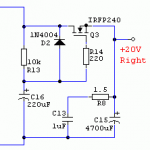
Yes, you can skip the mains trafo, the antipole PSU board and its expensive MUR diodes, caps, huge 22mF caps, and diode snubber caps.
Alternatively, for the more adventurous, you can also add an easy cap multiplier that can be made P2P with $3 in parts. The Cap Mx drops voltage by 4v relative to input so you get 15v out but -50dB ripple rejection added.
Simply connect 19v SMPS brick wires to +/- input and output of DC step up, then output of DC step up to Juma's easy peasy cap multiplier for super noise free PSU. It's not called "easy peasy" for nothing.🙂
Here is schematic - input voltage is on left and output on right. Output is simply 4v less than input. But DC step up gives variable voltage so set step up to 18v + 4v or 22v and Cap Mx will give you a rock stable ripple/hum free 18v until the cows come home.
Juma's Easy-Peasy Capacitance Multiplier
Attachments
Last edited:
Is it too late to get involved with this?
$22 Amp board ($24 normally) (high grade BC337 transistor included, NOS)
$19 Antipole board ($21 normally)
Gladly pay the normal price and I understand shipping to Canada may cost a little more.
Thank you,
Paul Hirst
PM sent
Yes, you can skip the mains trafo, the antipole PSU board and its expensive MUR diodes, caps, huge 22mF caps, and diode snubber caps.
Alternatively, for the more adventurous, you can also add an easy cap multiplier that can be made P2P with $3 in parts. The Cap Mx drops voltage by 4v relative to input so you get 15v out but -50dB ripple rejection added.
Simply connect 19v SMPS brick wires to +/- input and output of DC step up, then output of DC step up to Juma's easy peasy cap multiplier for super noise free PSU. It's not called "easy peasy" for nothing.🙂
Here is schematic - input voltage is on left and output on right. Output is simply 4v less than input. But DC step up gives variable voltage so set step up to 18v + 4v or 22v and Cap Mx will give you a rock stable ripple/hum free 18v until the cows come home.
Juma's Easy-Peasy Capacitance Multiplier
The problem with a regular capacitor multiplier is that it looks like a 1500uf cap or so, where as the KMR looks like an infinite capacitor.
- Home
- Group Buys
- Folsom DIY7297 Amp & Antipole PSU