look good,
how is the bass on these, been told can be a light light?
I guess that depends on what a guy looks for in the amount of bass, but I definitely would NOT say it's light. It won't rattle the windows, but I certainly see no need for a sub. It's actually pretty surprising how much bass comes out of a four inch driver. But that's my take on the CHP-70 as well.
Mike
nice job on your FH's !
I built a couple of pairs a few years back, one with FE108EZ's
& one pair with FE126 eNA's
Hoping to hear the latest version with the 7.3's at Dave's this summer.
Yours look great.
I built a couple of pairs a few years back, one with FE108EZ's
& one pair with FE126 eNA's
Hoping to hear the latest version with the 7.3's at Dave's this summer.
Yours look great.
I guess that depends on what a guy looks for in the amount of bass, but I definitely would NOT say it's light. It won't rattle the windows, but I certainly see no need for a sub. It's actually pretty surprising how much bass comes out of a four inch driver. But that's my take on the CHP-70 as well.
Mike
Thanks Mike.
Cheap enough to build so may have a go, need a project!
Thanks Mike.
Cheap enough to build so may have a go, need a project!
That's my feelings about building these. I also want to build a set of Pensils. I built my FH3s with removable supra-baffles so I could try different speakers in different configurations. I have a pair of CHP-70s that will probably end up as Pensil drivers. Once I get to that point, I'll swap the A7s and the CHP-70s in the FH3s and Pensils. Might even try a pair of CHR-70s someday.
Mike
mikje,
Nice build. 🙂
A few questions on the Alp 7.3:
- How many hours do you have on the drivers?
- What sort of fill are you using in the FH3? You might want to play around with the stuffing behind the drivers a bit - might have an effect on the sound.
- Did you chamfer the back of the mounting hole?
Nice build. 🙂
A few questions on the Alp 7.3:
- How many hours do you have on the drivers?
- What sort of fill are you using in the FH3? You might want to play around with the stuffing behind the drivers a bit - might have an effect on the sound.
- Did you chamfer the back of the mounting hole?
mikje,
Nice build. 🙂
A few questions on the Alp 7.3:
- How many hours do you have on the drivers?
- What sort of fill are you using in the FH3? You might want to play around with the stuffing behind the drivers a bit - might have an effect on the sound.
- Did you chamfer the back of the mounting hole?
I have about 200 hours on the drivers, I'm using polyfill, and I did chamfer the backs of the mounting holes.
However, this baffle is thicker than the baffle I used when I ran the speakers earlier. I'll play around with the stuffing. I know it got move around a bit when I was finishing the speakers. Thank you for the suggestions. Will the amount of stuffing closer to the driver affect the "harshness?"
I'll definitely reveisit those areas and see what I can adjust.
Mike
Did you also add the absorbing mats that should be glued inside the enclosure behind the driver and on the sides of the driver?
Did you also add the absorbing mats that should be glued inside the enclosure behind the driver and on the sides of the driver?
Yes I did. I wonder if adding some more stuffing to the same area will help? Thanks for asking. 🙂
Mike
Harshness can be due to many factors:
Speaker side:
- Too much polyfill directly behind the driver.
- Not enough chamfer on driver mounting hole.
Equipment side:
- It could just be your amp (or preamp, or source) has had this harshness all along, but that has been exacerbated by the A7's high sensistivity to resonance. If possible try a different equipment combo to see if the harshness can be attenuated.
Hope it helps
Harshness can be due to many factors:
Speaker side:
- Too much polyfill directly behind the driver.
- Not enough chamfer on driver mounting hole.
Equipment side:
- It could just be your amp (or preamp, or source) has had this harshness all along, but that has been exacerbated by the A7's high sensistivity to resonance. If possible try a different equipment combo to see if the harshness can be attenuated.
Hope it helps
Thank you. The only thing that changed since I ran them originally is the baffle. It's thicker than the original and therefore has less chamfer. I'll try to either chamfer it better or use a baffle with the same thickness as my initial use.
Thank you again,
Mike
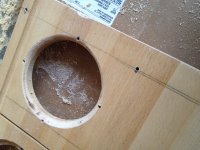
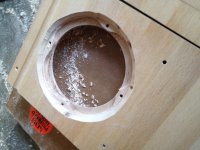
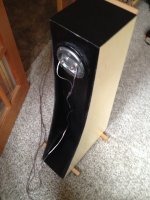
Well, I learned the importance of chamfering. It definitely improved the sound of my FH3s. It is safe to say I am a believer in proper chamfers now.
The first pic is what I thought a chamfer should look like before today. (After all, how much difference can it really make??? )
)
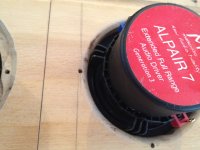
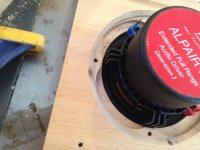
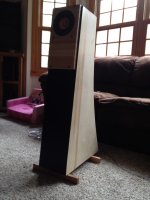
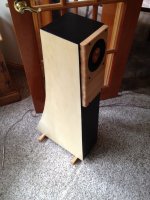
The second pic is more along the lines of a proper chamfer. The third and fourth pics are the same but with the driver in the baffle.
Gotta let that air and energy move!
Thanks all for your help and patience.
Mike
The first pic is what I thought a chamfer should look like before today. (After all, how much difference can it really make???
)The second pic is more along the lines of a proper chamfer. The third and fourth pics are the same but with the driver in the baffle.
Gotta let that air and energy move!
Thanks all for your help and patience.
Mike
Attachments
My Recently completed FH3 with Fostex FE126EN
Thanks,
Bibin
An externally hosted image should be here but it was not working when we last tested it.
An externally hosted image should be here but it was not working when we last tested it.
An externally hosted image should be here but it was not working when we last tested it.
An externally hosted image should be here but it was not working when we last tested it.
An externally hosted image should be here but it was not working when we last tested it.
An externally hosted image should be here but it was not working when we last tested it.
An externally hosted image should be here but it was not working when we last tested it.
An externally hosted image should be here but it was not working when we last tested it.
Thanks,
Bibin
Very pretty. I like the perspex (?) back-plates. Out of interest, where did those come from?
Thank you Scott. I custom built it using CNC laser machine.
thanks,
Bibin
Well, I learned the importance of chamfering. It definitely improved the sound of my FH3s. It is safe to say I am a believer in proper chamfers now.
The first pic is what I thought a chamfer should look like before today. (After all, how much difference can it really make???
The second pic is more along the lines of a proper chamfer. The third and fourth pics are the same but with the driver in the baffle.
Gotta let that air and energy move!
Thanks all for your help and patience.
Mike
Hi Mikje....can explain exactly what improvement the 'proper' chamfer made?
Hi Mikje....can explain exactly what improvement the 'proper' chamfer made?
I guess the greatest improvement I noticed was the decrease in harshness. While listening to jazz, the horns would produce sounds that I consider fatiguing. With the improved chamfer, those same pieces of music no longer have that fatiguing sound to them. The other improvement I noticed was an openness after the proper chamfer. The lack of openness can best be compared to cupping your hands around your mouth when talking or listening through a tube.
Does that make sense?
Mike
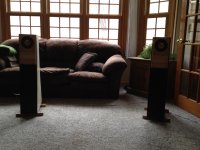
I finished these today. I used vinyl iron-on veneer from Parts Express. Pretty good stuff and easy to use, but DON'T used a cloth with any texture (between the iron and the veneer). Use a paper towel. You can probably guess why I know that. I was able to get some of the indentations out left by the towel, but not all of them. Other than that, I like the stuff. I hadn't used any iron-on veneer, but I might buy it again next time I buy veneer. I do have a roll of self-adhesive I'm going to try next though. I don't really like using contact cement. It's messy and I don't like the VOCs it puts off.
Anyway, here are some pics of the finished product. Regardless of my cabinet making efforts, I like the sound of these speakers.... a lot!
Mike
Anyway, here are some pics of the finished product. Regardless of my cabinet making efforts, I like the sound of these speakers.... a lot!
Mike
Attachments
- Home
- Loudspeakers
- Full Range
- Frugel-Horn Mk3