Good point. Indeed I was busy with that the past few days. The first setup with one board was very successful. Of course one board to start, as first focus was on spdif functionality. I was very glad ( every one who designed new boards from data sheets and own ideas, knows switching it on the first time is very exciting 😀 ) it worked seamlessly the first time. I tested 44.1 up to 192khz spdif. Nice function is, that during music playing on PC and through spdif source, you can just switch between the two sources without any hick up or need to reset anything. Next step is to see how it works with four and eight boards. planned for this weekend, will keep you guys posted 😎
Great work. 😀
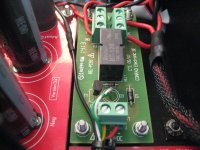
Here are the first Images 🙂
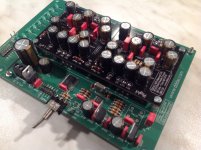
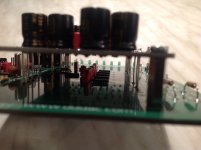
You can see I had to move parts under the deck as well. Also the delay of the data line is now done with a 74 style D-Flip-Flop. Hence no more 1k resistor in the data line. You also see the option for a TENT XO Clock and the idea to have a LED Board next to it, which can be broken off and moved to a front panel…
The Wolfson chip is clearly visable, as well the 74VHCT244 which acts as a line Driver for the decks as well to "Switch" between USB data and SPDIF Data and convert both logic voltages (5v and 3.3V) to 5 Volt Output (VHCT)
as said, next steps to add more decks
Best regards,
Doede
Attachments

That looked awsome! Can I start placing the order on DDDAC website now, Doede?
🙂 thanks for your enthusiasm 🙂
not yet.... I reall want to do intensive testing and make sure it all works with multiple boards. minimum four, goal is eight....
As soon as all is 120% fine, I will put it on the website and start ordering pcb's ( which will be red again ;-). Delivery of kits will be somewhere in February am ik afraid 🙄
My kit is just on the way, and I should have time to consider case options, and some of the other options for building a 4 board DDDac. I can see the benefits of the I2S (USB) and SPDIF inputs for those still using CD transports.
My question is, do you expect the new main board to have better (different) sound? Or are new new changes just to accommodate 2 inputs on the main board? My current DAC has two SPDIF inputs, one of which accepts the input from an external USB/SPDIF converter. I don't even remember if I hooked up my DVD universal player to the other input. That switch is way in the back of the unit (to keep the resultant SPDIF wiring short), and I don't use it. I would only consider the new board for perceived sound improvement.
I am planning at some point to try a Raspberry Pi device via the I2S to directly feed the DAC from the Ethernet cable, skipping the USB conversion process. The hardware for that is just being experimented with, and I await some results.
Very, very nice Doede!
Do the components stay under the DAC-boards?
I just figured out how to get a four board DAC in a 80 mm height enclosure, but that's not gone work with components beneath the DAC boards...😱
Nice idea for the little LED frontplate PCB 😀
Walter
Do the components stay under the DAC-boards?
I just figured out how to get a four board DAC in a 80 mm height enclosure, but that's not gone work with components beneath the DAC boards...😱
Nice idea for the little LED frontplate PCB 😀
Walter
I did not had space enough, so decided to put parts under the board. Yes it will have to stay ... normally four decks need like 90 mm.... so three decks then?
Looks the goods Doede. Well done. Are you expecting any sonic improvements with the new mainboard?
I am still patiently waiting for the Sowters to arrive. But I must admit that I do get a bit angry everyday I come home from work and not seeing a package sent from Germany... lol
I am still patiently waiting for the Sowters to arrive. But I must admit that I do get a bit angry everyday I come home from work and not seeing a package sent from Germany... lol
Be paitient Tuyen, it typically take about a Month from Germany to Australia via typical postal service. Who knows, Santa may drop by your jimmy this Christmas Eves with a pairs of Sowters for Boxing day?I am still patiently waiting for the Sowters to arrive. But I must admit that I do get a bit angry everyday I come home from work and not seeing a package sent from Germany... lol
LOL who knows..... 
I did not do the mainboard redesign with improved sonics in mind. SPDIF and buffering the I2S lines was main goal. BUT... on December 28th there will be a day long session with my audio-gang to test several aspects of current and new versions, as well power supplies, transformers etc... so after that I will have a good idea and will post of course 😎
for now! the weekend comes close, so I can start building some more prototypes 😀
Pictures of my DDDAC1794
I promised Doede to post some pictures.
The DAC is playing, but still not ready 🙂
Things to do:
- It's now only "2 parallel", I have to safe some money for 3 additional boards 😀
- The frontpanel is getting replaced by a 10mm brushed alu..
- The white 230V wire has to be repaced by a shielded, better looking one.
- I have to connect all the frontpanel LEDs.
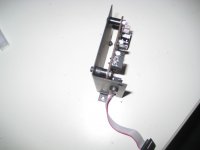
I used a Conrad relayboard to toggle between on/off with the momentary frontpanelswitch, with blue LED ring.
The WaveIO and the DAC-boards are in their own shielded compartments.
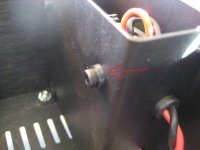
All the GND's from 12V and 5V are separated, The digital GND is also separated from the earth, meaning the USB connector and the GND hole at the WaveIO are isolated. is this the way to go?
Shouldn't I connect the GND of the DACboard or the ground of the RCA's somewhere to earth (=housing)??
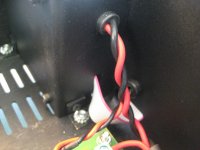
The RCA outputs are also isolated from anything. because I had a small hum and static, I connected the black wire (shield) of the Cinemags to signal ground. See pics. And it's now totally dead silent.
Except for the quantization noise of course, at 44.1KHz.
The white wire of the Cinemags ( housing) is connected to earth.
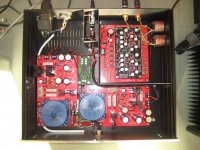
I hope you enjoy the pics 😀
At the last two pics you see the speakers, Windows 7 PC, DAC, Pass ACA and F5Turbo v3. Which are all DIY 🙂
Doede, thanks for your nice design and for sharing!
Walter
I promised Doede to post some pictures.
The DAC is playing, but still not ready 🙂
Things to do:
- It's now only "2 parallel", I have to safe some money for 3 additional boards 😀
- The frontpanel is getting replaced by a 10mm brushed alu..
- The white 230V wire has to be repaced by a shielded, better looking one.
- I have to connect all the frontpanel LEDs.
I used a Conrad relayboard to toggle between on/off with the momentary frontpanelswitch, with blue LED ring.
The WaveIO and the DAC-boards are in their own shielded compartments.
All the GND's from 12V and 5V are separated, The digital GND is also separated from the earth, meaning the USB connector and the GND hole at the WaveIO are isolated. is this the way to go?
Shouldn't I connect the GND of the DACboard or the ground of the RCA's somewhere to earth (=housing)??
The RCA outputs are also isolated from anything. because I had a small hum and static, I connected the black wire (shield) of the Cinemags to signal ground. See pics. And it's now totally dead silent.
Except for the quantization noise of course, at 44.1KHz.
The white wire of the Cinemags ( housing) is connected to earth.
I hope you enjoy the pics 😀
At the last two pics you see the speakers, Windows 7 PC, DAC, Pass ACA and F5Turbo v3. Which are all DIY 🙂
Doede, thanks for your nice design and for sharing!
Walter
Attachments
-
 6 close up.jpg452.8 KB · Views: 325
 -
 5 pass through.jpg493.9 KB · Views: 621
 -
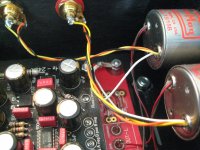 4 how I connected the trafos.jpg542.7 KB · Views: 645
 -
 3 relaisprint.jpg510.8 KB · Views: 670
 -
 2 Overview inside.jpg460 KB · Views: 727
 -
 1 Shielded WaveIO.jpg157 KB · Views: 735
 -
 7 isolated WaveIO GND.jpg422.8 KB · Views: 272
 -
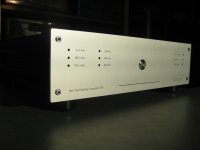 8 frontpanel.jpg207.6 KB · Views: 353
 -
 9 all made myself.jpg229 KB · Views: 368
 -
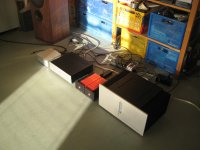 10 in the spotlights.jpg304.2 KB · Views: 361
For late at night, when kids are to bed 😀
It's 5 watt class A, saves me on the electricity bill 😉
It's 5 watt class A, saves me on the electricity bill 😉
The ACA amps are pretty good!
My kit should be somewhere between Wiesbaden and the Gulf Coast of the USA. I should be finished with the Aleph J before starting the DDDac.
My kit should be somewhere between Wiesbaden and the Gulf Coast of the USA. I should be finished with the Aleph J before starting the DDDac.
4 decks works seamlesly, both spdif as usb 😎
tomorrow 8 decks...
What about 16 decks .....😀
I used a Conrad relayboard to toggle between on/off with the momentary frontpanelswitch, with blue LED ring.
Walter, could you provide a link of this Conrad board?
Anyone: has there been a comparison between Doede's dac and a Buffalo III?
- Home
- Source & Line
- Digital Line Level
- A NOS 192/24 DAC with the PCM1794 (and WaveIO USB input)