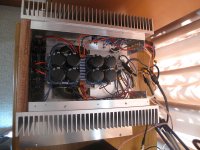
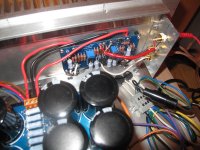
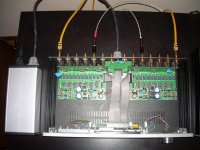
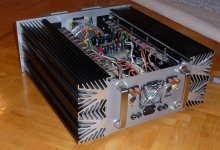
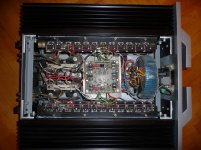
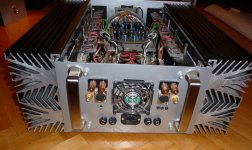
My take on the F5. The chassis is built around two Conrad heatsinks. I used R-Core transformer. The rest is as in the article.
Davide
Davide
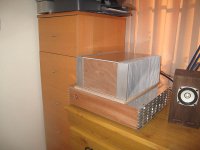
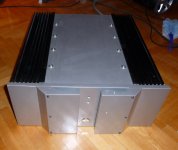
Hi Davide. I like the sides of the cabinet underneath... look like heatsinks. It's a P.S.?
Can you show us a better pic?
Merry Xmas to all!
Can you show us a better pic?
Merry Xmas to all!
So, the box under the F5 is a DAC. It's very simple to make such a box, as on the side are just few bars with nuts in between. The nice thing is you can decide how high to have the chassis after you make everything.
For the R-core transformer, I contacted Kitamura-Kiden, but they do not sell to public, but there is a company that makes custom made transformer for them called Phenix. They speak only japanese and I understood they work only with Japanese customers.I had my Japanese colleague ordering the transformer for me. It's also not so cheap compared to the toroids available in US or Canada.
I don't know if it's normal, but the voltage with the load is a bit lower, I have 23 V instead of 24V. The bias is 1.3 A per channel.
I am not sure if the orientation of the board is optimal. I think I will also add two leds on the front and a relay to switch it on from the pre-amp (If I figure out how the solid state relay I got works).
Merry Christmas,
Davide
So, the box under the F5 is a DAC. It's very simple to make such a box, as on the side are just few bars with nuts in between. The nice thing is you can decide how high to have the chassis after you make everything.
Thank you! When you have five minutes spare, grab a camera and shot a couple of closeups: one inside and one outside, pls.
Thank you! When you have five minutes spare, grab a camera and shot a couple of closeups: one inside and one outside, pls.
Yes! I would love to see this as well!!
It's a neat idea and looks very nice in the current photo.
Quite elegant, I like it!Hi,
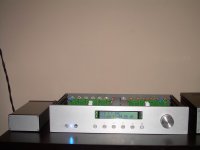
my ugs pre all inclusive version.
Needed only nice feet and a display glass with a cover.
I'm very happy, it sounds fantastic🙂
Thanks you Nelson and Francois!
Anto
What did you use for the front display, any preassembled preprogramed kit?
Regards,
Regi
Hi,
my ugs pre all inclusive version.
Needed only nice feet and a display glass with a cover.
I'm very happy, it sounds fantastic🙂
Thanks you Nelson and Francois!
Anto
I'm a using a rubber feets from Monacor , I like it (Just rubber feets)
Very very nice build 10y!
and a nice touch with the braille.
cheers,
c.
Thanks you culture !
I appreciate yours compliments 🙂
The braille is a choice of the french diy builders from which I have got finished alu panel.😱
Cheers,
Anto
Quite elegant, I like it!
What did you use for the front display, any preassembled preprogramed kit?
Regards,
Regi
Hi Regiregi22,
So happy that you like it, thank you.🙂
Display panel used is this from digikey.com (usa) :
NHD-0220WH-MTGH-JT#E-ND.
I find that it is fully compatible with the cristallofontz of the original project, but it is less expensive. Microcontroller used is atmel 128 with the software compiled by cheffdegear, version 2.01.
Ciao,
Anto
I'm a using a rubber feets from Monacor , I like it (Just rubber feets)
Hi Ramallo,
your suggest is that I will looking for🙂.
Thank you !
Anto
Hi,
my ugs pre all inclusive version.
Needed only nice feet and a display glass with a cover.
I'm very happy, it sounds fantastic🙂
Thanks you Nelson and Francois!
Anto
I can see there has been many hours spent thinking, purchasing, and bulding this work of art.
I wish you many hours of happy listening.
I can see there has been many hours spent thinking, purchasing, and bulding this work of art.
I wish you many hours of happy listening.
Hi Melon Head,
thank for your kind words.🙂
Yes, about two months of real work and more time waiting all parts, electronics and mechanics. However it has been a real fun this diy experience.
Cheers,
Anto
pictures of my A-75 (11years old), its biggest amp i ever built and heaviest too (weight 42kg) 😎. since orig. fets has been inaccessible, I replaced them (4x12matched IRF9630/630)
Attachments
IRF9630/630

Same here.
(and G-D cheap ones, hundreds left from the project)
- Home
- Amplifiers
- Pass Labs
- Pictures of your diy Pass amplifier