Might be improperly associated with Linkwitz's famous Orion DIY speakers. Maybe not... but I have an uneasy feeling about it nevertheless.
You might need to make up your brand. Hmm... "Adorion" ... "Oragio" 😉
..Todd
You might need to make up your brand. Hmm... "Adorion" ... "Oragio" 😉
..Todd
Last edited:
@Tubelab: Although I don't like the stone effect, it technicaly looks pretty good. I found that whatever I tried, some dust particle or insects found a way to sneak onto my wet high gloss surfaces, so I stopped doing that and get it done. As long as you grind (break corners if you can), wash, prime, spray, you'll propably end up with something half decent. And if you don't, well, grind it and try again. 😉
....Oregano....You might need to make up your brand. Hmm... "Adorion" ... "Oragio" 😉
@Tubelab: Although I don't like the stone effect, it technicaly looks pretty good. I found that whatever I tried, some dust particle or insects found a way to sneak onto my wet high gloss surfaces, so I stopped doing that and get it done. As long as you grind (break corners if you can), wash, prime, spray, you'll propably end up with something half decent. And if you don't, well, grind it and try again. 😉
....Oregano....
Org... Uhhh nevermind
Powder coating is just a special way of laquering, only difference is that the particles aren't suspended in a solvent. It comes off just like everything else 😀
I have found that stripping powder coating is a lot tougher than conventional paint. On a scale of 1-10, in my experience stripping conventional lacquer or enamel is a 1 and powder coat is an 11. I live in Southern California where oil based paint is rapidly going the way of the buggy-whip, so our strippers may be a bit neutered. In LA, Orange, and Riverside counties, you can no longer buy oil based house paint.
I believe Boywonder previously suggested just roughening up the surface instead of removing all the coating?
Since they are new, you just need to give the surface some grip for the new paint. Beadblast, sand, wire wheel, etc will all work, and if you go far enough you'll eventually get down to bare metal, in which case you'll need to prime before applying the top coats. Using the wirewheel or sandpaper approach will make it hard to get into the area by the lower screws, since the mounting feet are in the way. Also, don't forget to flip the end bells over and spray the edges, or you'll end up with back end bells with blue edges.
Powder coats are a lot more durable than lacquers. I don't know where the assertion that they are the same comes from. They are baked-on and are harder and yet more chip resistant than any paint I have ever used. It also bonds to the substrate better, which is especially important with aluminum. That's why powder coat is often used on wheels.
You don't need to remove it. Wet sand it with some fairly coarse paper, like 220 or 320 grit. Then prime it with some automotive primer and paint it. Don't wait too long between the primer and the final coat(s)...just the minimum amount required by the primer. Use light coats...resist the temptation to completely cover with the first coat. It will be more chip-resistant that way. I give bare aluminum the same treatment and get good, durable results.
You don't need to remove it. Wet sand it with some fairly coarse paper, like 220 or 320 grit. Then prime it with some automotive primer and paint it. Don't wait too long between the primer and the final coat(s)...just the minimum amount required by the primer. Use light coats...resist the temptation to completely cover with the first coat. It will be more chip-resistant that way. I give bare aluminum the same treatment and get good, durable results.
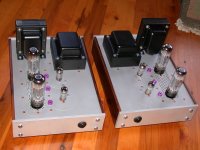
When the Transformers arrive, I can finally design a chassis. I want professoinal looking results. I'm still undecided on modern, or classic styling. One option would be the classic wood chassis / aluminum top plate. Going that route, I would build, or have built a wood box of walnut, and have Front Panel Express do the plates, as they have done excellent work on other things for me.
Open to all options on chassis construction, and parts selection as the builds begins.
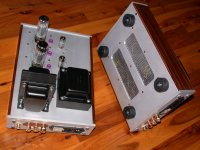
FWIW, here is my chassis construction method. Hopefully there are some ideas here that may be useful.
Bead blasted 1/4" AL font and back panels, 1/8" bead blasted top and bottom plates with perforated AL sheet riveted in. Round power switch since round holes are easier than sq/rectangular. I picked up a Freud non-ferrous table saw blade at Home depot that cuts the bar and sheet stock like butter.
I've also done "time-saver" grain pattern on AL with a 120 grit belt sander, although my preference lately is the bead-blast look. I made a bead blasting rig out of a rubbermaid storage container, and a cheap sandblast gun.
Perf hole pattern and rivet location also align with the solder tab strips to minimize fasteners on the top deck.
Top panel slides in groove in side panels, bottom panel is rabbeted in for ease of removal. Threaded brass inserts for F/R panel attachment. This way, if you screw up a top panel, or later decide those 7 pin sockets need to be 9 pin, you can fab a new panel and still re-use the rest of the chassis.
Bias pots are Bourns 10 turn WW and banana plug sockets on the top deck to connect voltmeter.
Rubber feet and copper rivets are from McMaster-Carr.
Those are my painted Edcors from my earlier post.
Attachments
Last edited:
I checked the Edcor site to be sure. Edcor ships powder coated, not lacquered, end bells.
I don't know what the smell was from, but when I opened my box of EDCOR transformers you could smell the solvents that smelled of Laquer.
End Bells? Laminates? I don't know which but it was a definate Laquer solvent aroma.
The core and bobbins are dipped in varnish after assembly. That smell take a while to go away...it will go away faster when warmed during operation.


FWIW, here is my chassis construction method. Hopefully there are some ideas here that may be useful.
Bead blasted 1/4" AL font and back panels, 1/8" bead blasted top and bottom plates with perforated AL sheet riveted in. Round power switch since round holes are easier than sq/rectangular. I picked up a Freud non-ferrous table saw blade at Home depot that cuts the bar and sheet stock like butter.
I've also done "time-saver" grain pattern on AL with a 120 grit belt sander, although my preference lately is the bead-blast look. I made a bead blasting rig out of a rubbermaid storage container, and a cheap sandblast gun.
Perf hole pattern and rivet location also align with the solder tab strips to minimize fasteners on the top deck.
Top panel slides in groove in side panels, bottom panel is rabbeted in for ease of removal. Threaded brass inserts for F/R panel attachment. This way, if you screw up a top panel, or later decide those 7 pin sockets need to be 9 pin, you can fab a new panel and still re-use the rest of the chassis.
Bias pots are Bourns 10 turn WW and banana plug sockets on the top deck to connect voltmeter.
Rubber feet and copper rivets are from McMaster-Carr.
Those are my painted Edcors from my earlier post.
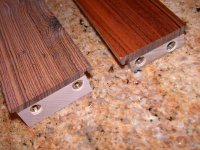
OK, we need to talk more about those. That it's exactly the look I wanted. 70's style, wood on the sides, and aluminum else where. I wanted some wood trim, but prefered it not be the main structure. My concern is the tooling required. I need details! I could use Front Panel Express for the tops, it it would cost too much for them to do it all. I must find a way to replicate that!
BTW, they look fabulous! A+++++
Last edited:
That does look nice doesn't it!.
I have and will use a router with templates for mine. Still leaves the issue of getting the surface finish as seen in boywonders. I have safely routed out 3/8 aluminum.
The plates could be taken to an anodizing shop if you have on locally.
I have and will use a router with templates for mine. Still leaves the issue of getting the surface finish as seen in boywonders. I have safely routed out 3/8 aluminum.
The plates could be taken to an anodizing shop if you have on locally.
Powder coats are a lot more durable than lacquers. I don't know where the assertion that they are the same comes from. They are baked-on and are harder and yet more chip resistant than any paint I have ever used.
Powder coating uses a plastic medium that has more in common with laser printer toner than it does paint. It can be removed with fire!
Yeah, many use a polymere binder, they have no solvent, there is electrostatic force used to bring it on the surface and it's baked on. Point is: None of this matters for grinding it away. It's a sort of coating. And it's one of those that comes off (there are some that dont that easily) if you kindly ask it to. 😱Powder coats are a lot more durable than lacquers. I don't know where the assertion that they are the same comes from. They are baked-on and are harder and yet more chip resistant than any paint I have ever used. It also bonds to the substrate better, which is especially important with aluminum. That's why powder coat is often used on wheels.
I don't think it matters how it's applied. Its just pigments too, only bound a little differently.
You don't need to remove it. Wet sand it with some fairly coarse paper, like 220 or 320 grit. Then prime it with some automotive primer and paint it. Don't wait too long between the primer and the final coat(s)...just the minimum amount required by the primer. Use light coats...resist the temptation to completely cover with the first coat. It will be more chip-resistant that way. I give bare aluminum the same treatment and get good, durable results.
I don't recommend you paint over a roughed layer of coat. It can work but it too can cause problems. The rest is absolutly correct, the thinner the single layers, the better the overall paint job.
So why a just a single 10m45s ccs instead of a cascode? I thought the cascodes gave better performance.
OK, we need to talk more about those. That it's exactly the look I wanted. 70's style,
I was wearing tie-dyed bell-bottoms and listening to the Bee Gees when I came up with the look..😉
The plates could be taken to an anodizing shop if you have one locally.
Absolutely, if my wallet wasn't so tight that would be my first choice. Around here the minimum lot charge is about $80 or so, which buys a lot of glass beads. Keep in mind that you still need a reasonable surface finish before anodizing or the scratches, gouges, blemishes, etc. will still show. Timesaver finish + anodize or freshly milled + anodize looks good. Anodizing is not very friendly, in fact, it's quite toxic.
Conventional AL anodizing comes three ways, type 1 (Chromic-non dyed), type II (Sulfuric-non-dyed IIA, or dyed IIB), and type III (hardcoat). 6000 series AL alloys anodize easily and can be dyed lots of colors, or done natural; other alloys may or may not anodize well and it's best to ask before taking the leap. Hardcoat is the most $$ since it has to stay in the tank longer, but if you want a rugged dark grey look it's quite nice.
The chassis above required a mill, planer and a table saw to complete. If you don't have access to mill, you can't do slots very easily, but you could still do large round holes with perforated AL underneath using holesaws. Also, the rear panel could get a lot simpler if your power entry can use a round hole, and the speaker binding posts are insulated from the chassis (more simple round holes).
You could also use solid hardwood for the side panels, but if you get into exotics it makes sense to laminate to save the lumber, the trees, and $$. Making thin decorative wood pieces requires a planer, unless you don't mind sanding and you can keep things flat.
The slot and the rabbet on the side panels are simple rips on the tablesaw. A std table saw blade is 1/8" wide, so the 1/8" top panel slips right in. Most modern rip blades are .090" wide (thin kerf) so I use a 1/8" combo or a laminate blade to make the groove.
Screwing into end-grain is another issue; that's why I use the threaded inserts (also from McMaster-Carr). In the side panels shown above, the inserts are threaded into the end grain of the substrate (hard maple IIRC), still end grain.....I have since changed this a little by gluing small hardwood substrate blocks on the ends of the side panels to allow the inserts to thread into side grain, a huge improvement. I use the holes in the front and rear panels as the template to get the holes for the threaded inserts in the right place.
That really is a fantastic job Boywonder! I wonder if you might throw up some internal shots of your work as well?
Also, do you have a good source for the bias adjustment setup you used?
Also, do you have a good source for the bias adjustment setup you used?
FWIW, here is my chassis construction method.
I see you used the Corcom power entry modules with the fuses, voltage selector, line filter and croissant warmer tray.
Seriously, very tasteful and well executed. I haven't yet got up the nerve to use wood as a structural enement in an amp chassis but those inserts look secure. I have a few sizes of them in my fastener box I'm sure... Zebrawood (or bocote?) over eastern maple?
Oh yeah, I like that power entry module too! 🙂 Where do I find those? I can find the Corcom with everything but the voltage selector at Mouser.
They have a few Qualtek modules that are pretty nice. Pete Millett's Engineer's Amp BOM turned me on to these:
http://www.mouser.com/catalog/catalogUSD/641/1110.pdf
http://www.mouser.com/catalog/catalogUSD/641/1110.pdf
- Home
- Amplifiers
- Tubes / Valves
- Mullard 5-20 KT88 PP blocks!