FS: Magico 7” 4 ohm, 4 pcs.

Hi,

For Sale 4 drivers Magico 7" 4oHm, from Magico Q1 loudspeaker.

Magico Q1 - Acoustic Tuning

Magico Driver:

Voice Coil: 3" Former Titanium

Copper Sleeve

Underhung Magnet System

Xmax: 10mm

New.

Price: $8000 ($2000 per driver) + shipping.

Drivers location Israel.

Best regards,
Boris.

Attachments

  • 1.jpg
    1.jpg
    844.6 KB · Views: 1,167
  • 2.jpg
    2.jpg
    467 KB · Views: 1,126
  • 3.jpg
    3.jpg
    427.3 KB · Views: 1,127
  • 4.jpg
    4.jpg
    448.6 KB · Views: 1,061
  • 5.jpg
    5.jpg
    469.2 KB · Views: 1,062
  • 6.jpg
    6.jpg
    423.1 KB · Views: 495
  • 7.jpg
    7.jpg
    354.6 KB · Views: 536
  • 8.jpg
    8.jpg
    345.9 KB · Views: 548
  • Impedance.jpg
    Impedance.jpg
    195.1 KB · Views: 208

SSL EVO4000.1 Class d

I im stucked with this amp, the PS fets was burned i checked the square signal in Gates with a scope an was ok, 4.3 volts DC, anyway i changed the PS driving transistors

i got the same square wave sinchronized,*when one is high the other is low.

My problem begins when i installed fets with p75nf75, and they got hot quickly so i tried with irf3205 with same hot results, i installed all fets but with the overheating problems i installed one fet per bank steal with overheating problem i have to clamp the fets, i detected when the fets are installed i have no signal coming from the pins 11 and 14 from the sg3525.

i can not make the PS to work, the fets are clamped so i can make a measurements, the rectifiers tha goes to the output section are out of the board with no change

this is are the voltages coming from sg2525:

with out fets in board:

1. 0.03 v
2 5.12 v
3 0.01
4 0.25
5 2.07
6 6.02
7 2.05
8 4.82
9 5.53
10 0.02
11 4.41v
12 0.000
13 10.61
14 4.41
15 10.01
16 5.10 volts

4.42 volts in gates

with fets:

1. 0.02 v
2 5.08 v
3 0.01
4 0.25
5 2.07
6 6.02
7 2.05
8 from 0.5 -- 0.8 volts
9 5.22
10 from 0.07 -- 1.07 volts
11 0.02v
12 0.000
13 from6.7---10.61 volts
14 0.04
15 from 6.54 to 10.01 volts
16 5.10 volts

i suspect the toroid transformer can have some problems
i checked diodes and zeners driving transistrors ressistance gate reistances, i removed the diode bridge thath goes to both of the 15 volts regulators.
but im lost at ths moment i can not make the sg3525 give signal in pins 11 and 14 with the fets instaled, i checked to the lm393 involved with the protection circuit an all voltages seem fine, even when the amp starts remote to positive, the red led turn on for about two seconds then the blue led turns on and the red off, the blue led stays on but dimming constantly.

L pad to attenuate line out to mic in or something else

Hi there, I would like to build a variable (preferably) pad in order to get signal from a mixers rec out ( mixer master audio MM1210 only available output) to a wireless microphone input, whose receiver would be on a dslr camera nearby. In this scenario I have to also sum the 2 channels to one. I was thinking an l pad in order to achieve near -40db attenuation and 2 1k resistors on each channel to sum them up. Will this work? Any advice is very welcome.

I love the Elekit TU-8200R Amp with TU-8500 Pre-Amp.

Good morning and happy Monday, y'all! I hope everyone had an excellent Thanksgiving this year. 🙂

Before I get into it, I want to thank Victor Kung @ VKAudio for his assistance and patience in answering my questions, particularly about Capacitor upgrades. His knowledge is invaluable and he's a good guy to have in your corner when you need help. I also want to thank TubeDepot which is where I purchased my kits from. Honestly, if I'd have spotted Victor's store earlier, I probably would have purchased directly through him. However, I have no complaints whatsoever with my transaction as TubeDepot has always provided me with great products at fair prices.

With that done, I'll move on.

I've been an audiophile for more than 35 years. Music is the one thing I can depend on to get me through each day. It make a bad day turn good and make a good day even better.

Now, I'm not an audiophile in the "I own a set of Infinity IRS-V speakers powered by 3 Macintosh Amplifiers" sort of sense. I would love to be there, but that's a financial commitment I'm simply just not able to justify. However, I absolutely love how a quality sound system can bring out deep emotions, stir up memories of people and places, and transport you to another time. It has that much influence.

Until recently, I've always been a solid state kind of guy. Part of the reason is that the generation I grew up in was on the leading edge of Transistor technology with vacuum tube well on their way out the door. In fact, about the only thing you could buy with vacuum tubes in the '80s were guitar amps, and even those were rapidly declining in favor of the less expensive, sturdier solid state equipment. I do remember as a younger child, my parents and grandparent having old vacuum tube equipment, and I would spend many hours listing to records on this equipement. This probably set my mental bar for audio quality.

I guess that the other reason I was into solid state was that I was very big into car audio in the '80s and '90s, and there just isn't any place for vacuum tubes in car audio! I see there are companies that actually specialize in this kind of equipment, but that all seems a bit gimmicky. LOL

A couple years ago, I really started getting back into the idea of analog sound. I have always love vinyl and actually had an impressive collection until our house burned down in 2015 and we lost everything. Almost 40 years of collecting lost forever. Anyway, while I enjoy the analog nature of vinyl, it's always been through solid state amplification. Not that it was bad... In fact it's quite the opposite. It's just that I always did feel like something was lacking. Some level of depth or warmth that I remembered from my childhood that I just couldn't seem to reproduce. So decided to start looking around at what's available.

Vacuum tube audio equipment is clearly big business these days, with companies building preamps, amps, active crossovers, and other stuff that vary in range from hundreds to hundreds of thousands of dollars. The array is as dizzying as it is almost endless. Reviews leave you with more questions than answers, and almost anything with decent reviews will empty your wallet in short order. But the question at the end of the day is, "Is a $10,000 amplifier any better than a $1,000 one?" I'm sure that at the end of the day the answer would be, "Yes, the $10,000 amp is better." But the next question would logically be, "Is it $9,000 better?" In many cases the answer would be solidly, "No."

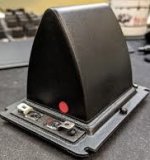
With this in mind, I started looking at many different amplifiers in the "under $5,000" range. There are a number of what I presume to be quality products on the market in this price range, but still couldn't make heads or tails of what was actually worth dropping my hard-earned cash on. Oddly enough, while researching different amplifiers, I came across a DarkVoice 336SE headphone amplifier in a pawn shop and scooped it up. Even before I plugged it in and turned it on, I was already looking at reviews, schematics, and upgrades to this unit. My first 20 hours into it, I had already order a variety of tubes so that I could start rolling as time permitted. I do realize that this little amp met with mixed reviews, but was mostly positive. I also discovered that there were some very easy improvements that could improve the quality and reduce the idle noise of the amp. I, personally, love this little amp. It brought back that sound I so vividly remember from my youth. The depth and presence that I felt I was missing was restored. Even with high quality digital recordings, there was a sonic improvement. That's was it. I'm now hooked on tube amplifiers!

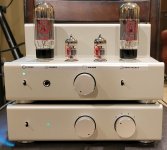
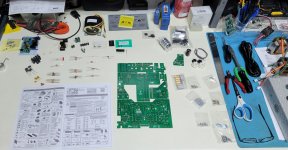
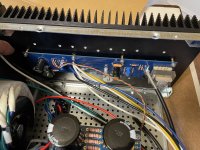
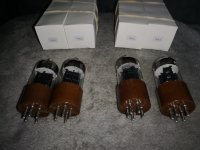
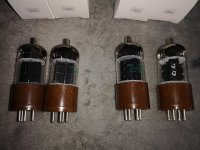
I figured the best place to start would be at the bottom of the chain and slowly work my way up. After digging around for several months, I came across the TU-8200R Amp kit along with the TU-8500 Pre-Amp kit. I found it intriguing as it was a full-on, build-it-yourself sort of kit that came with everything. The reviews on it were outstanding, and the documentation on component upgrades was well defined and easy to follow. The only pitfall was that some of the upgrade components were no longer available, such as the AMTRANS components, but c'est la vie. The biggest improvements seemed to come from using Mundorf coupling caps and Lundahl transformers anyway, so that was what I opted with for the final build. Tube rolling will come later. Ordered through TubeDepot and then waited for the brown Santa to show up in his trusty delivery van.

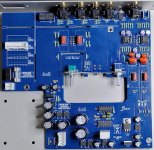
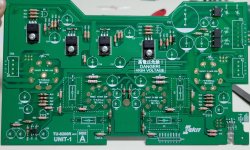
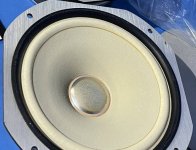
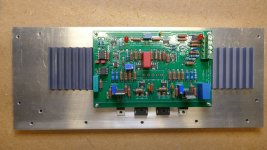
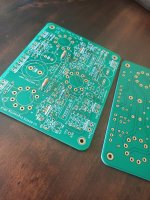
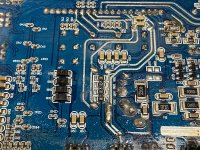
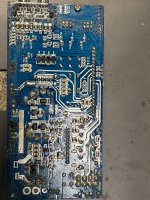
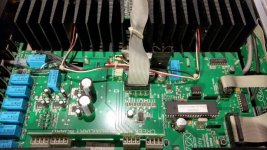
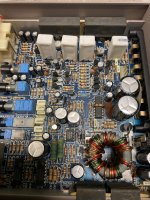
I did my process a little backwards, starting with the pre-amp first as I was waiting for my Lundahl transformers to come from VKAudio. Out of the box, this thing is a solid work of engineering. The chassis was remarkably clean in design and fit together well. I may, at some point, disassemble and have the chassis powder coated a different color, but it's great as it is. The PCB is laid out very well, all the components were grouped in nice, organized baggies, and the instructions were very clear to understand. Now, I'm an electronics engineer by trade (digital, not analog), so following a schematic and PCB layout is a simple thing for me. Not to mention that I have a helluva soldering station. PCB assembly and soldering didn't take long, and within a couple hours I had the whole thing put together. Slapped in the J/J tubes, connected my Technics 1200 turntable to it, and hooked it up to an old Pioneer SX-980 with Kenwood KL-777A speakers and then let 'er rip.

I let the pre-amp run for about 2 hours just to let things settle in and then dropped Tom Petty on the platter. Even with the tubes barely even run, the difference was immediate. The sound was warmer with vocals that were more in the foreground. I played this album and then moved on to my next favorite, Pink Floyd - Wish You Were Here. Shine On You Crazy Diamond (Parts 1-5) is my quintessential sound system test. For me, this track reveals the soundstage and depth of a sound system, or even the capability of individual components, and let me tell you, the TU-8500 did not disappoint. I went with this setup for several days, and with each passing hour the pre-amp continued to provide subtle improvements in sonic and tonal quality. I now realized I needed to get the amplifier built!

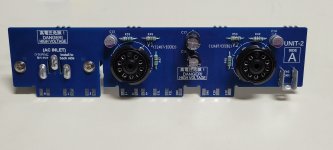
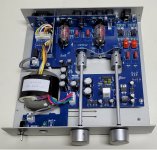
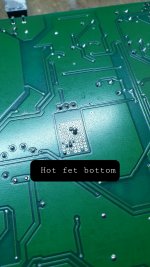
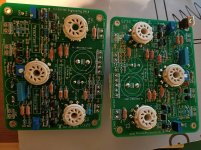
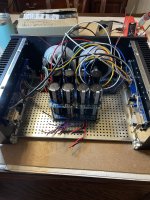
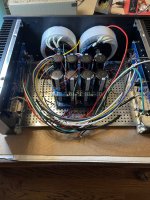
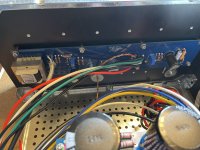
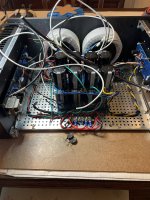
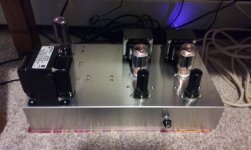
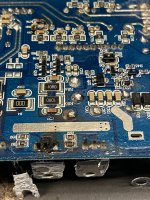
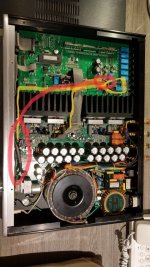
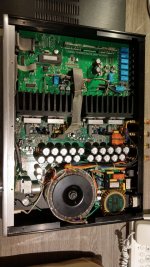
Thanksgiving intervened and I had to do all that family stuff. While I always enjoy being with family, I was quietly preoccupied with wanting to put the amp together. Our office was closed for Black Friday so I headed in and began the process of assembling the amplifier in peace and quiet. Again, all the details were impeccable and assembly was completed in a matter of hours. I'm a bit of a perfectionist, and since the tubes are exposed in this unit, I spent a little extra time making sure that the tube sockets were level and even. Unfortunately, during my final assembly of all the PCB units, I forgot to solder the bridges on the bottom of the input/output board which left me a little perplexed when I fired up the amp and had no sound. A few muttered curse words and 45 minutes later, all was good.

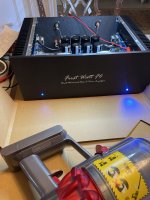
I've always heard from people that 10 watts of power from a tube amp is like 50 watts of power from a solid state amp. I always took these comments with a large degree of skepticism since I've always argued that "Watts is watts." I guess that it's true that wattage is a pretty stable measure of audio output. But let me tell you right now... This little amplifier that only runs 8 watts per channel sounds better than my 100 watt per channel Onkyo receiver (in stereo mode) running through a set of B&W 603 S2 speakers! Of course, the Onkyo running in 7.1 will simply outmatch almost any 2 channel amplifier for range and soundstage, but in 2 channel mode I would take the little tube amp every time. There is no absolutely no hint of hiss or hum at idle with no input, even with headphones on. It is dead quiet until you feed the signal back into it and then it just fills the room.

I just couldn't believe the quality of the sound the TU-8200R produces at a pretty solid listening level. It's certainly loud enough that I can feel immersed in the music, and that even with the TU-8500 pre-amp on a flat 1x gain on the inputs. I haven't even turned it up to 3x yet, and from what I've read so far, the amplifier can certainly handle the higher input levels without becoming too distorted. I may give that a try tonight and see how well it handles. I expect it may pick up some signal noise, but I can't say until I give it a spin.

As an aside, the amplifier works great with a set of high quality, high impedence headphones. My Sennheiser HD-650, which works fantastic with my DarkVoice 336SE, sounds fantastic with the TU-8200R. Of course, you don't buy an amp like this just to plug in a set of headphones. It's just nice to know I'm not losing anything in sonic quality. My DarkVoice picks up stray interference with the volume turned up and no live signal coming in, but I think that has more to do with being pretty close to my monitors on my computer desk. I've moved it to another location and that noise disappeared. However, I do not get any noise with this combination of pre-amp and amp sitting in the same location, so the DarkVoice might need a little more input filtering. I did install the PS-3249 DAC module and that works just as I would expect. I don't expect to use it much, but it's there if I need it and it doesn't take away from anything when it's not plugged in.

Overall, this has been an absolutely fantastic kit build. It's a pretty easy go, provided you have a resonable level of skill with soldering. The rest is just following instructions. I did take the amp apart and installed the original transformers just for a quick listen, and the sound did have a little bit of dryness to it. I can't quite explain it, but it felt like some of the low frequencies were a little muddled and washed out which took away from some of the depth of the soundstage. I can't say for highs since I have tinnitus (too many years of concerts and loud car audio) and can't hear anything above about 12,000 Hz, but the range I can hear still seemed to be pretty clear and sharp.

Tube equipment is clearly the way I need to go in the future. I got my feet wet and I'm now ready to jump in. Just for grins, I've already ordered and received the TU-8550 pre-amp and will soon order the TU-8900 amplifier. I'm ejoying the building of these kits and have been absolutely floored by the sound quality of both the pre-amp and amplifier. I mean, for the price you just can beat it. And with the ability to swap power tubes in the TU-8200 between the 6L6, KT88, EL34, 6550, and possibly even the KT90 (I don't know if KT120 would work), all with auto biasing, it makes tube rolling a fun (albeit potentially expensive) adventure. But if you're going to tube roll, then this is a great way to start out.

Again, many thanks to Victor Kung, TubeDepot, and also to Elekit and the infamous Mr. Fujita. Excellent work by everyone in bringing this exceptional product to market and making it affordable to the average hobbyist. It provides entry level access to quality tube audio equipment as well as a platform in which to build a solid foundation of understanding how tube audio equipment works. Well done!!!

TL;DR

I bought the Elekit TU-8200R amp and TU-8500 pre-amp kits along with Lundahl transformers and Mundorf caps for the amp. I assembled them and they are *******' AWESOME! Do yourself a favor and get these for yourselves. You can't beat the quality, especially for the price.

Attachments

  • 20221126_151320.jpg
    20221126_151320.jpg
    613 KB · Views: 303
  • 20221114_172426.jpg
    20221114_172426.jpg
    656.9 KB · Views: 249
  • 20221114_172452.jpg
    20221114_172452.jpg
    180.5 KB · Views: 226
  • 20221115_092119.jpg
    20221115_092119.jpg
    728.8 KB · Views: 264
  • 20221125_120231.jpg
    20221125_120231.jpg
    389.4 KB · Views: 229
  • 20221125_145949.jpg
    20221125_145949.jpg
    422.4 KB · Views: 243
  • Like
Reactions: Robin De Wolf

Farnell LT30-01 dual bench power supply faulty?

Hi,

I have picked up recently a vintage Farnell LT30-01 dual bench power supply from a well known auction site.
It has two fully independent channels capable of delivering 30V at 1A max.

I tested it today and I think one channel is not behaving correctly (maybe usable but I do not think it is ok).

I want to use current limiting facility.
I set both channels to CV (the switch underneath).
I set up first the desired voltage to say 5V. Then I set up the current limit. I connect 10Ohm to the output. and set the meter to show the current.
I expect to get 0.5A which I do. Then I adjust the current limit downwards until the measured current starts to drop. This is my limit setting.
I verify the operation by replacing 10Ohm load with a smaller one. The meter shows still 0.5A but the voltage drops accordingly to Ohm's law.
This is what I call proper operation.

The other channel: I set up the voltage, connect my 10Ohm resitor and proceed with the current limit setting. With this channel I can set the current limit to any value between 0-1A and the PS seems to increase the voltage if I exceed 0.5A which I do not like very much.
Of course I can still set up the current limit to 0.5A (and verify that the voltage is still 5V) and I can test the limiter by trying a lower value resistor - which seems to work ie t keeps the desired current but the voltage drops.

Still, somehow I do not like the idea that if I accidentally turn the current limit pot my voltage will increase too.

Is the unit faulty?

It is not my policy to take the advantage of the seller/force him to pay return postage etc using fleabay buyer protection scheme. BUT I also do not wish to pay for a unit advertised as working and then spend time fixing it...
I'd rather be soldering amplifiers in this time.

Wear on speaker cap coating

Hi there,
I saw a couple of vintage Coral speakers for sale. They look in good shape in the picture, except that the center caps, which are supposed to look like polished silver, have a dull look for most of the surface, except for the rim. See pic.

Shall I be concerned about the sound quality? Aesthetics are secondary.
Shall I be concerned about further degradation? E.g. is the silver coating detaching and will it eventually flake off?
Is there some kind of service to restore the caps to their original sheen or replace them for a reasonable price?

Thank you.

Attachments

  • coral_cap.jpg
    coral_cap.jpg
    103.8 KB · Views: 87

Need POWER SUPPLY schematic for Threshold FET 9 preamp

I found a Threshold FET 9 preamp at a recycling center (!!!), no power supply. It's in fantastic shape and I have hooked it to a friends power supply and it works. Threshold power supplies are few and far between and not cheap. I would like to build my own. I could backwards engineer the original, or if anyone has a schematic for the original or if there are any plans floating around for an upgraded power supply, that might be a good way to go. It's 18 volts DC but I'm not sure of the amps or wattage required at the output as I can't find much on either unit. The power supply does have a sticker that notes input power select of 120 vac or 240 vac with a max drain of 10 watts. The fuse for 120 vac use is .5 amp, slow blow or 1/4 amp slow blow for 240 vac use.

Any suggestions would be appreciated.

Thanks,

Eric M.

MTX 81000D LED 238 does not turn on and no audio

Hello friends! Thank you for allowing me to continue being part of the forum. On this occasion I have in my hands an amplifier of the brand Mtx model 81000d in which I received an irf540 in the output stage, of course it was blown up. The problem is that it does not generate audio. LEDS 399 and 463 turn on, but there is a current consumption of more than 4 amps and the fet that is attached to the board is very hot, I have a sawtooth gate pulse, but I understand that it is normal, at least Turn on the amplifier my supply voltage goes from 12v to 9v, I checked the fet that is on the board and it reads well, tomorrow I will lower it and get the HCPL3120, in the same way I measured them and they seem to be fine but I will try to get them, thank you your help and patience... regards

Attachments

  • 20221123_203723.jpg
    20221123_203723.jpg
    469.9 KB · Views: 154
  • 20221123_203601.jpg
    20221123_203601.jpg
    394.6 KB · Views: 131
  • 20221123_185459.jpg
    20221123_185459.jpg
    513.1 KB · Views: 148
  • 20221123_185445.jpg
    20221123_185445.jpg
    453.6 KB · Views: 139
  • 20221123_185452.jpg
    20221123_185452.jpg
    589.2 KB · Views: 151
  • 20221123_185441.jpg
    20221123_185441.jpg
    587.5 KB · Views: 224

When to use a soft start circuit?

I've read lots of information that says that once you roughly pass a 300VA transformer, that you should include a soft start in your amplifier. My question is this - is it really needed when you're on 230V like in Europe? Most of the working examples show really large in-rush currents, but they are almost always on 115V AC. If 300VA+ is roughly the point for 115AC when it's needed, wouldn't it be more like 600VA for 230VA? Sorry if it's a remedial question, but since the current is half at 230V AC, it seems like a soft start wouldn't be needed at the same threshold.

Zen V9 - Alternate Power JFET choices?

Hello,

I would like to experiment with a Power JFET build using the Zen 9.

https://www.passdiy.com/project/amplifiers/zen-variations-9

I'm looking to build it using Lovoltech LU1014D but want to use a current production part.

Can anyone suggest current SiC production parts?

Poking round I found these:

UJ4C075060K3S (N-OFF)​

https://www.mouser.ca/ProductDetail/UnitedSiC/UJ4C075060K3S?qs=hd1VzrDQEGjVfGB6b9i7uA==

UJ3N065080K3S (N-ON)​

https://www.mouser.ca/ProductDetail/UnitedSiC/UJ3N065080K3S?qs=byeeYqUIh0OYOU7Cis0jMg==

Which Power JFET is preferred N-ON o N-OFF?

New Flagship DAC the AK4499EX to Debut at the IPS / HIGH END® Munich2022 Show

https://www.akm.com/eu/en/about-us/news/2022/20220420-ak4499ex/

It looks like we will be getting a new "DAC system", consisting of two chips, one doing the DSP & ΔΣ modulation and one being the actual DAC, much like the previously announced pair of AK4191 & AK4498.

So the DSP & ΔΣ modulation will be performed by the previously announced (but never really seen by the general public) AK4191, and the DAC will be done by the new part AK4499EX (which looks like a 2-channel version of the AK4499 with the digital components removed).

1650532364316.png


1650532331004.png


So AKM is slowly making a comeback..

Attachments

The Ikea Symfonisk speaker conversion project

I am starting this new thread with the hope fellow forum members will benefit from the work already done, and possibly can help me with the work still ahead.

I too am working on the Ikea Symfonisk hack, mostly because we are already heavily invested into the Sonos system for casual listening.

In my office,I used to have a Sonos Connect:AMP to drive two homebrew bookshelf speakers, but I got curious after reading about the Symfonisk hack. So I bought one, opened it up and hooked it up to the drivers directly and this sounded way more detailed to me. So I bought a second one and from thereon, the project got stuck.

But not before I got a friend to design a 3D printable enclosures to mount the Symfonisk board on the back of the speaker:

(It's a real pity the forum engine ignores the orientation property)

We even added the Sonos signature button panel:


It's got that 3D chique finish, but it's on the back, so nobody sees is. I have to lookup the .STL files and I will post them here later.
As is well known, the Symfonisk is a bi-amp system, driving the tweeter and woofer with separate Class-D amplifiers. The cross-over filter is probably digital, since Sonos offers a feature they call Trueplay, allowing to tune a speaker for the room it is place in. It's sold as a feature, but it's probably a work-around for the bug of using sh*tty drivers in a tiny box.

Now I wonder if this feature can also be used to compensate for a different set of drivers. To do that right, the digital cross-over filter must not only be able to adjust the levels on both sides, but also the cross-over frequency.

And this is where the project is stuck now: I want to measure the cross-over properties, but I lack the experience. I own a Rohde & Schwarz UPL audio analyzer and I have a Sonos Connect I can use to inject the UPL's signal into the Sonos system. There will be delay, so sweeping will not be possible, but it can also use white noise, so that will be the next-best thing.

Is there anybody here who can help me set up this measurement?

Attachments

  • IMG_4122.jpg
    IMG_4122.jpg
    903.9 KB · Views: 1,012
  • IMG_4123(1).jpg
    IMG_4123(1).jpg
    457.4 KB · Views: 1,131

Ferrograph F307 Mk 2 transformer failure

I have had my Ferrograph F307 Mk2 from new having purchased it as a student in 1975. So I'm rather fond of it!!
It has developed a fault - the mains fuse blows on power up and a local vintage amps repair firm has confirmed what I thought - the main transformer has failed somewhere deep in the windings.
Replacements are not available so I am looking at a possible rewind. The schematics (attached) indicate an output voltage between A and B of 70V but do not confirm what it is between X and Y. Am I right to think that it's the same?
Ferrograph F307 wiring diagram.jpg
between X and Y. Am I right to think that it's the same?

Attachments

SS amplifier dissipating 120W using internal porous ceramic heatsinks.

I have previously built amplifiers dissipating over 32W of heat using porous ceramic heatsinks.
https://www.diyaudio.com/community/...and-heatsinks-using-ceramic-heatsinks.380763/

I wanted to rebuild my Ovation SX 15W per channel class-A amplifier which dissipates 120W as heat. The original SX build used an off the shelf case which was large and heavy so I designed a new one using the technique I previously used in my “headinclouds” KGSShv Carbon ES headphone amplifiers dissipating about 32W. The cases are all 3mm sheet aluminium alloy and the heatsinks are porous ceramic with adhesive pads. The SX rebuild adds two ripple eaters, volume and balance controls and headphone feed while being smaller and lighter.
I allowed 3W dissipation for each Amec Thermasol FCH505010T, so 22 dissipate 66W per channel for a reasonable temperature rise. They are simply stuck on to aluminium plates holding the power transistors and forming part of the case. Of course the heatsinks are now internal so the case needs a good updraught to allow the heat to escape. In practice the temperature rise is similar to the original large aluminium finned amplifiers. The area near to the power transistors runs at around 50°C and the outer heatsinks 44°C.
DSCF3506.JPG
DSCF3531.JPG
P1000669.JPG
P1000673.JPG
The case is 375W x 320D x 170H (inc. feet) [14.75 x 12.6 x 6.75in]

Use of transformer for unbalanced RCA to Icepower balanced input

Hi.
I've built a pair of Icepower 200asc amps, and am using these in a biamplified system, with a DAC feeding an active crossover (RCA unbalanced outputl
The 200asc has a balanced input. Since I already have a pair of suitable transformers from another project (Jensen JT11-P1), I'm hoping to utilize these to converth the unbalanced input for use with the balanced amp (FYI, I am not interested in an active solution, nor passively tying one of the 3 pins to ground).
BTW, there are a Red and Brown lead going into the transformer and Black,White, Yellow and Orange leads coming out. I do not see any labels for them).

I see in the manufacturer's diagram (attached) that they show an RC network (13k/620pf) across the output leads attached to pins #2 and #3 (which is also tied to pin 1/screen, input shield).

Q:: Are all these connections and Res/Cap components shown in the diagram necessary and correct for my application?

I have seen other diagrams online that differ greatly, but noticed that Jensen refers to this one as "Best", which I interpret as only one way.

Thanks for any guidance in this effort.

Attachments

  • Screenshot_20221126-062049.png
    Screenshot_20221126-062049.png
    123.3 KB · Views: 550

Differential Current Probes

Hi,
my name is Alfred Rosenkraenzer, I worked 36 years as a design engineer, mainly on analog and digital signal designs.
Now I am on early retirement.
I designed two differential current probes to measure the current in a shunt resistor with a scope. These are pretty helpful if you like to measure eg the current in the emitter resistors of an audio power amplifier, or at switching power supplies.
There are two articles about them in ELEKTOR:
https://www.elektormagazine.com/magazine/elektor-201609/39807
https://www.elektormagazine.com/magazine/elektor-159/59112

Attached are some screen shots from the emitter resistor of an amp.
On SCR01 the yellow trace is the output of the amp at 8 Ohm, purple the upper emitter current.
Note the difference in bias current between SCR02 and SCR03. Look at the end and the start of the half sine.

If someone is interested I can send you more info.
I still have some blank boards which I can sell.

Best regards
Alfred

Attachments

  • SCR01.PNG
    SCR01.PNG
    11 KB · Views: 99
  • SCR02.PNG
    SCR02.PNG
    7.9 KB · Views: 108
  • SCR03.PNG
    SCR03.PNG
    7.9 KB · Views: 105
  • SCR04.PNG
    SCR04.PNG
    10.6 KB · Views: 102

el34 quad tube pp guitar amp: series /parallel heater wiring for half power Q/A

hello,

I have an amp that uses series parallel heater wiring for the el34's
the left to power tubes were one wired lot and the right side were the other wired pair (please see original schematic below)

to save cost for a quad set of tubes I opted to run the amp at half power on only the two center tubes V10, V11 by wiring the heaters as a series/parallel pair, rebiasing and running the output impedance at half. this has worked fine.

I am going to pass the amp on now so I am thinking to wire V9, V12 heaters as a pair so the new owner can purchase a quad set of el34's and run the amp at full power should they choose.

My question is in the design are the V9,V10 and the V11,V12 heaters wired together for the correct voltage because the are situated close to each other to make wire routing easier and saves on wiring ....

Or is it a design rule effecting noise and interference that heater wiring in series parallel arrangement has to be at each end of the output transformer (in quad pp designs)?

please note: I am only inquiring in regards to the heater wiring arrangement,

...........to simplfy can V9,V12 be run as one heater series/parallel pair and V10,V11 be run as the other heater pair (with re wiring of course) without causing poor effects or problems?


thankyou

Attachments

  • screenshot-www.ozvalveamps.org-2022.12.10-19_01_21.png
    screenshot-www.ozvalveamps.org-2022.12.10-19_01_21.png
    53.6 KB · Views: 134
  • screenshot-www.ozvalveamps.org-2022.12.10-19_15_28.png
    screenshot-www.ozvalveamps.org-2022.12.10-19_15_28.png
    79.7 KB · Views: 132

Ladder Attenuator: Why a calculation with specific load, and even "no load"? (Elma)

Hi friends
I am still struggling to understand the math behind ladder attenuators. I once thought it would be easy, but nope, not really. (Not if following/listeningn to the masters at least).
So I have this cool ladder attenuator calculation sheet from Elma, but it's too cool for me: Why are there those "Ladder (no load)" and "Ladder (with load)" options?

Haven't ever seen anything like that although I've looked at I'd say most of the products available...
I believe Master Salas already explained it (here), but I'm completely overwhelmed.
What Load-impedance should I go with, and — why?
(excel calcsheet included as zip-file)

Thank you

Attachments

Making cases and heatsinks using ceramic heatsinks.

Cases and heatsinks are a problem for DIY builds.

I made quite a few amplifiers with thick machined front panels, heavy finned heatsinks and aluminium cases. Such parts need machining and tapping.

I devised a way of making cases, which eliminated these problems and made for easier case design, lower costs and quicker builds.

Cases

Made from sheet aluminium alloy of preferably 3mm so only single sheet of material needed.

Depending on the facilities you have available these can be made manually. I get the parts laser cut by a company which will also supply the material. Alloy 5251 lasers and anodises well. The case parts need holes to be countersunk where necessary and are then taken for surface finishing, (bead blasting and anodising in my case).

I then take the front panels to be screen printed with the graphics I provide. The assembly is with corner posts and angle brackets cut and drilled, and bolted together. I only drill and tap corner posts to attach base and top panels. The case is basically a box with a front panel on to cover the front of the box.

Heatsinks

I became aware of porous ceramic heatsinks and realised that these small, light self-adhesive items would solve problems. I bought a few and tested to see if they did what was claimed. A single 50mm square of 10mm thick could dissipate 5-10W stuck on sheet aluminium. To make heatsinks you only have to bolt the semiconductors directly to the 3mm plates and place the ceramic heatsinks as needed.

Edit; a link to these was omitted, http://www.amecuk.co.uk/ Element14 has them in many countries.

https://www.newark.com/c/cooling-thermal-management/heat-sinks?brand=amec-thermasol

They are not expensive, and with a range of sizes you can arrange heatsinks of different shapes. I was concerned that they might unstick but the opposite has been true, they are hard to remove.

They are not pretty and can be easily chipped so I contain them inside the case and organise slots above and below to act as a chimney to allow convection. This works well and they do not run hot. The porous ceramic devices are very effective.

I have found that this method is much easier to procure and build. The amplifiers built this way can be smaller and lighter. These techniques can be adapted to any case whether needing heatsinks or not.
I should say that these heatsinks are small and they don't weigh much but that each amplifier on either side of the case dissipates about 14.5W and the heatsinks are only warm. (Edit; Further explanation a few posts below)

Attachments

  • P1090504.JPG
    P1090504.JPG
    387.5 KB · Views: 575
  • P1010241.JPG
    P1010241.JPG
    206.8 KB · Views: 557
  • P1090506.JPG
    P1090506.JPG
    257.4 KB · Views: 479
  • P1090495.JPG
    P1090495.JPG
    502.4 KB · Views: 519
  • Like
Reactions: stretchneck

Fixing Behringer DEQ 2496 "flashing screen" and similar

I have 7 Behringer DEQ 2496 units in continuous usage in 3 different systems. They conveniently allow me to do a wide range of adjustments I need to do, including parametric EQ, graphic EQ, bass limiting, level adjusting, level monitoring, and RTA. And all with midi controllable setting memories. They are useful in multiway as well as (my kind of) multichannel systems.

Around 2013 I discovered I could even use them to replace the Behringer DCX crossovers I was then using. By aligning two "low pass" filters in the parametric section, you can get an LR24 lowpass response, and likewise for the highpass response. This enabled me to use full digital I/O because the DEQ have full digital I/O whereas the DCX only has digital input. Then I can use the DAC's of my choice (so long as DAC latency is corrected for each way and each supported sampling rate...).

I started with one unit in 2005, added the second one in 2008, and on and on. But by 2010 the first one failed, and for me they seem to have lasted 5-10+ years (some of the latest new ones I bought are still going fine, and I've improved the ventilation with higher spacers, and they seem to have improved the parts quality a bit since 2005).

I never fixed any, I just bought new ones like candy as the old ones failed. I saved them in a big pile for "later when I have time to fix them."

I think the time has come to start trying to fix them. They are unavailable new and the used ones (I have sadly learned) may be nearly "used up" if they work at all. I got exactly one year's use out of the last one I bought on ebay for $200.

The latest one (a year after purchase on ebay) has now died with the "flashing screen" problem. When the unit boots up you never get the copyright screen or anything just a flashing screen. Something like half of the ones in my dead pile died with that problem. Others may have the "blank but lit screen" problem, or the "dead as a doornail" problem. I suspect most or all of these problems are power supply related.

Sadly there is no schematic and no service manual. I have found a multipage schematic of some kind but I haven't seen the power supply on it.

I am going to be taking one apart today or soon to see what I can figure out.

45 DHT Filament Question . . .

Hi folks. Quick question about DHT filaments. I designed a build to incorporate two switches, one to fire up the filaments, and the other to pass the B+. To my chagrin, I just discovered after turning b+ off, I'd forgotten to turn the filament switch off last evening. Unfortunately, I'm talking vintage 45 globes. Duh. :-( As a general proposition, how much damage have I done? (The amp sounds fine right now.)

F6 Mosfets running too hot?

Good morning to the group,

I’m a newer builder and reached another challenge there perhaps someone can share some of their expertise. My latest project is the First Watt F6. I built it and now am in the final stages of biasing the channels. With (2) meters clipped the source resistors and(2) others connected on the speaker outputs, I thought I was golden because I kept watching my heat sink temps were as I ran the bias up and we’re just nicely warm, never hot at 47*C. As I continued to raise the bias, finally stopping at 565/575mv and offset set @ +\- 1-2mv. Everything seemed nice and stable. So after a few different days of monitoring the bias and offset remaining fairly stable. I connected some test speakers, there’s no hum or noise so I played some music. It sounded good. It’s when I went to take my test equipment off I noticed the plastic on my test leads on both channels Source Resistors was literally melted. Shame on me for not noticing sooner and not checking the mosfets sooner. I just assumed if the heatsink is cool, so is what is attached to it. I got my infrared and started shooting temps on the mosfets. THEY ARE HOT, very hot @ 69*C. I immediately backed down the bias on both channels to around 350mv. After some time i checked temps again and they are still super at at almost the same temp 68/69C. Even the hold down washers are extremely hot. I never noticed this on the F5T or Aleph J amps and I will check those this weekend. I checked to be sure my screws were tight and they are. It almost seems like I’m not transferring the heat from the mosfets to the heatsinks. Is that Possible? I guess I should ask, do I have an issue to address?

Attachments

  • AAC45857-0279-4F2E-B224-A1D6232C34CB.jpeg
    AAC45857-0279-4F2E-B224-A1D6232C34CB.jpeg
    939.6 KB · Views: 170
  • 128ED44D-0A09-47F6-9243-DDAA1318663B.jpeg
    128ED44D-0A09-47F6-9243-DDAA1318663B.jpeg
    921.3 KB · Views: 159
  • 9C67B777-1080-4DBC-9B4F-45B1168DB21B.jpeg
    9C67B777-1080-4DBC-9B4F-45B1168DB21B.jpeg
    892.3 KB · Views: 152
  • 8D8ED766-C60C-4B7E-AA10-06A3C28EC6CF.jpeg
    8D8ED766-C60C-4B7E-AA10-06A3C28EC6CF.jpeg
    881.1 KB · Views: 161
  • 6C73E74A-11D2-46AB-BB7E-5661C192C10F.jpeg
    6C73E74A-11D2-46AB-BB7E-5661C192C10F.jpeg
    679.1 KB · Views: 154
  • BF299213-056D-4C5D-B89B-F342CFE5780D.jpeg
    BF299213-056D-4C5D-B89B-F342CFE5780D.jpeg
    660.1 KB · Views: 158
  • 7C476357-5607-48FA-875D-2A28063901CA.jpeg
    7C476357-5607-48FA-875D-2A28063901CA.jpeg
    661.3 KB · Views: 159
  • BECEB41B-C2DC-420F-A397-DD29D3303443.jpeg
    BECEB41B-C2DC-420F-A397-DD29D3303443.jpeg
    428.1 KB · Views: 159
  • 81A52B2E-282B-4548-A879-692C4F5FD3CA.jpeg
    81A52B2E-282B-4548-A879-692C4F5FD3CA.jpeg
    759.6 KB · Views: 186

Parallel 3094 Design

Greets & thanks to the community, been through a lot of threads that have proven quite helpful.

Hoping I could get input on whether this board layout is functional/optimal, first timer here.

Power comes in via a DC-DC converter on J4 that's mounted to a seperate board.

My biggest concerns are whether the set pin layout is ok, the datasheet suggests a guard ring & I'm not fully sure I've accomplished that here. That and there aren't any great examples of a parallel 3094 layout, so just horked ideas from the 4x 3045 design on AD's website.


I might have to break the whole thing out into a seperate sub-assembly so that I can follow the exact layout of the eval boards? This area is all the space that's available on the mainboard. Are there any designs floating around the forum that would be good examples of a parallel 3094 layout?

Cheers & much appreciate all help and suggestions

Attachments

  • 3094 panel.png
    3094 panel.png
    32 KB · Views: 127

Passive component matching?

Just curious if folks actually go through the hassle of measuring and pairing resistors, capacitors, and transistors used in signal paths in order to help keep everything internally balanced when assembling kits. Since many of the preconfigured kits such as Elekit tend to use 5% tolerance resistors, I was not very surprised to see large swings in resistance between the individual components. There are obviously some locations where a slight variance wouldn't be critical, like for the power supply. However, it seems that anything directly in the signal path could exhibit a balance issue if the passives had enough accumulated variance.

With OCD in full swing, when building my TU-8200, TU-8500, and most recently my TU-8550, I did take the time to value match as many pairs as possible. I don't know how much it really helped, but to my ears I don't notice any balance issues.

Anyway, just wondering if anyone else did this.

6HJ5 SET

I just wanted to share my successful build using the 6HJ5 wired as a triode. These tubes are cheap and rugged, and oh yeah they sound great. The driver is a 6N7 with both triodes in parallel.

I have a SS Slewmonster and Mullard 5-20 monoblocks so this amp is my "colored" sound amp. It has that warmth of a 300b amp. I highly recommend people to go ahead and not be afraid to use this tube for audio. I know George has used them in Pete's big red board but I wanted to share the success of it wired as a triode.

-bird

Attachments

  • 20160322_190105.jpg
    20160322_190105.jpg
    282.6 KB · Views: 2,309

On the directivity of dipole tweeters

There have been some attempts lately to make dipole tweeters work up to high frequencies with constant directivity. How high can we go, if the tweeter housing is already almost as small as its radiating area?

I would like to demonstrate the issues involved with an idealized 1 inch circular tweeter. I am using some Boxsim simulations to show things detached from specific driver peculiarities like FR and dome breakup modes.

Let’s start with the mathematical dipole model – first for a dipole distance of 2,5 cm to keep things within 20 kHz:

attachment.php


This is equivalent to this Linkwitz figure.

A 1’’ tweeter would have a physical diameter of at least 2,5 cm. This would lead to a dipole distance of 1,25 cm. As a 2-point source this would sim like this:

attachment.php


Of course a tweeter is no 2-point source. Let’s first move to a dipole point source on a 25x25 mm square baffle (Boxsim can’t do circular baffles).

attachment.php


We can see that the dipole peaks are slightly lower in frequency because a 25x25 mm baffle is more like a 28 mm disc than 25 mm. More important by far is the change in directivity that is introduced by the baffle. The dipole 8 gets sort of slimmer.

Since a real tweeter is not a point source on a baffle, we make the cone/dome/foil as wide as the baffle. Note that our model is working as a dipole membrane in a housing with no depth now. Any real world tweeter would have to be larger:

attachment.php


Note how the dipole 8 gets even slimmer than before and how the dipole peaks move to even lower frequencies. Strangely the 60 deg peak is at a lower frequency than the on-axis peak. Same for 30 deg. How come? The next diagram shows why by overlaying the last two diagrams:

attachment.php


The wider source starts to beam – lower in frequency at wider angles. From a certain frequency up the directivity of the tweeter is no longer controlled by the dipole function but by the tweeter diameter. The next diagram shows this relationship at the first dipole peak:

attachment.php


A monopole tweeter would have a main beam to the front of almost the same contour as the figure 8 of the dipole. This would be true for any driver whose radiating area is as large as its baffle – regardless of size. Any attempt to manipulate the radiation at the sides of the baffle is quite fruitless for frequencies above the first dipole peak – they don’t show up any longer at the sides.

The only cure is to move the first dipole peak up by making the tweeter smaller. Above the first dipole peak all compact drivers will move from the (constant) directivity of the dipole 8 to the frequency dependent directivity of a beaming driver.

That’s how I see it. 🙄

Attachments

  • dipol 25_1.gif
    dipol 25_1.gif
    7.8 KB · Views: 4,401
  • dipol 25_2.gif
    dipol 25_2.gif
    7 KB · Views: 4,399
  • dipol 25_3.gif
    dipol 25_3.gif
    7.1 KB · Views: 4,362
  • dipol 25_4.gif
    dipol 25_4.gif
    7.1 KB · Views: 4,323
  • dipol 25_5.gif
    dipol 25_5.gif
    8.7 KB · Views: 4,342
  • dipol 25_7.gif
    dipol 25_7.gif
    7.3 KB · Views: 4,306
  • Like
Reactions: Juhazi

Help with REW subwoofer placement vs Mic placement - different SPL reading

Hi All!

this is the first day im using REW.
From the youtube tutorial I've seen, people say it doesnt matter if you put you mic at you sub position, or at the MLP. But I'm getting 2 very different SPL reading.
Can someone explain this to me?

Purple line: subwoofer at its 'OEM' position and Umik-1 at the MLP. noise is set to 75db with the rew generator with pink noise before taking the reading.
Red line: Subwoofer on couch, mic at the subwoofer 'OEM' position. Didn't change anything else except the position of the 2.

Those line are averages from 3 reading for each position. I was doing the exercice because I want to DIY a subwoofer, and I wanted to know if the spot I want to position it will be a good spot. Started measure the "OEM' spot and the MLP to see if they were the same....

So, should I move the sub around and keep the mic at the MLP, or should I keep the subwoofer at the MLP and move the mic around or the reading?

Thanks!

Attachments

  • Capture d’écran, le 2022-12-09 à 14.44.15.png
    Capture d’écran, le 2022-12-09 à 14.44.15.png
    96.6 KB · Views: 131

DB Drive NEO M4

Amp has a few issues with it .

First off the power supply fets are burnt .

The amp has 47 ohm gate resistors for the power supply fets .

The fets are marked CS50N

Anyone know what fets I can replace these with ?

Attachments

  • 35621669-3159-464E-9139-6DA3BA7B26B1.jpeg
    35621669-3159-464E-9139-6DA3BA7B26B1.jpeg
    562.4 KB · Views: 74
  • BBDB729D-49ED-40B1-8908-46888FE74339.jpeg
    BBDB729D-49ED-40B1-8908-46888FE74339.jpeg
    487.1 KB · Views: 67
  • 1BC36978-816C-4571-A3D3-E46A258C35E0.jpeg
    1BC36978-816C-4571-A3D3-E46A258C35E0.jpeg
    486.3 KB · Views: 70
  • 93BD1633-F2C6-41B3-84B9-8949082E19EA.jpeg
    93BD1633-F2C6-41B3-84B9-8949082E19EA.jpeg
    722.2 KB · Views: 73
  • 1EA967A3-1623-41A5-B3C3-34A053483048.jpeg
    1EA967A3-1623-41A5-B3C3-34A053483048.jpeg
    736.6 KB · Views: 76
  • 146873A9-E7D1-4C99-BED0-0444ABC6A87F.jpeg
    146873A9-E7D1-4C99-BED0-0444ABC6A87F.jpeg
    613.9 KB · Views: 77
  • 620C2A06-AD4A-4404-A0DF-BA44190C4D0A.jpeg
    620C2A06-AD4A-4404-A0DF-BA44190C4D0A.jpeg
    645.8 KB · Views: 80

Maxon motors for TT use

Hi Folks,

Various people have asked about this so here is something I wrote for the maxon AU web site. It is by no means an exhaustive list, although the suggested model families are a good choice there are many variations within those families, primarily nominal voltage, which as explained below can prove critical in the selection process. Also $AUD one off prices are given in the pdf..they are for comparison only. Call maxon for an exact quote as the exchange rate varies. I do not claim to be the foremost expert on this topic, I respect others, such as Mark Kelly for one, have done much work on this.

Maxon Brushed motors for Hi-Fi turntables

Much has been written about this subject and I appreciate that others have gone into considerable detail. The purpose of this document is to put together suggested motor choices available from maxon in one place, and give an idea of the relative pricing. Note these are guide prices only as for example, the exchange rate fluctuates. Also note, we have ‘cherry picked’ some likely motors here, but this list is in no way exclusive. Other motors in these series and other series may be suitable. If you are not sure please call maxon.

Before we start we should outline the basic requirements

1) Sufficient power, ie speed x torque
2) Low noise, electrical and mechanical
3) Minimal torque ripple
4) Reasonable cost

For most people, particularly novices, a brushed motor is a good choice. The control electronics are comparatively simple and as they can be linear, low noise and the cost is lower. The wiring is also simpler, just two wires to the motor. The drive system is inherently smooth and quiet as long as we are aware of some basic points.

Motor Selection

For a retrofit situation we often have little control over the mechanics, the motor speed is much as determined by the original design. In the case of TT’s employing synchronous type motors this may be quite low, much less than 1000 rpm.

This requirement is usually at odds with the brushed motors available, which tend to be high revving when run at their design voltage, typically 4000 to 6000rpm.

Fortunately the solution is at hand. By using a large diameter motor (which provides good torque, and more power than is ever likely to be required) we can under run it from a lower voltage than its nominal design voltage. This will reduce the speed whilst torque remains purely proportional to the supply current. From a datasheet perspective this means selecting motors with a low rpm/volt speed constant, line 13 in the maxon data sheet tables.

Taking the A-max 26 110191 as an example, a nominal 48V motor, this has a speed constant of 127 rpm/V. So we can see that in a typical turntable application (~600rpm) the supply voltage will be only approximately 4-5V. This is perfectly fine as long as the motor has sufficient torque. From the datasheet the motor makes 15mNm torque at max current.

As the turntable belt drive multiplies the torque by 20X approximately this is quite substantial. We could go into more details as regards start up times if we know the moments of inertia, frictions etc etc, but unless we are designing for broadcasting applications this is probably not required here. In most real world situations belt slip will limit the torque in any case.

So we need to look at some large diameter brushed motors, large in this context is ~>25mm diameter, with low volt/rpm..

What else is important? We want the lowest noise, mechanical and electrical. This means minimal brush noise and low torque ripple. So the choice is now towards precious metal brushes (PMBs), for minimal drag, noise and best efficiency, a long life capacitor (CLL) module to prevent brush sparking and as many poles as possible for smooth torque delivery.

Some suggestions, in order of cost, lowest first.

A-max 26 series

A-max 26 7W 13 pole 110191 an old favourite and still a good choice

RE-max 29 series

RE-max 29 9W 13 pole 226779 (bit more power has extended shaft)
RE-max 29 15W 13 pole 226761 (more power for heavier platters, faster start etc)

The RE-max 29 and A-max 26 support both DC tacho (as a special) and encoder options.

RE 25 series

RE 25 10W 11 pole 118748 (with extended shaft, more power smaller size, tacho option)
Can have DC Tacho 118909 factory fitted for closed loop control

The RE 25 comes with the option of a factory fitted DC Tacho 118909, and so if required a true ‘closed loop’ control can be closed around the motor and the speed controller. It is also the most powerful motor for its diameter, which may help in some conversions, although it is also the longest. See table for approximate dimensions.

Speed control.

The LSC 30/2 4Q linear controller 250521 could be used for TTs. It supports I x R mode. This technique provides motor speed control by a form of feed forward. A brushed motor can be modelled as a source of voltage (the back EMF) in series with a resistance (the winding and brush resistance) . The voltage is proportion to the motor speed and opposes the supply voltage. The current is proportional to the motor torque. As motor torque and current increases, and the motor slows, the current increase is measured and used to estimate an increase in motor supply voltage in an attempt to stabilise the speed.

As there is no true feedback control, the accuracy of this arrangement is limited. The advantage is that no feedback device is required, so simple, low cost, and there is no NFB loop to stabilise.

The more accurate option is to use a motor with the Tacho option. Coupled with the LSC30/2 or other DC servo amplifier this would give absolute control of the motor speed. However be warned the combination of a high mass turntable, compliant drive belt system and low motor inertia will make the loop more difficult or impossible to compensate.

Further hints and tips

Check the drawing of the motors carefully in the datasheet to get the exact dimensions; those above are a guide only.

Be careful not to damage the motor when fitting the drive pulley. In particular the shaft of the motor must not be subject to excessive axial loads which might damage the bearings. If press fitting chose a motor with an extended ‘through’ shaft, then the press can be applied carefully directly to the shaft.

Never press on the motor body to press fit a pulley.

Details of all motors are on our web site:
www.maxonmotor.com.au

Attachments

Woofers- Tweeters and XO Parts BEST OFFER TAKES ALL

LOCATED 44405--- BEST OFFER TAKES IT ALL- Everything works....Over $2200 in drivers and $500 in XO parts... XO parts some have booger soldier as i dont have a removal tool. A couple woofers kids poked dust cap- yeah I know it makes no difference- but I wanted to be up front. Theres also 3 more XO "sets" has 3 more 2.o air coils 20uf caps 3ohm 7.5ohm resistors 1.8uf 4.7uf caps and 0.9/1.0 air coils. they are in cabs- hot glued in. I can include the cabs which are 3.

Must be picked up unless you have the means to send boxs/packing with return label im not paying sipping out of my pocket if that happens Venmo or something else. I don't use Paypal


Attachments

  • 20220407_183036 (1).jpg
    20220407_183036 (1).jpg
    296.5 KB · Views: 84

Alpine PDX M6 no output

Hello, i received a alpine pdx m6 sub amp.. Repaired the filter caps, because broken. Nothing more. Amp powers up, 1,08Amps idle.
Oscilation at output perfekt. Traced input signal from input preamp board to mainboard, also perfect... Must be something between drive ic and mainboard. Expect a broken resistor.
Cant find something. Anyone has a diagram, or had this failure before?

Troubleshooting 50 dB left right channel Crosstalk on Creek Audio Destiny Integrated Amplifier

Hi All,

The published specs are 60db so it doesn’t surprise me I’m still in the ballpark.

The analog source is a 1kHz sine wave from a DAC with one RCA plugged into the Aux input opposite of the channel being tested for crosstalk.

I used my DMM to measure AC voltage at the the amp speaker terminals, without speakers.
Measurements are as follows: 170mV vs 0.5mV. Crosstalk is 20*Log(V1/V2) = 50db. It’s a few db worse crosstalk from left to right. I’ve been able to double check my measurements using the amp headphone output connected to the input jack on my Mac, recording that input on Audacity and then running a FFT analysis. The 50 db crosstalk is consistent and gets worse as frequency increases, as expected.

Is the most likely cause capacitive coupling via the L/R channel wires (marked in red) that go from the Input board to the volume control and back? These wires, 3 per channel, converge to a 6 wire conductor with shielding, and a drain wire that is connected to ground. The cable length is about 2 feet. The signal then goes through the mute relay to a pair of wires (marked in yellow) that connect to the left and right Amp sections. I think the sequence is Input to Volume to Pre Out to Mute relay to Amp In. Running in Passive preamp mode. I’ve attached photos with and without the markings. See pages 2,8, and 9 of the attached schematics for reference.

I’m wondering if there is a way to improve the crosstalk? One idea is using a Cat7 ethernet cable which has shielded pairs, outer shielding and a drain wire. Or just running separate wires which would take more space. Or is there a lot more that is causing the crossover? And is troubleshooting 50db really worth the trouble? I should add one motivator to replace those wires is a bigger voltage spike (barely audible) in the right channel when changing inputs. Any help is appreciated. If anything, learning more about crosstalk sources would be great.

Attachments

  • 4A788F9A-78B0-4164-A670-91AD2922D34D.jpeg
    4A788F9A-78B0-4164-A670-91AD2922D34D.jpeg
    300.7 KB · Views: 330
  • hfe_creek_destiny_int_schematics_en.pdf
    hfe_creek_destiny_int_schematics_en.pdf
    3.1 MB · Views: 155
  • 786E382E-BC2D-4DB2-B8B0-5D90DB71CF5D.jpeg
    786E382E-BC2D-4DB2-B8B0-5D90DB71CF5D.jpeg
    111.2 KB · Views: 184
  • 2F2EB12A-B9C8-4D89-BE11-3CBBFC9D2668.jpeg
    2F2EB12A-B9C8-4D89-BE11-3CBBFC9D2668.jpeg
    300.8 KB · Views: 236

Fixing 2 QSC RMX1450's

Hi all, I am teaching myself soldering and how to fix my own amplifiers. I bought a pair of these QSC RMX 1450 VERY used off of facebook marketplace knowing the right channel in both did not work. (suspecting something someone did with bridging at some point in time). I knew these were rough, but they seemed like a good project to start learning on for the price.

When I bought the amps, the fuse for the right channel would blow instantly when powered on (12A) I tested the bridge rectifiers and they were failing so i replaced all 4 (2x on each amp) with the closest I could find to the original rectifier GBPC2502W-ND https://www.digikey.com/en/products...2?s=N4IgTCBcDaIOICEAKBhMBWADGA6gWgDkAREAXQF8g

After I replaced those, the fuse would still blow. then I tested the Bipolar Transistors (8 per amp channel, 16 total per amp) a few of them were failing the test on the bad channels, so I order 16 of them (I did not replace the other 16 on the good channels). 757-2SC5200-O(Q) https://www.mouser.com/ProductDetail/Toshiba/2SC5200-OQ?qs=EEns8I54Y6BCHV7Kwts0vw==&countryCode=US&currencyCode=USD

Success! I can turn the amp on and it no longer blows the fuse! however, after hooking a speaker up to the right channel I got a really loud humming noise coming out of it and then a cap started sizzling and the top popped off before I got the amp unplugged. I let the amp set for a couple days then just unsoldered the 4 caps off of the bad channel and am a little defeated, but again its a learning project and my first time doing something like this.

The question(s) Are:
1. what produces that humming sound I heard?
2. should I go ahead and replace ALL of the caps? (total of 16 caps between both channels on each amp)
3. if so is there anything else I should replace aswell?
4. should the 2 good channels have there 8 Bipolar Transistors replaced too?
5. what caps should I go with and why? I know theres got to be better ones out there since these were made.

Cap Specs: 100V, 3300uf, Nichicon, 25mm x 50mm. the new ones cannot be more than 25mm wide, but could be taller if need be.

I saw this post and thought it was interesting that I could go bigger https://www.diyaudio.com/community/threads/bulging-capacitors-on-qsc-mx1500.367169/post-6513907

Thank you for helping a beginner!

Beginner TL hornresp question - is driver very close to vent ok?

Hi,
request help - I am learning hornresp to design a TL for Tectonic TEBM65C20F-8 driver. My question is although the power level looks flat, the driver position is very close to the vent, it that ok or am I doing something wrong? Please find attached few screenshots from hornresp. Thanks for your help.

Attachments

  • driver-parameters.JPG
    driver-parameters.JPG
    21.9 KB · Views: 49
  • filling.JPG
    filling.JPG
    88.9 KB · Views: 48
  • power.JPG
    power.JPG
    102 KB · Views: 52
  • Schematic.JPG
    Schematic.JPG
    83.8 KB · Views: 53

Linkwitz LM4780 PCB Proposal: Comments Wanted!

After building a set of LM3886 amps based on the Linkwitz circuit (which I really like!), I figured I would try an amp using the LM4780 based on the same circuit layout. Since I haven't used this chip before, I figured I would ask:

1) If anyone has used the Linkwitz circuit ( http://www.linkwitzlab.com/images/graphics/3886amp.gif ) using the LM4780 as two LM3886's. I know other amps (Brian and Peter's come to the front of my mind) use this chip in a similar manner, but I was specifically interested to see if anyone has used the Linkwitz topology. It should be fine, but there is no since in re-inventing the wheel if there is someone who has already found out any issues. (Searching the forum didn’t show much, but I figured someone has to have done this!!!)

And 2) Attached is a proposed PCB that fell together rather nicely, but I figured I would run it past more experienced designers first. Particularly, I am concerned about the V+ section coming from the input pin header to C+ and the input signal traces running along the top right edge of the board. If anyone has any comments either way as to whether my concerns are justified, or if I am in good shape, I would appreciate the feedback. Any suggestions or comments about the rest of the board are welcomed as well!

Thanks!
David


As a side note, I started off trying to make this a single sided PCB. That idea got trashed rather quickly, but I was wondering if anyone has used a single sided LM4780 PCB?

Attachments

  • lm4780c.jpg
    lm4780c.jpg
    37.7 KB · Views: 1,182

Hi from MO

Hi,

I joined this forum because I am trying to restore an old Pioneer car CD player, and am unable to source lasers for a unit that old. I have been working on it off and on for a couple years, and have all portions working except the CD portion of the unit. I would like to find a way to insert audio from a bluetooth device and try to have the CD portion work close to original capacity (I don't expect full functionality). I found a post on here where some users talk about using a similar chipset to what I have and am looking for information on how to accomplish this restoration. I have collected as much manuals and datasheets on the cd player, mechanisms, and chips as I believe is available at this time.

Here is the forum post I found: https://www.diyaudio.com/community/threads/cxd1125q-and-cxd1135q-spdif-output-mod.317359/
It doesn't mention doing what I am wanting to do, just that some other people have a better idea of how these old cd players work.

Is there a section on here that would be appropriate to start a build thread on this project? Are there also some other posts I should read before starting such a project?

Hope to learn from your expertise!

WTB Looking for single Tannoy gold 10" with crossover

It doesn't have to be pretty since the orphan I have is not pretty either, but it has to work. I'm in US but have family in EU so if you are not keen on sending abroad that's alright. I know Brits are already convinced that stuff is being delivered by teleportation and any other method is going to destroy their valuable possessions and it's best that perspective buyer will show up with cash and flowers and chocolate for thier spouses but that's not happening ,sorry🙂

A question about analog-semiconductive tech development in the recent Decade.

Greetings everyone! I really want to learn some knowledges about the analog semiconductor. Unlike the CPU\GPU\SoC sector, nearly everyone talked about "X nm", transistor count and etc. Very few audio-circuit amateurs will say something about the key technologies that makes our chip OPAMPs or even new BJT transistors better.
So, I·m curious about what have changed the analog semis in the past ten years?
From OPAMPs to the low noise LDOs and even the discrete transistors, too many high performance new models has came out within the decade, and what are the tech trend behand them?

I only know something that was stated on the official website, say TI has a ”high voltage CMOS“ tech that makes my old daddy stuned😎 .
  • Like
Reactions: dliscomb

New Year Party BoomBox Ideas 2.1 tall all in one

Hello Friends

I want to surprise my Famali with a DIY boombox that we will use for the 31st dec new year party
Its going to be used outdoor in the garden and have a powerpoint so dont need to have it battery powered

The items that I have with me is chinese make 2.1 TPA 3251 100 watts x 2 8ohms bluetooth and 200 watts Subwoofer amplifier the specs say it has 2 chips TPA 3251 so decent power can be achived 49v AC adapter. I tried this amp on my 3 way speaker and its super was surprised at the cost and performance


In Drivers I have the following below
Peerless TC9FD12- 8 3.5" FR 8 drivers total
variety of Subwoofer drivers with me
Peerless Tymphany 830946 6-1/2" Paper Cone Woofer Speaker 4 Ohm. 4 nos
Peerless Tymphany 830667 8" Paper Cone SLS Subwoofer 4 nos
Tang Band W8-740P 8" Subwoofer 2 nos
Beyma 12BR70 2 nos
I am confused what config to make since I dont know how to simulate WinISD sealed or ported , downfiring or Horn etc

It need to be all in one box can be tall but not flat horizontal like soundbar Bass area can be broad below part I guess and top part having FullRange
Music is electronic EDM and POp rock we will be playing. Around 40-50 people will be present and we will dance in open garden. Not enclosed area.

I also have Hypex nCore streo amp 500 watts per channel if you feel we should not use chinese TPA amp but then it will be stereo and not 2.1 I think even f we get f3-50hz should be good? I will keep one ipad for music and headphone to 2 rca it will go to amp.

I have been using Bose S1 pro and marshall Woburn blutooth speakers and its not great. Getting to hire DJ on new year is pain since our farmhouse place is far away from town once a DJ confirmed and last moment dint turn up thank god i had bluetooth speaker at least we hadsomething to play music

I am confused what to do please help people

regards
anand shah
tigeranand at gmail dot com incase someone was to connect via email
whats app +919867199941


TPA3116D2 400W Best 5.1 Class D Amplifier Board

Hi Music Lovers, Today In This Article We Are Going To This Tpa3116d2 Class D Ic Based Six Channel 5.1 Class D Amplifier Board…From Roger Audios. In This Article, We Are Going To Read About This Board’s Input And Output Connection Details And Technical Specifications.

Class d amplifier board

Where Do We Use This 6-Channel Amplifier Board? We Are Using 6 Channel Amplifier 5.1 Amplifier Board Maximum Used For Our Assembled Home Theatre Systems And Amplifiers.
If We Assemble A Home Theatre Or Amplifier For A House We Mostly Use Class Ab Amplifier Boards.

To Compare The Class Ab Amplifier Board This Class D Amplifier Board Will Give You Very Good Audio Results And Clarity. In Today’s Market, Many Branded Home Theatres And Sound Bars Mostly Use Class D Amplifier Boards For Better Audio Results. So That’s Why Today I Am Reviewing This Class D Amplifier Board.

class d amplifier board
Top View Of The Board
class d amplifier board
Bottom View Of The Board
This Board Is Made With Original Four Tpa3116d2 Ic And High-Quality Pcb And Components. If You Want To Know More About This IC You Can Click Here To Read This Tpa3116d2 Datasheet. This Board Is Manufactured In Tamilnadu India. That Also Provides Service Support In The Future. And Also They Are Going To Make Class D 2.1 Boards, Stereo Boards, And High Wattage Amplifier Boards In The Coming Days As Well. I Will Write More Articles If They Release New Boards.

[IMG alt="class d amplifier board
"]https://i0.wp.com/easyamplifier.com/wp-content/uploads/2022/12/image3-1024x512.jpg?resize=768,384&ssl=1[/IMG]
This Board Comes With Tpa3116d2 Four Ic ( I Have Already Mentioned That) And This Board Works With Single Supply DC (From 12v To A Maximum Of 24v. Recommended Supply Voltage Range Is 24v DC) This Board Comes With Two Stereo ICs And Two BTL Mono ICs. Two Stereo Ic For Front Left Right And Surround Left, Right. Two Mono Ic For Centre And Subwoofer Channel Output.

The Stereo Ic Can Give You A Maximum Of 50w Power Output Per Channel With A 4-Ohm Speaker. And You Can Get 35 To 40 Watts Of Power Output Per Channel When You Are Using An 8 Ohms Speaker. And The Center And Subwoofer Section You Can Get A Maximum Of 100 Watts Of Audio Power Output Per Channel Only If You Are Using A 2 Ohms Speaker. Otherwise, You Will Get Only 70 To 75 Watts Of Power Output If You Use A 4 Or 8-Ohms Speaker.


When Compared To Class Ab Amplifiers This Class D Amplifier Board Comes With Many Protection Features Like Amplifier Will Be Shut Down When Its Input Current Overload. And When The Speaker Terminal Is Shorted Or The Speaker Burn This Class D Amplifier Board Will Go To The Protection Mode. This Amplifier Will Go To Protection Mode When You Give Overload Input Gain.

Input And Output Connection Details Of This TPA2116D2 Class D Amplifier Board​

image1.jpg

All Input And Output Connection Details Are Clearly Mentioned In The PCB… If You Have Any Doubts About Regarding Connections You Can Ask Me In The Comment Section. This Board Will Run With A Single Supply DC. For Best Results, You Should Give SMPS Power Supply Range From 15v To 20v With 15 To 20 Ampere. Because This Board Ic Watts Total Of 400 Watts…

If You Want To Get Maximum Capacity Front This IC You Should Use A 20v 20 Ampere Power Supply With Proper 4 Ohms Speaker For The Front And Surround Channel And 2 Ohms Speaker For Subwoofer And Center Channel. So That’s All Friends. If You Have Any Questions Regarding This Board You Can Ask Me In The Comment Section Below… Bye Friends

Technics SU-V9

I bought second hand this amp and I would like to make a new glass door for it. Preowner made some plastic one which is very bad made and look terrible out.
Can anyone share originall dimensions and thicknes and where exactly the holes should be. It was originaly tempered glass used or just regular one with trimmed edges? I think it was not even completely clear but a little darker.

Thanks!

WTB Fountek FR59EXE

I’ve been looking on flea bay periodically and have a similar thread on diyma. These drivers have always been on the back burner to order but I never did and now they’re extinct, snooze you loose. I just want them in my collection of raw drivers to play with and maybe use in a build eventually. A simple search of 420Tabbycat on diyma will show that I’m a long term and active member if someone has a pair and wants to see if I’m ok to deal with. I’m not willing to break the bread on the Audible Physics ram2’s.

Impressed with the Peerless TC9FD18-08

I had my reservations with this TC9FD18-08 driver or other FR drivers, for that matter.

I tried that Nola clone, haphazard as it is, based on what seems to be several interpretations of the design.

Well heck, these little drivers in that situation sound quite nice indeed. Electric violin? Holy crap, man. Talk about riveting and real sounding. I have had them on for 4 days now and I have to force myself away from them and make myself go to bed. I'm no audiophile, but I have a rather nice collection of all different types of speakers.

Anyway, I am intrigued now. I want to try other designs.

I have a pair of Dayton PA130-8 that I don't remember buying, or why, and a pair of Mark Audio 10.3.

I did start a thread asking about the MA drivers and got some info there and reckon I need to purchase some plans for those (info needed as to how to go about that).

But what about these Dayton PA speakers? I have seen the thread about the .53x Karlson but those threads go for a lot of pages and I was not exactly sure which drawing went to what without starting over in that thread.

What I have for amplification is, a Denon 3805 with a separate DSP amp for my 12" subwoofer. Some amp boards (TDA8932) that I got for something else, a monoprice 50w hybrid and some old integrated amps (HK and pioneer) and another 2 channel board with a fan on it made by Sure, IIRC.

What could I expect from the PA130's compared to the Peerless TC9FD18-08? Would any of these amp boards work with these FR builds? If so, what to use specifically for a power supply? I read about laptop power supplies but they come in a variety of power ratings.

The Karlson types look interesting. Would 17-18 mm plywood work for that?

Any help would be appreciated.

volume control problem

I've got a Trends TA-10.2 integrated amplifier. The volume potentiometer wore out and I tried to replace it. In the process of desoldering it I damaged that part of the circuitboard so that it's not possible for a new volume potentiometer to work properly. The amplifier comes with a jumper system so that the volume control can be bypassed, which I tested and it works fine as a power amp (always at maximum volume level). I have two questions: 1. Is it better to install a gain control at the input, or a volume control at the output? 2. How would you go about installing it?

Zen Quad 22

Hi folks!

To complement my pair of Quad IIs (currently being restored), I decided to build a stripped down version of a Quad 22 pre-amp - what better design to partner the IIs? I know some mock the 22s sound, but I've always respected Peter Walker's designs, and - for nostalgia reasons more than anything else - I wish to build one for my Quad IIs.

This is a totally ground up design - I don't own a Quad 22 and won't shell out for one on Ebay as the prices are insane.

As mentioned, this will be a 'Zen' Quad 22 - I don't need the complicated switch-bank, or any of the balance/filter/tone controls. As most all of my sources provide 2V output I believe I am correct in thinking I can dispense with the EF86 stage of the circuit as well and have the sources go directly to the 500K volume control? (Got a nice stepped attenuator from China for this). The EF86 stage is present in the attached diagram, but I shall probably remove it for the next revision. Actually if you follow the original circuit diagram you can see that the Radio 2 bypasses the EF86 stage also and runs direct into the 500K pot.

As my Quad IIs use their original circuit values (apart from the dual section cap uprated to 2 x 32uF) I want to do the same with the 22 - no 'improvements', just stock values.

The problem I have at present - not being an expert in these matters - is how to imlement the required feedback to this circuit so it meets the Quad 22s original design? I know its feedback was part of the balance control section, but I have dispensed with this. Could some kind soul possibly draw onto the attached diagram the correct way to implement the required feedback?

The original diagram maybe found here: http://www.dc-daylight.ltd.uk/Valve-Audio-Interest/Schematics/QUAD-22-Schematic.pdf

Thanks so much!

- John

Attachments

  • quad 22r.jpg
    quad 22r.jpg
    82.8 KB · Views: 353

Replica Pre QUAD 22 - Questions on mids

Hi,

I just replicated a simplified circuit of preamp 22 of Quad, added a PSU and used on the audio signal path caps of 4.4uf (instead of only 2.2 uf) and of 0.47 uf. The pre seems to lack of mids. Modifiying the value of 0.47 uf to a lesser value would increase mid presentation? the 2.2uf cap, has any effect on mids? are there any other mods or changes to improve mid´s definition?
Thank you for your time and consideration. Sebastian

For Sale Vintage Telefunken 12AX7/ECC83 Tube

(1) Used & tested Telefunken 12AX7/ECC83 tube, made in West Germany. Both sections test strong on my TV-7 D/U tester; section 1: 60, section 2: 62 (min: 32). It also checks good for shorts and gas. The tube number is worn but readable. An embossed Telefunken diamond is on the bottom.

$35 via PayPal. First Class continental USA shipping is included.

Attachments

  • Tele_12AX7A.jpg
    Tele_12AX7A.jpg
    185.6 KB · Views: 90

PCB Source

Hello, I am located in the US.

I found this old magazine from 1979 that has series of articles with regards how to build a modular integrated amplifier. I would like to build the unit. The problem is that all the PCB's are picture-based (see example below).

The question is: Is there anyone who could take the pictures and fabricate the PCB's given that I provide all size measurements, of course?

Thanks in advance.

Best

Capture.JPG

Which caps to bypass power supply caps

Apologies if this is posted in the wrong thread. I have a couple Decware Torii amps. One mod offered by Decware is bypassing the power supply caps. There’s either four or six 33uf 450v caps. My question is what value bypass caps? Will 1.0uf 250v caps work? These are what I have on hand. I figured I’d see if these will work before having to buy others.
Projects by fanatics, for fanatics
Get answers and advice for everyone wanting to learn the art of audio.
Join the Community
507,635
Members
7,881,569
Messages

Filter

Forum Statistics

Threads
405,925
Messages
7,881,569
Members
507,635
Latest member
tom.mccann